
Bargello Color Runs
Posted in Quilting
Two weeks ago, I showed you my color choices and pattern for the bargello quilt I’m making as part of a bi-weekly class. Our homework before this week’s class was to create our color map and have all of our fabric cut into strips and sewn into color runs for the quilt.

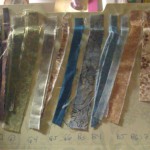
Bargello quilts are made by strip piecing, which means sewing together long strips of fabric, and then cutting the result to create the pieces used in piecing together the quilt. The foundation of the bargello technique is using strip piecing to create color runs: rectangles of fabric made from equal-width strips of your fabric. The color runs are then cut perpendicular to the sewn seams in different widths to create the curves of the quilt.
The pattern I chose has rather tall rows—3″. That means, all of my strips were cut to 3.5″ (for a 1/4″ seam allowance on both sides). Cutting was simple with a rotary cutter, mat and 6×24″ ruler. Then it was time to actually start sewing!

One place Wright and Edie differ is how to sew together your color runs. The most difficult part of this step is to create the color run without having the strips begin to dip in the center—called bowing. To counteract this tendency, both Wright and Edie recommend altering each seam direction as you create your color run. So, you sew the first seam in one direction and the next one the opposite, and keep switching back and forth.
Wright suggests sewing all of your strips in pairs with the same seam direction: 1 to 2, 3 to 4, 5 to 6, etc. Then, you sew your pairs to each other with seams going the opposite way, continuing to sew the groups together until the color run is finished.
Edie takes the sequential approach and has you sew each piece to the next in order, switching seam directions as you go. Wright’s recommended method is a bit faster I think, since you can chain piece all the pairs, and is the one I chose to use.

Another place Wright and Edie differ is how to place the ends of the strips. Wright proposes to line them up evenly on one end, creating only one jagged end (due to differences between manufacturer’s fabric widths). Edie counsels arranging the ends based off the shortest strip, creating two jagged edges that supposedly allows you to have more useable strips. I figure, the shortest is the shortest, regardless of how ends are set up and used Wright’s way instead. Only one jagged end also makes Wright’s method a little less confusing: when you sew the pairs, you sew from the side where the edges meet. When you sew all the other seams, you sew from the uneven side; this is an easy way to tell which direction you should be sewing your seam.

Using Wright’s method, I didn’t experience notable bowing. In addition to the speed advantage that I spoke of, I also think that her method keeps you from making exponential errors. If you sew each piece to the next one, any previous bowing will continue to get worse as the issue is compounded down the line. When you sew the groups together, you don’t experience as much of an issue because you are working in smaller chunks that don’t inherit the mistakes of each previous piece.
Unfortunately, I missed Monday’s class (and a day of work) with some sort of bug. I did find out today that the homework is to start cutting the actual strips from the color runs and piecing them together, so I’ll be talking about that in my next post. Also, please forgive me for the poor quality images. My phone’s camera had to do, as the real camera was unavailable.
Do you have a preference for either of these methods? Tell us about your experiences in the comments.
This is part two in a multi-part series. Keep following along by subscribing to the RSS feed, or view the related posts.
Comments are closed.