
Squaring and Bordering the Bargello
Posted in Quilting
Now that the main section of the quilt is complete, it’s time to square it and add borders.

Squaring
My quilt top was badly out of square. It’s kind of demoralizing it’s so badly out of square. Make sure you’re paying attention to how rows are lining up across the quilt, not just within row groups. Had I done that, I think it would have helped a lot. Instead, I was steam ironing the heck out of one section of the quilt trying to square it up a little by stretching it to match other sections. I don’t know if that’s the most advisable way to do it, but it worked relatively well. At least, it made the edges mostly square, but you can see where the row seams do not line up across the quilt.
The top and bottom rows are also not straight, because I had to cut an uneven amount to square up the sides. But, it happens sometimes, and you just have to roll with it.

The sides were mostly square, but the top and bottom weren’t. To square them up to add the borders, I taped the quilt to the floor, and measured center, then measured the top and bottom and lined up the borders so they were square, meaning that there were different amounts of seam allowance on the quilt top. After sewing the borders on (using the 1/4″ border allowance to guide me), I cut off the excess.


Borders
My teacher made one of the quilts from Twist and Turn Bargello Quilts by Eileen Wright. The prescribed border includes a 1/4″ strip much like the one Edie used on the pattern that I’m using.
The catch is, Wright has you cut a 1″ strip, fold it in half, and simply sew one end into the seam, leaving the other loose (similar to a prairie point border). After sewing eight 1/4″ rows in my quilt, I decided that this was the best thing since sliced bread, and used this method rather than piecing together the strips normally.
Wright also has you cut your borders on bias, which my teacher said made a huge difference in attaching them (much easier) and also hid any joins better than normal seams. Unfortunately, I didn’t have enough fabric to do borders on the bias, but it is something to consider in the future, for sure. Also, because of my out-of-squareness, I am relying on my non-stretchy borders to help square it up. Bias borders would just bend out of square with the quilt top.
Instead of doing borders with half blue, half green like Edie used (well, blue/brown), I chose to use a blue inner border and green outer border, with brown binding. Edie’s pattern called for a 1/4″ inner border, 3/4″ outer border and 3/4″ binding, which I also modified. Mine are 1/4″ inner, 2 1/4″ outer (technically 2 1/2″, but 1/4″ is covered by the inner border), and 3/4″ binding. I added a wider outer border to infuse a little more color to the quilt. Once I finished the top, I felt that the browns and creams were overwhelming the blues and greens.
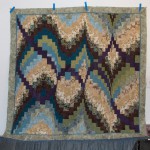
Here’s the completed top, including borders. The hanging shot is probably the most color-correct.


What tips do you have for squaring up quilts? What about adding borders?
This is part five in a multi-part series. Keep following along by subscribing to the RSS feed, or view the related posts. You can also get a downloadable pdf of my pattern changes.
One Response to “Squaring and Bordering the Bargello”
Jacki Robinson
10:07 pm | 10/20/18
Thanks so much for this lesson on squaring and bordering the Bargello quilt. I love, love, love the hint to cut a narrow strip, fold it in half, and sew the raw edge into the seam. Easy-peasy.
That’s exactly what I did and I agree with you…”best thing since sliced bread.”