Raevenfea

Maker of various fabric things

This is a static export of a blog I put on ice many years ago, that still has personally relevant content. No promises can be made around linkrot, styles, or working functionality.

Posts tagged: Finished projects

Maxing out Miniatures

Posted in Quilting

  • Batting: wool
  • Fabric: Reproduction-style
  • Finished projects
  • Q016DB
  • The Miniatures Nine-patch

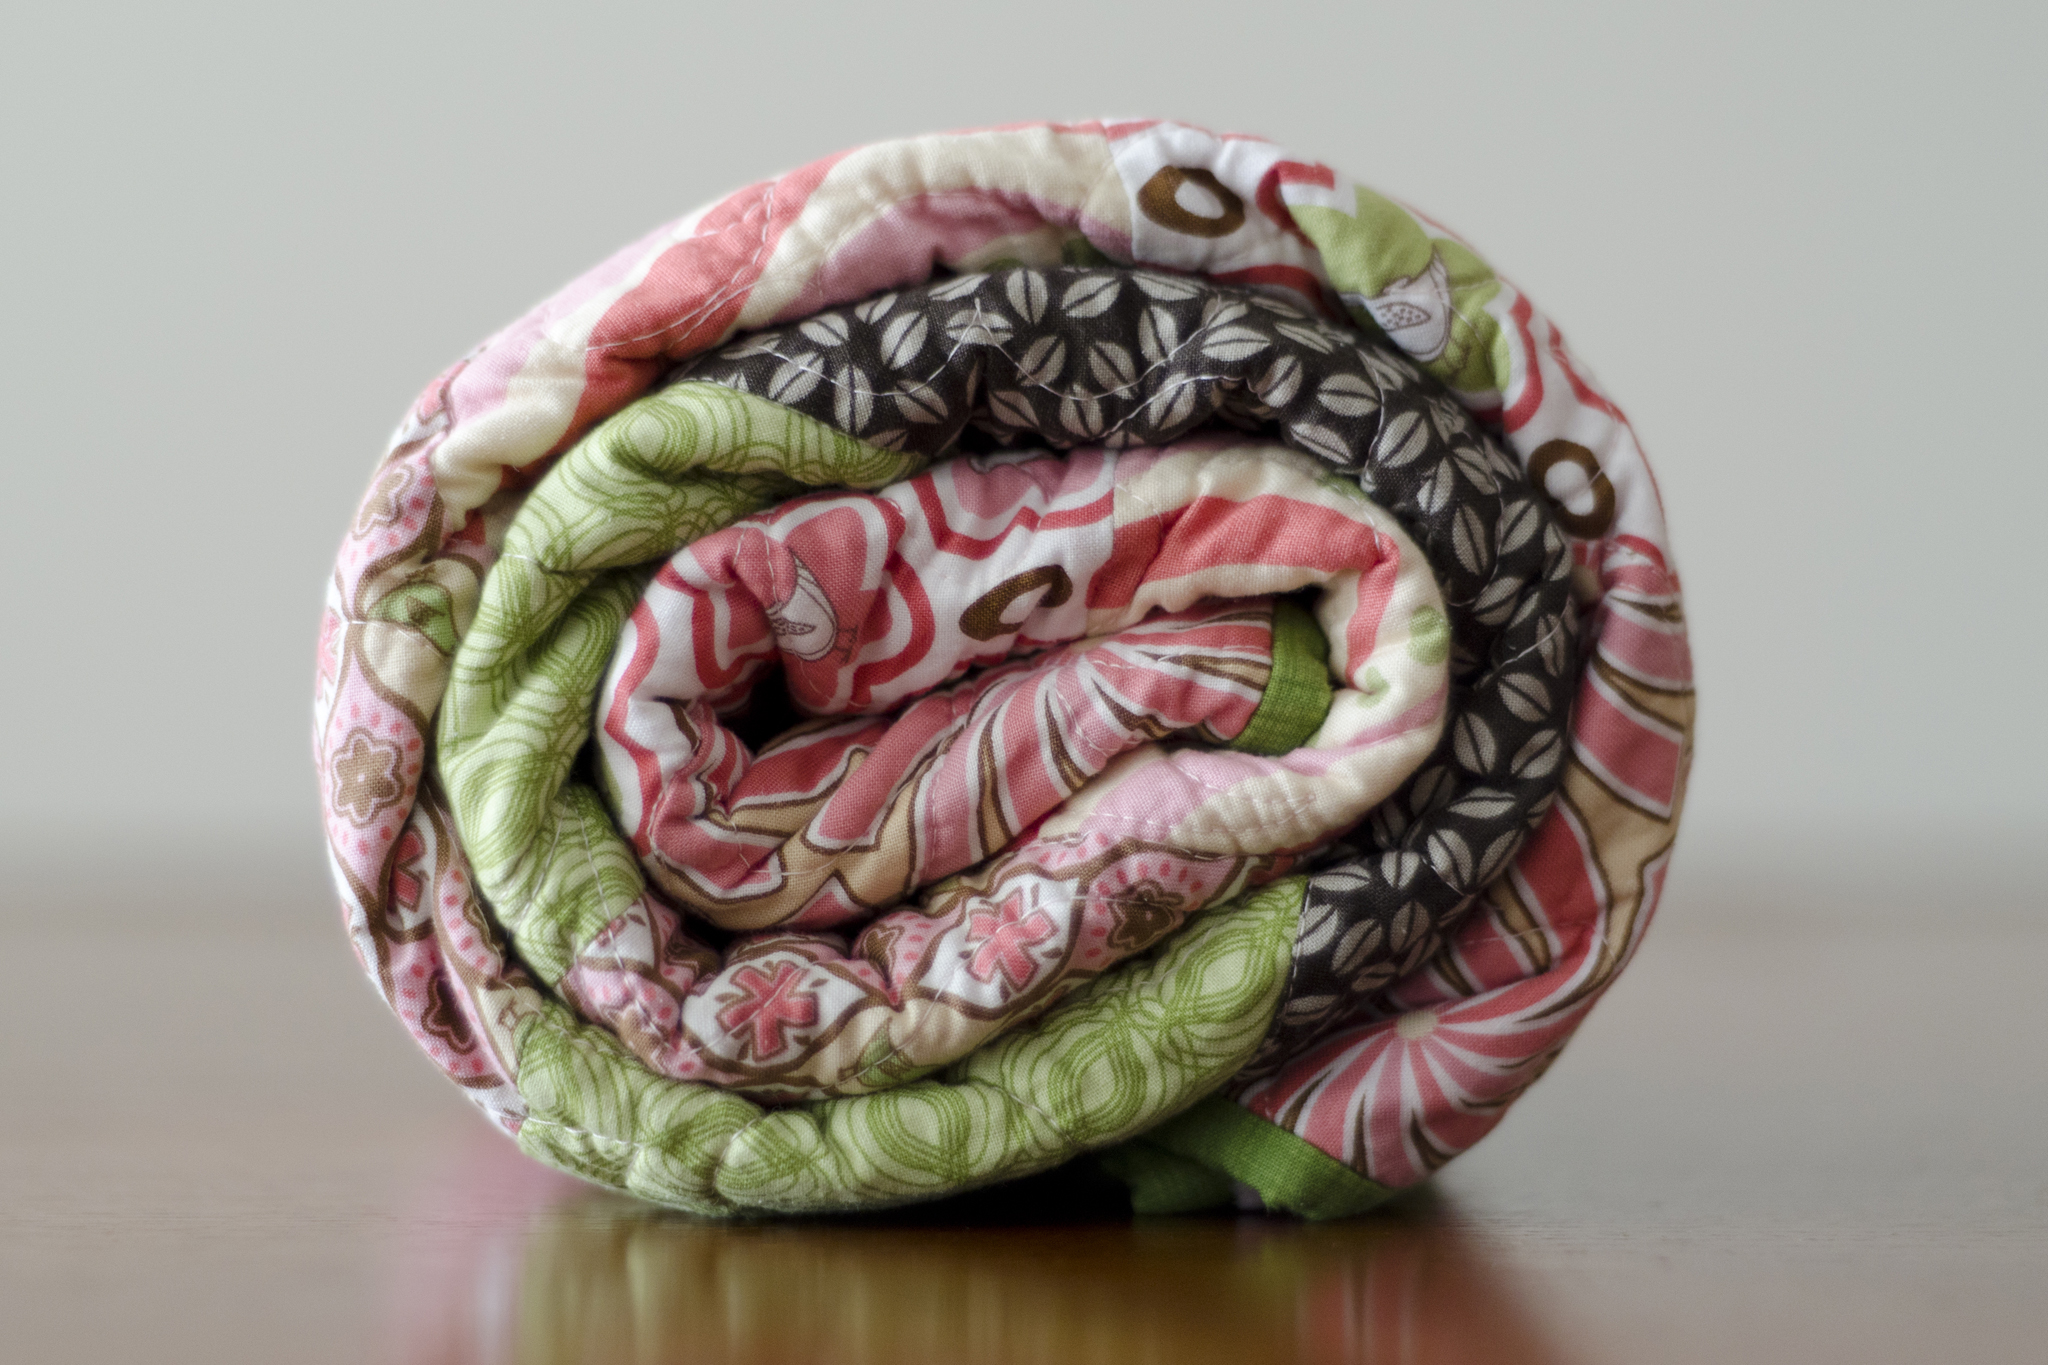
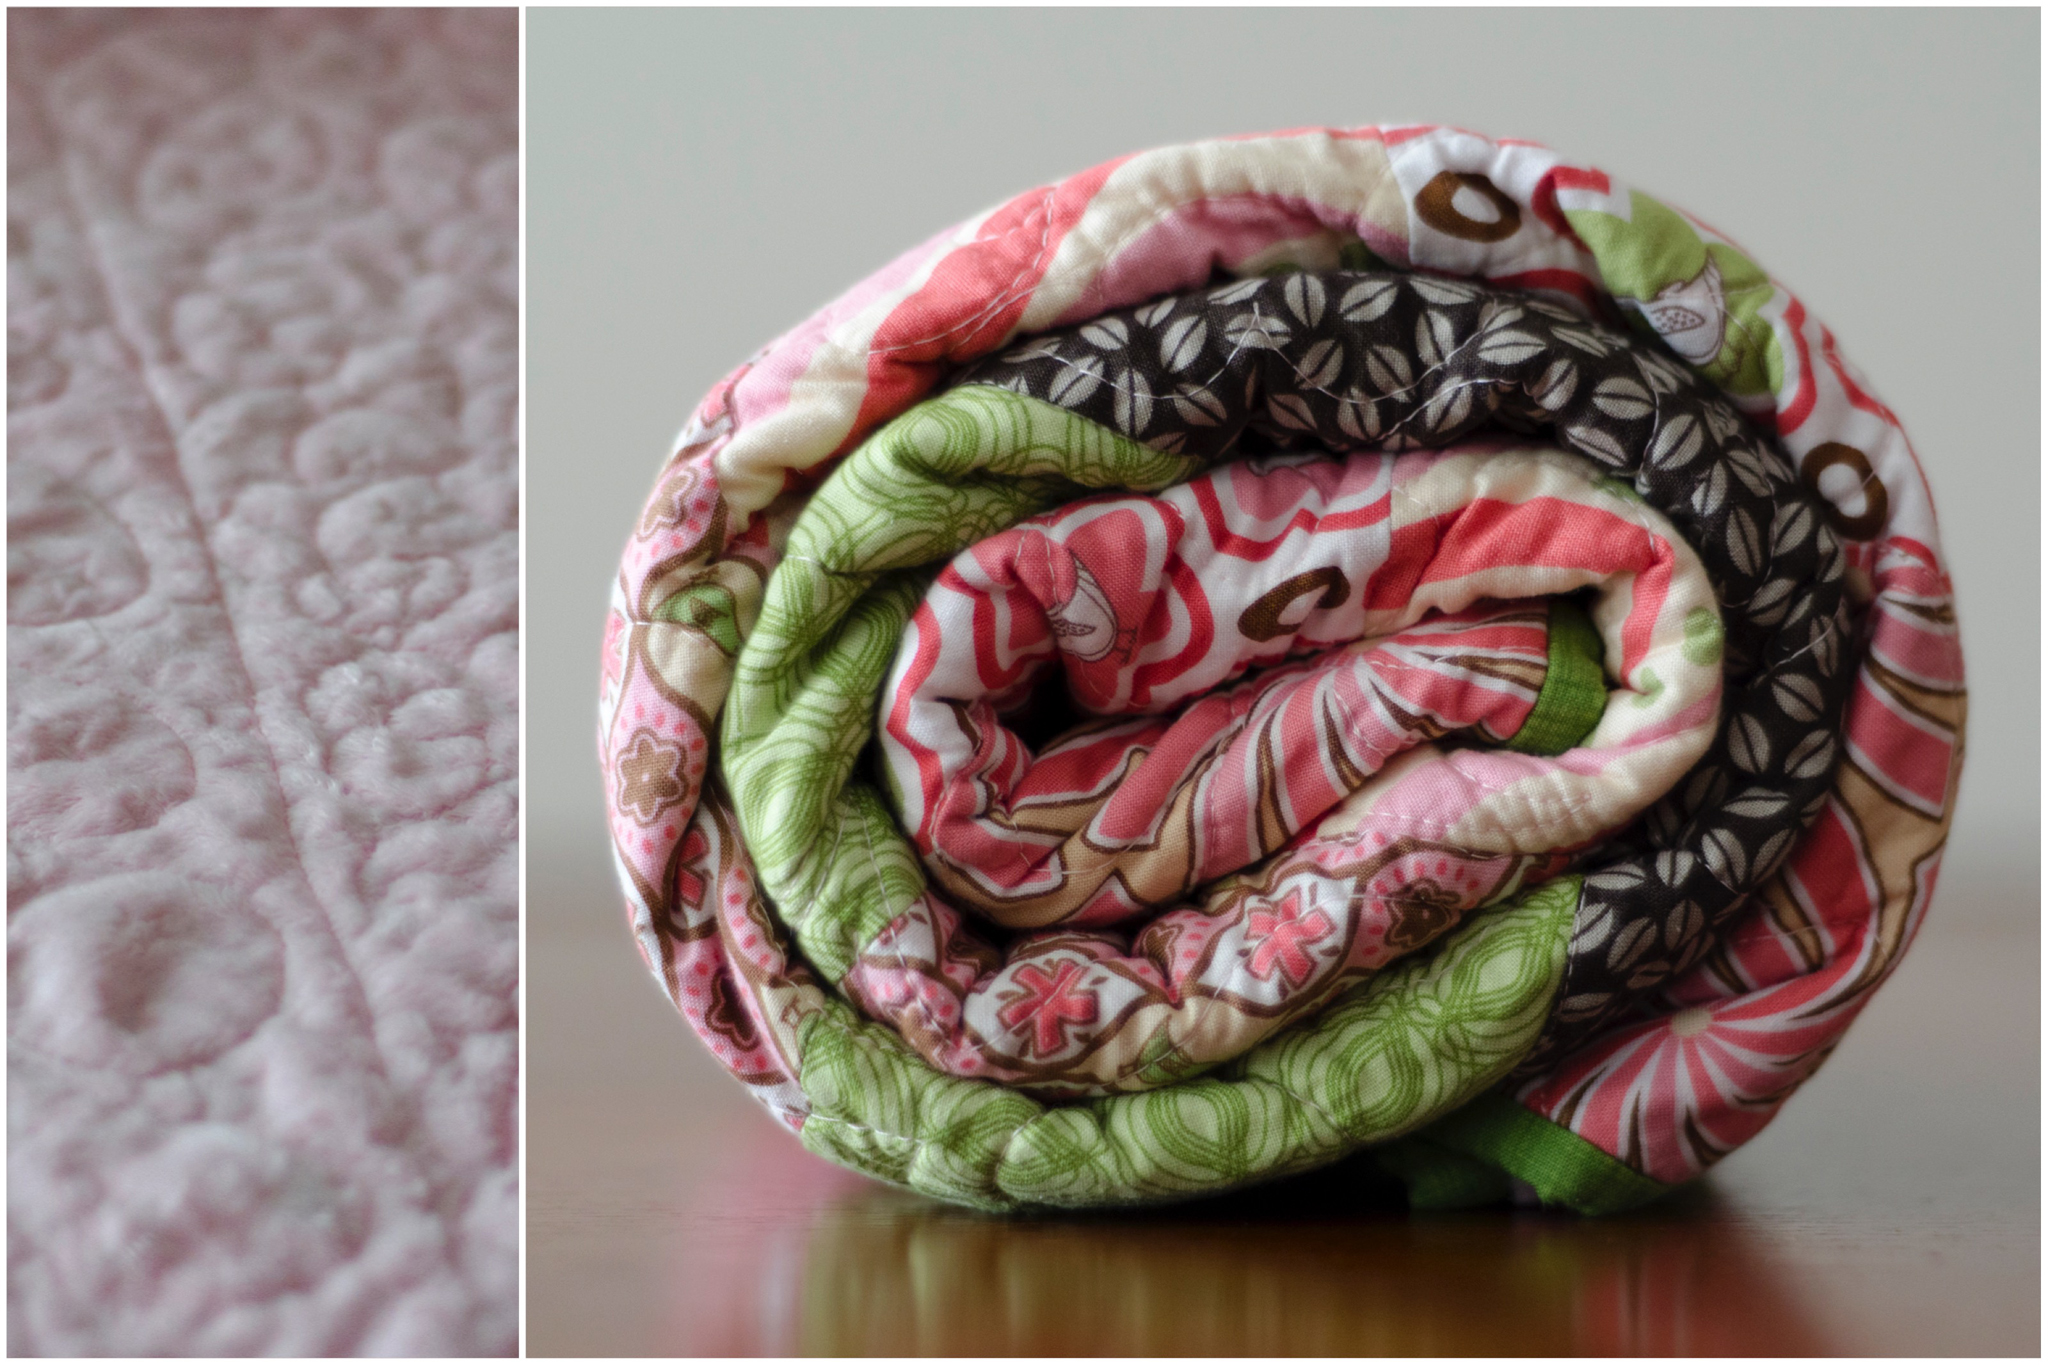
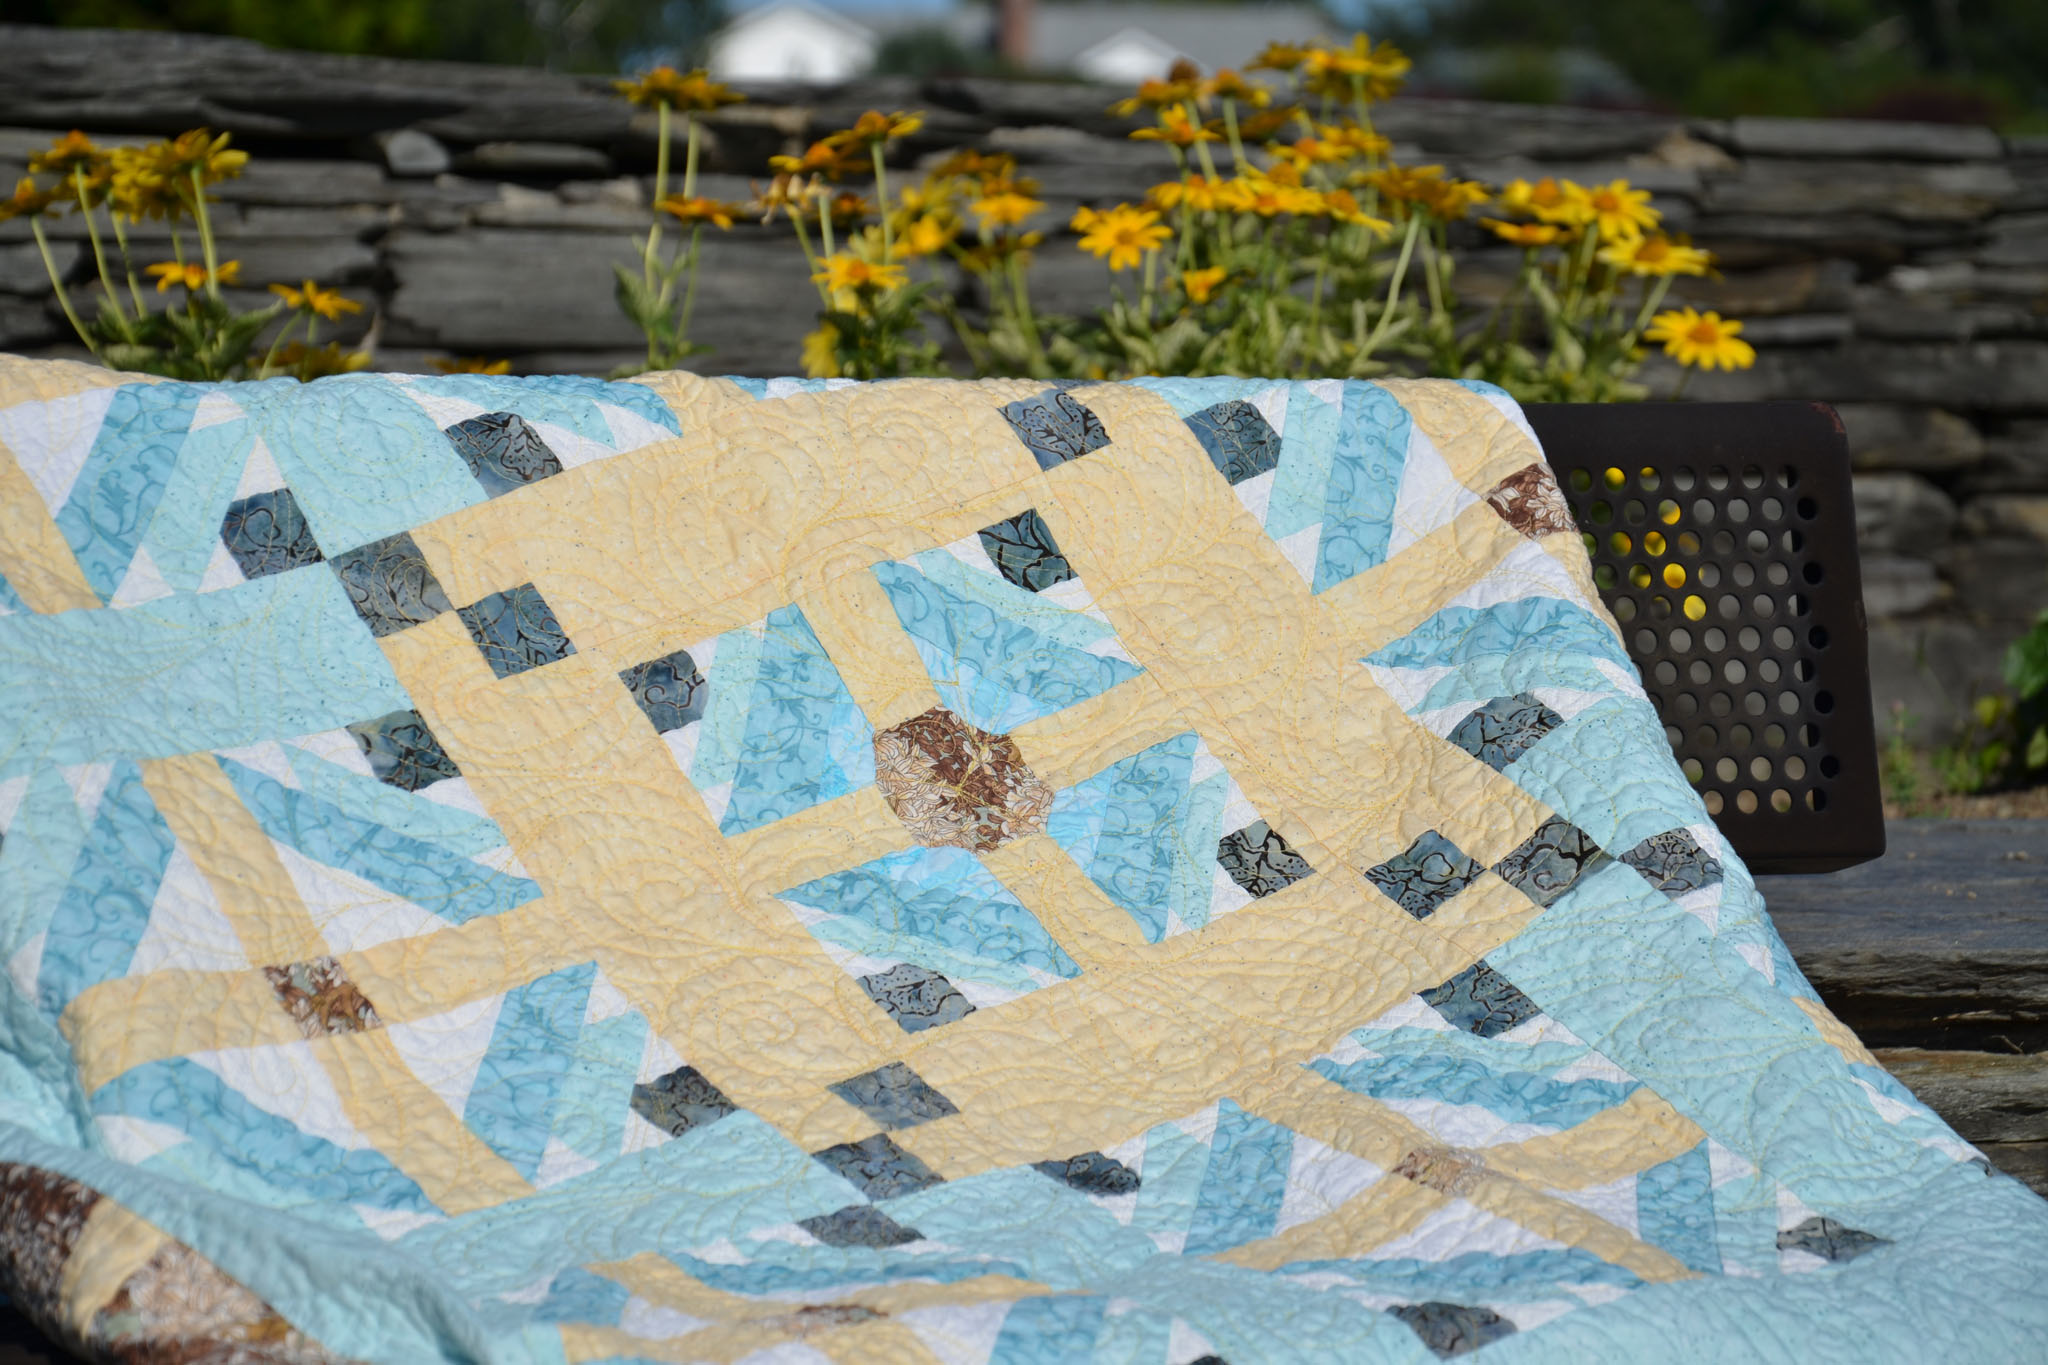
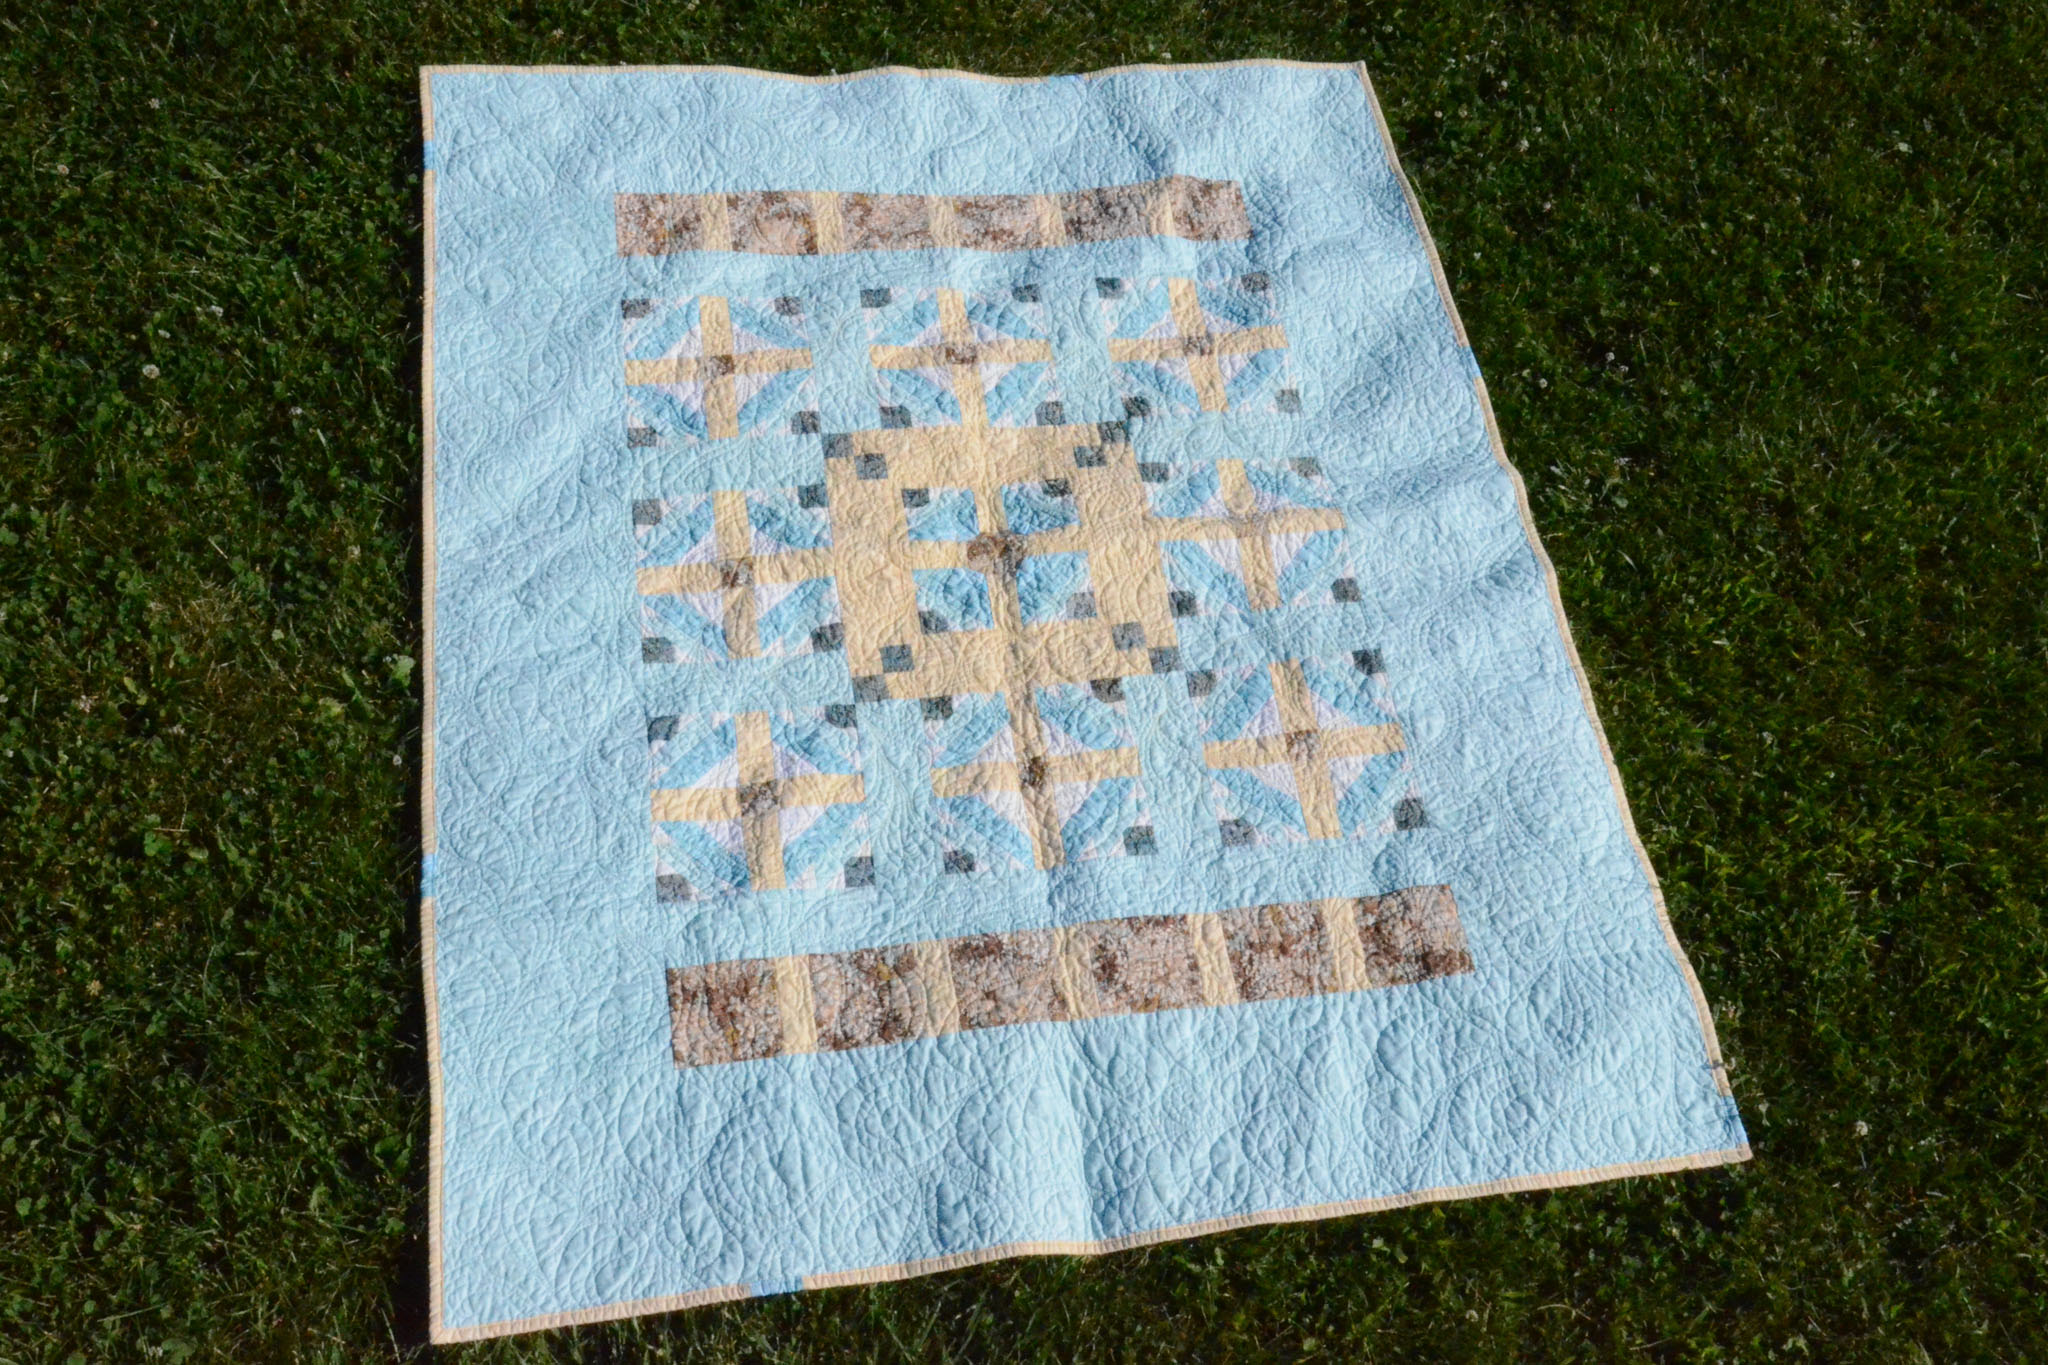
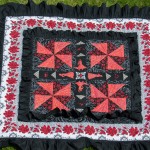
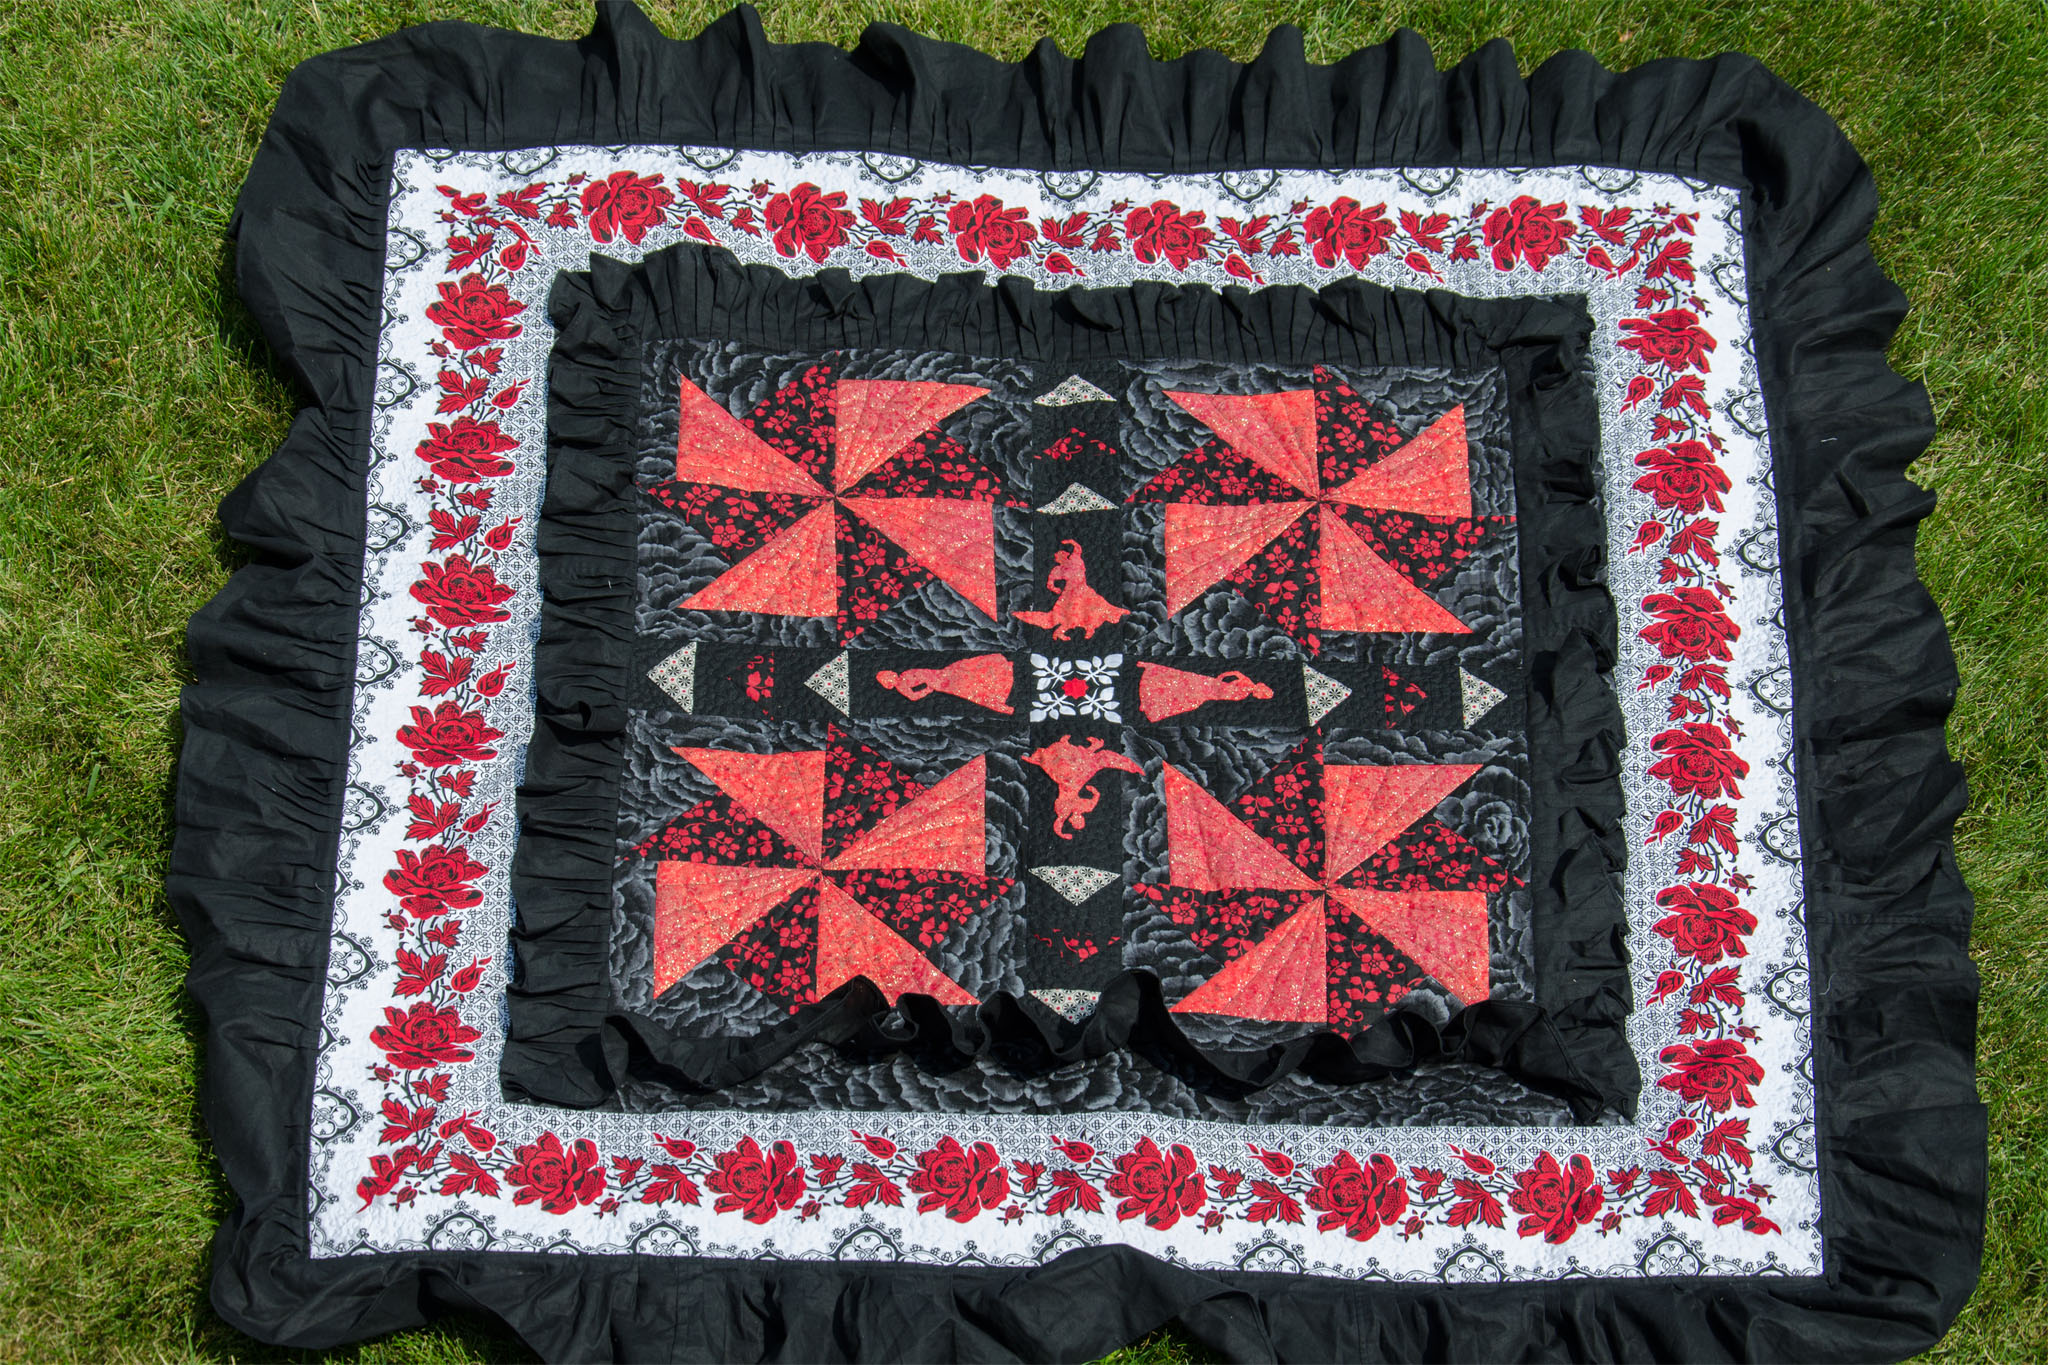
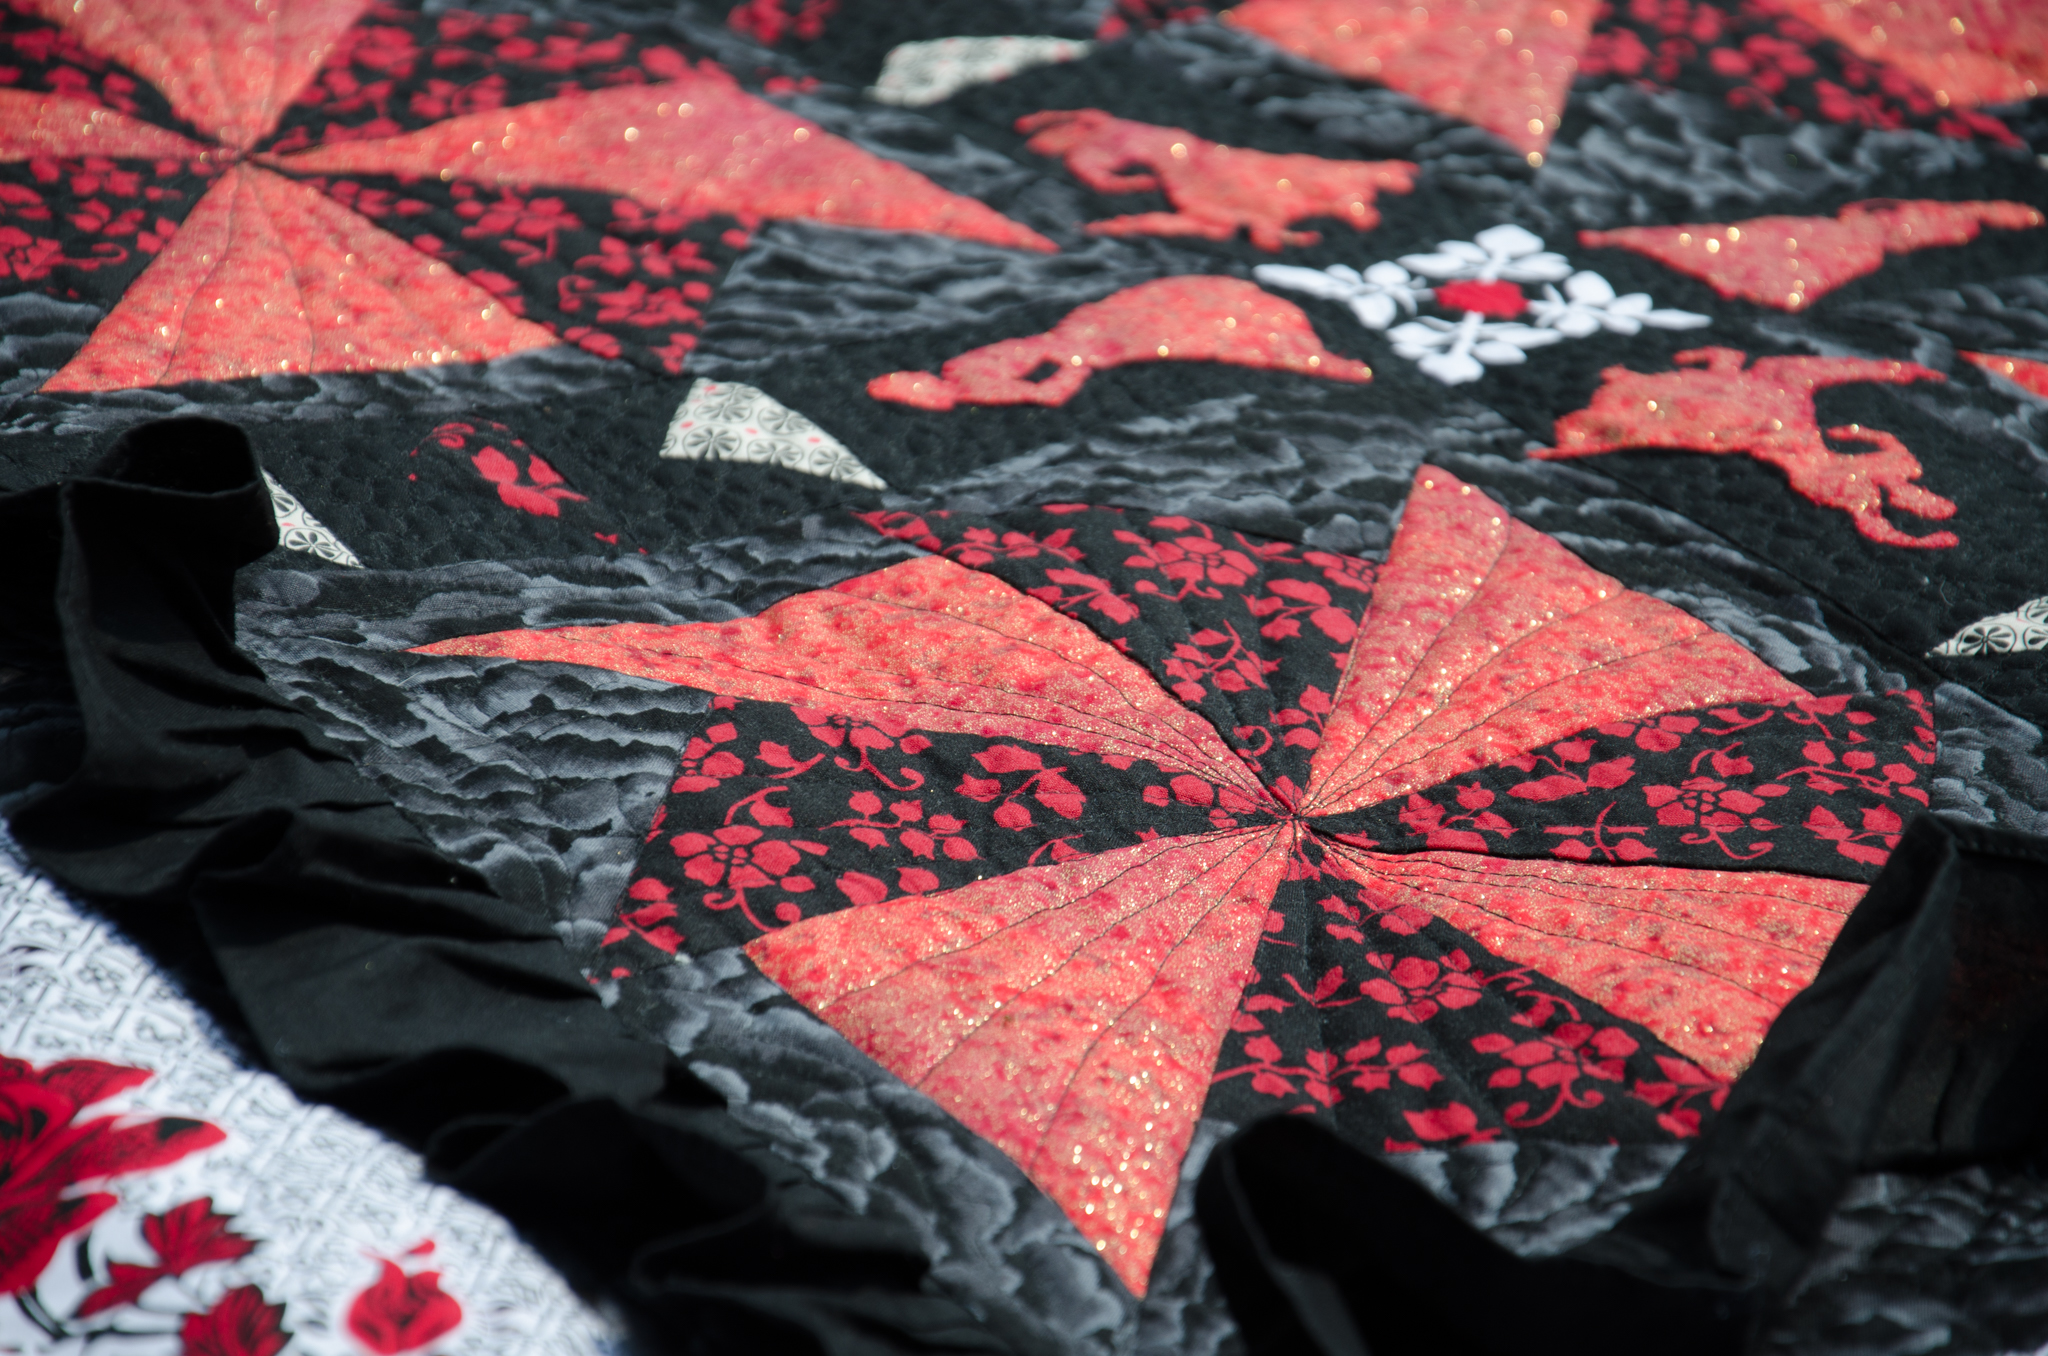
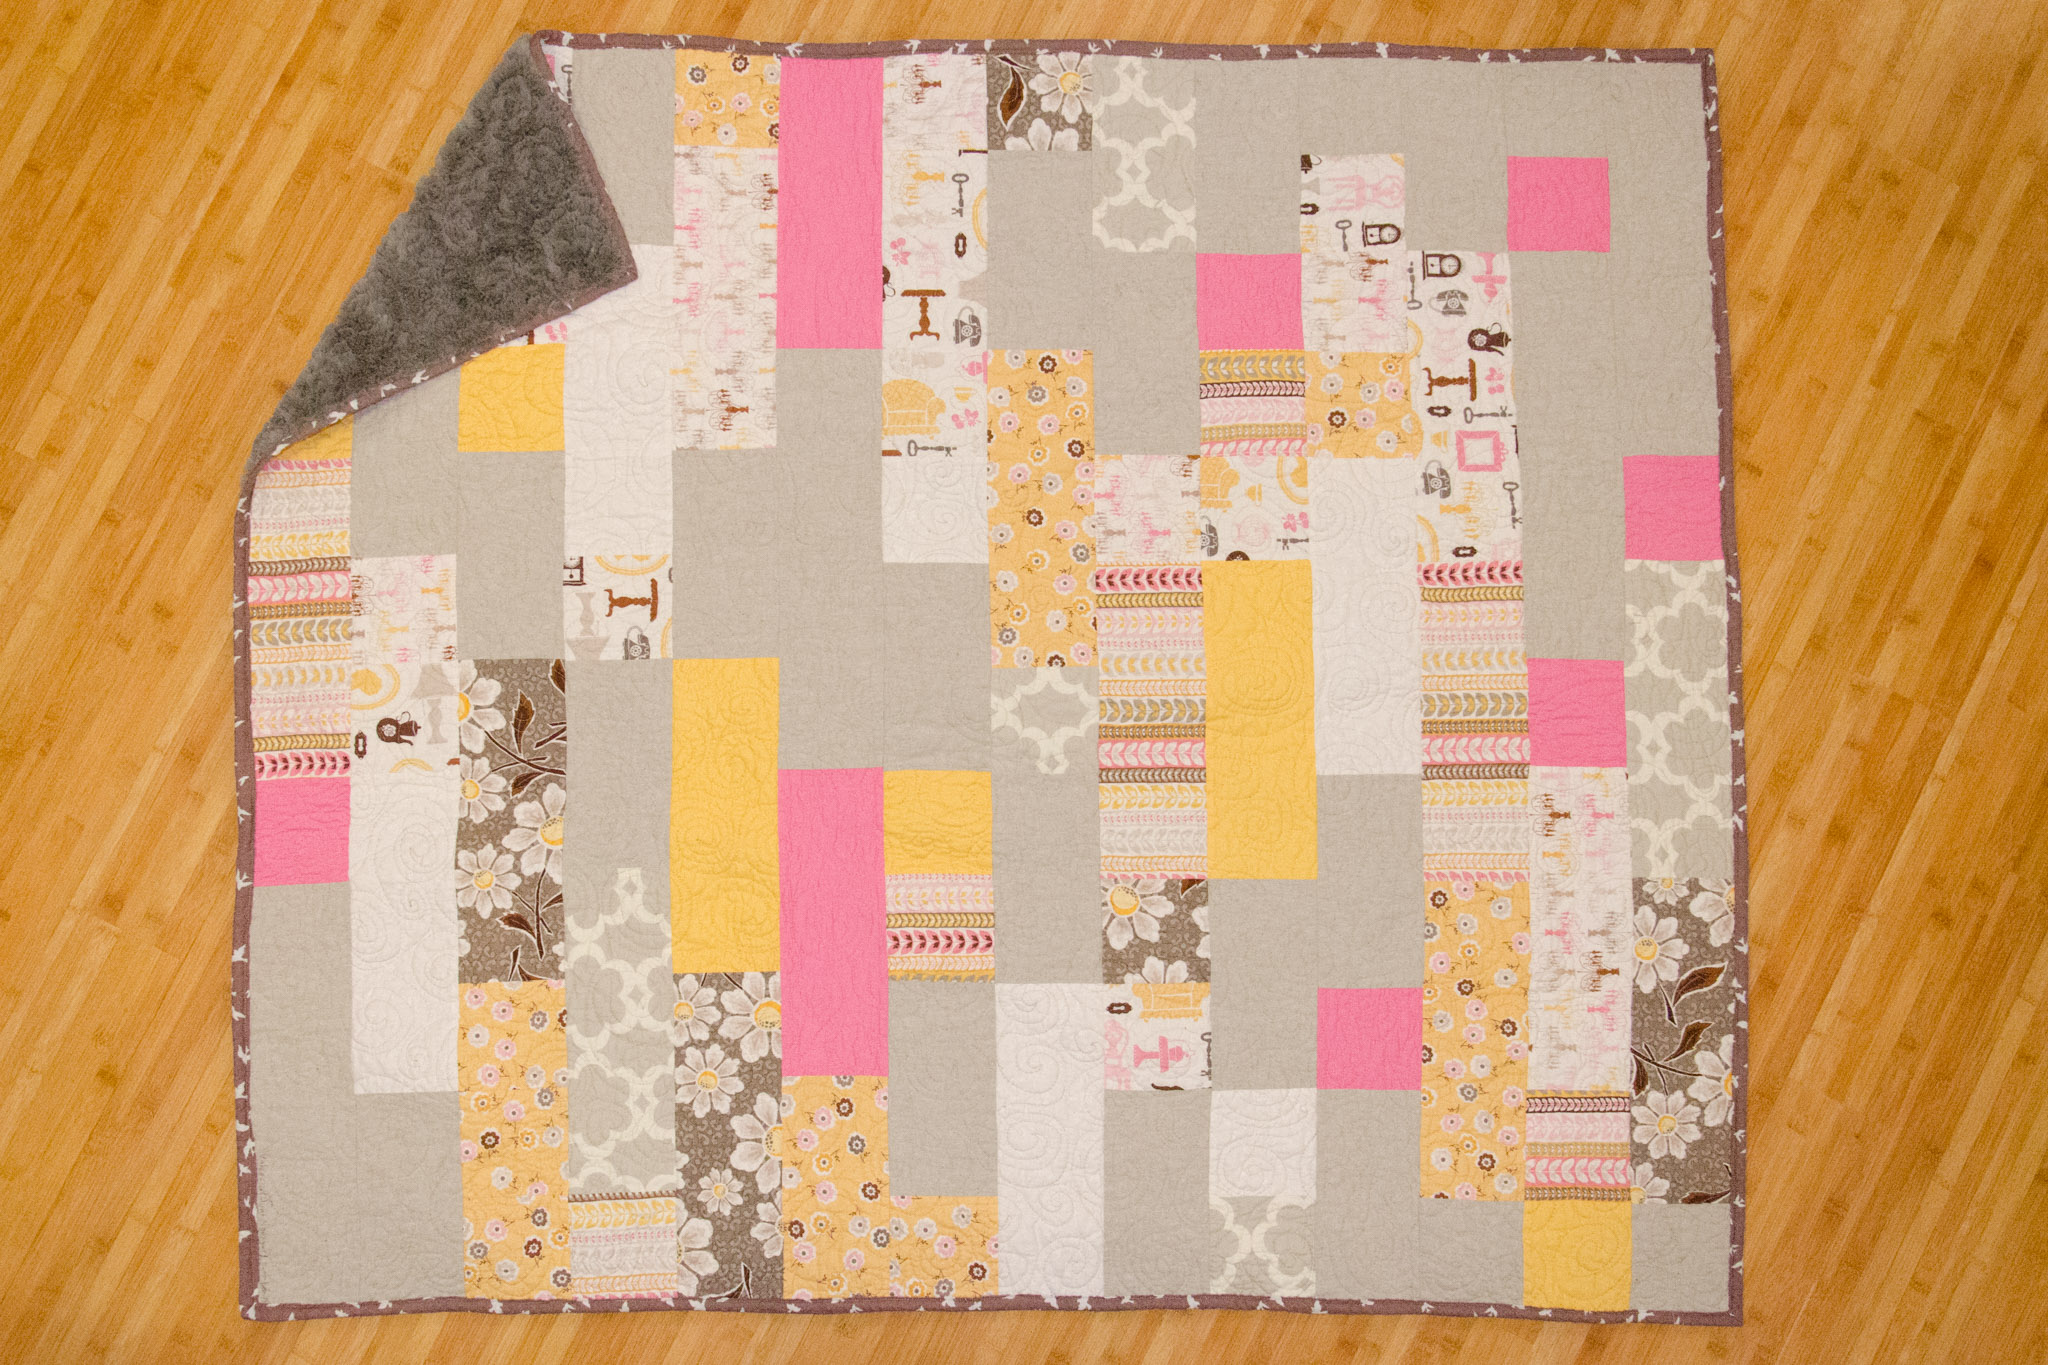
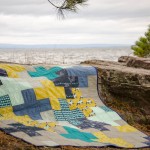
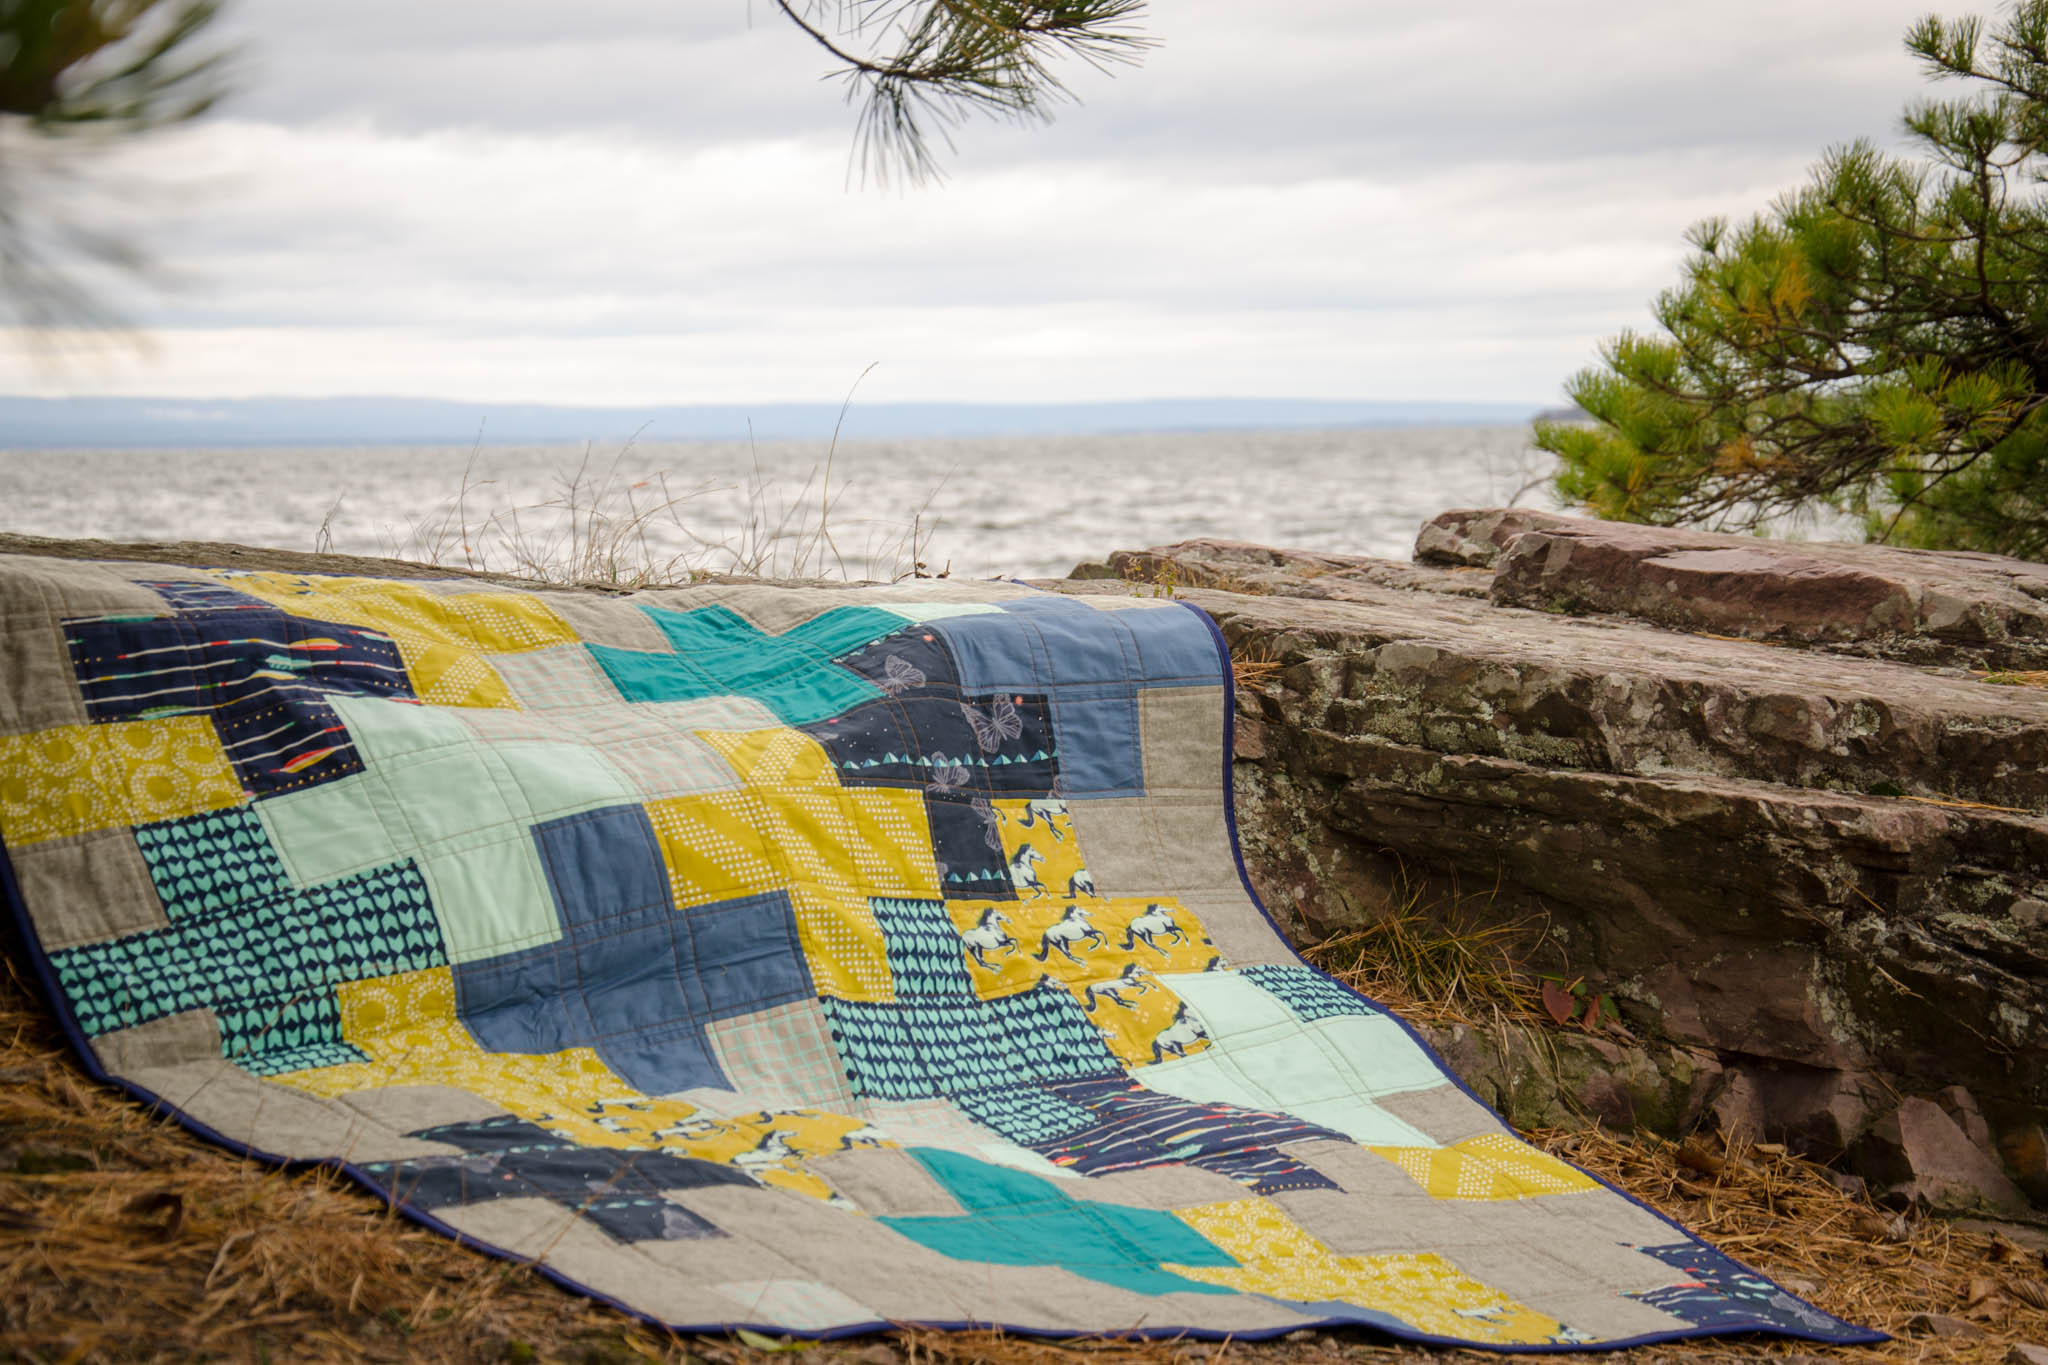
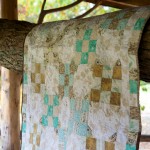
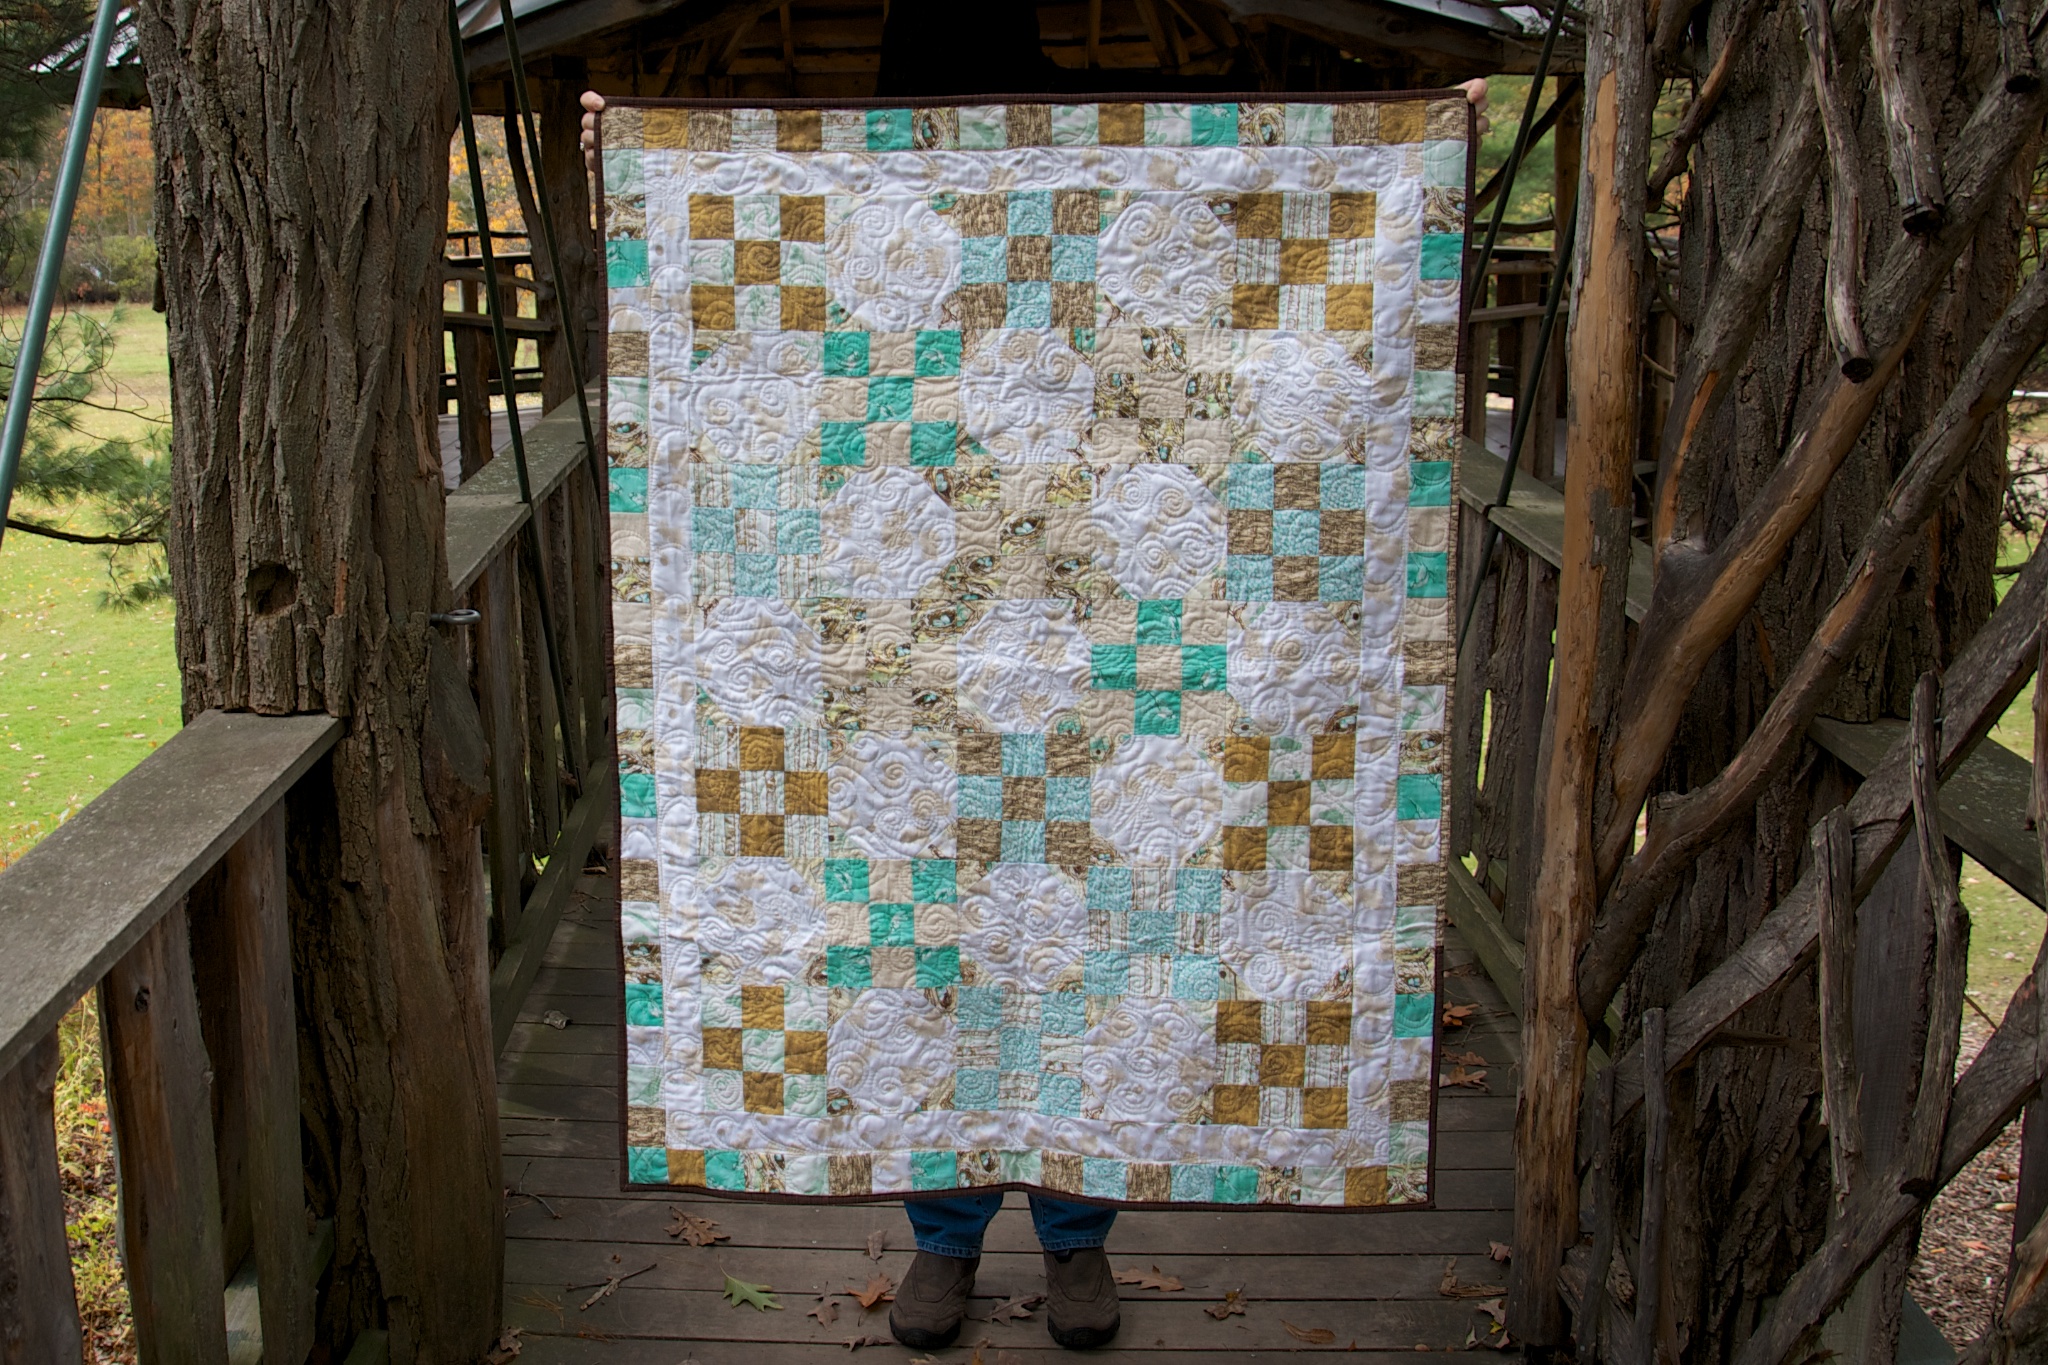
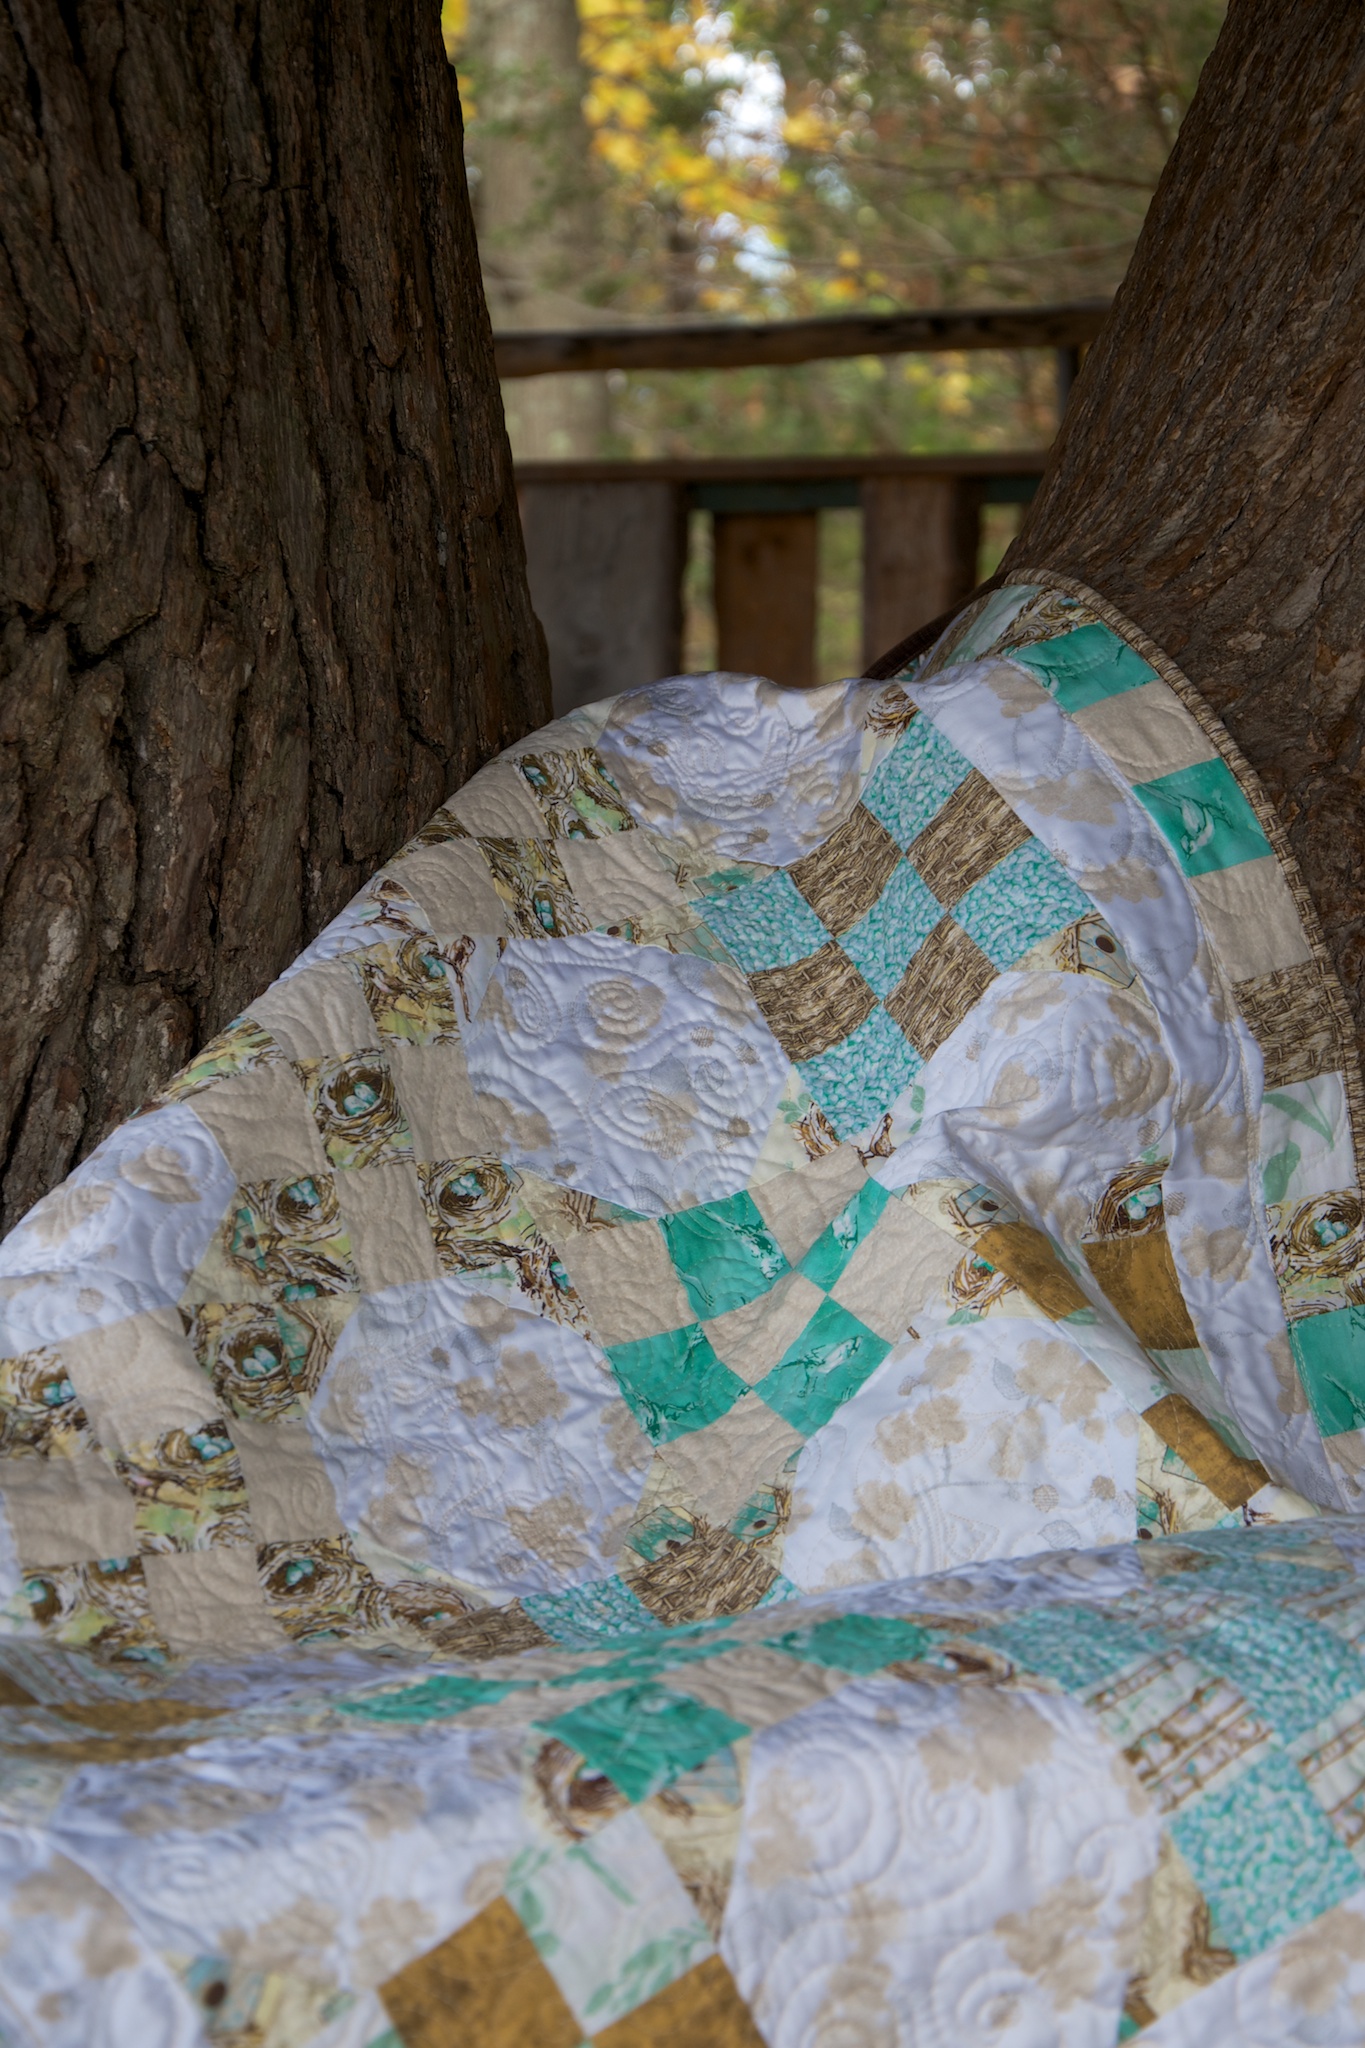
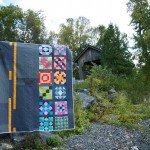
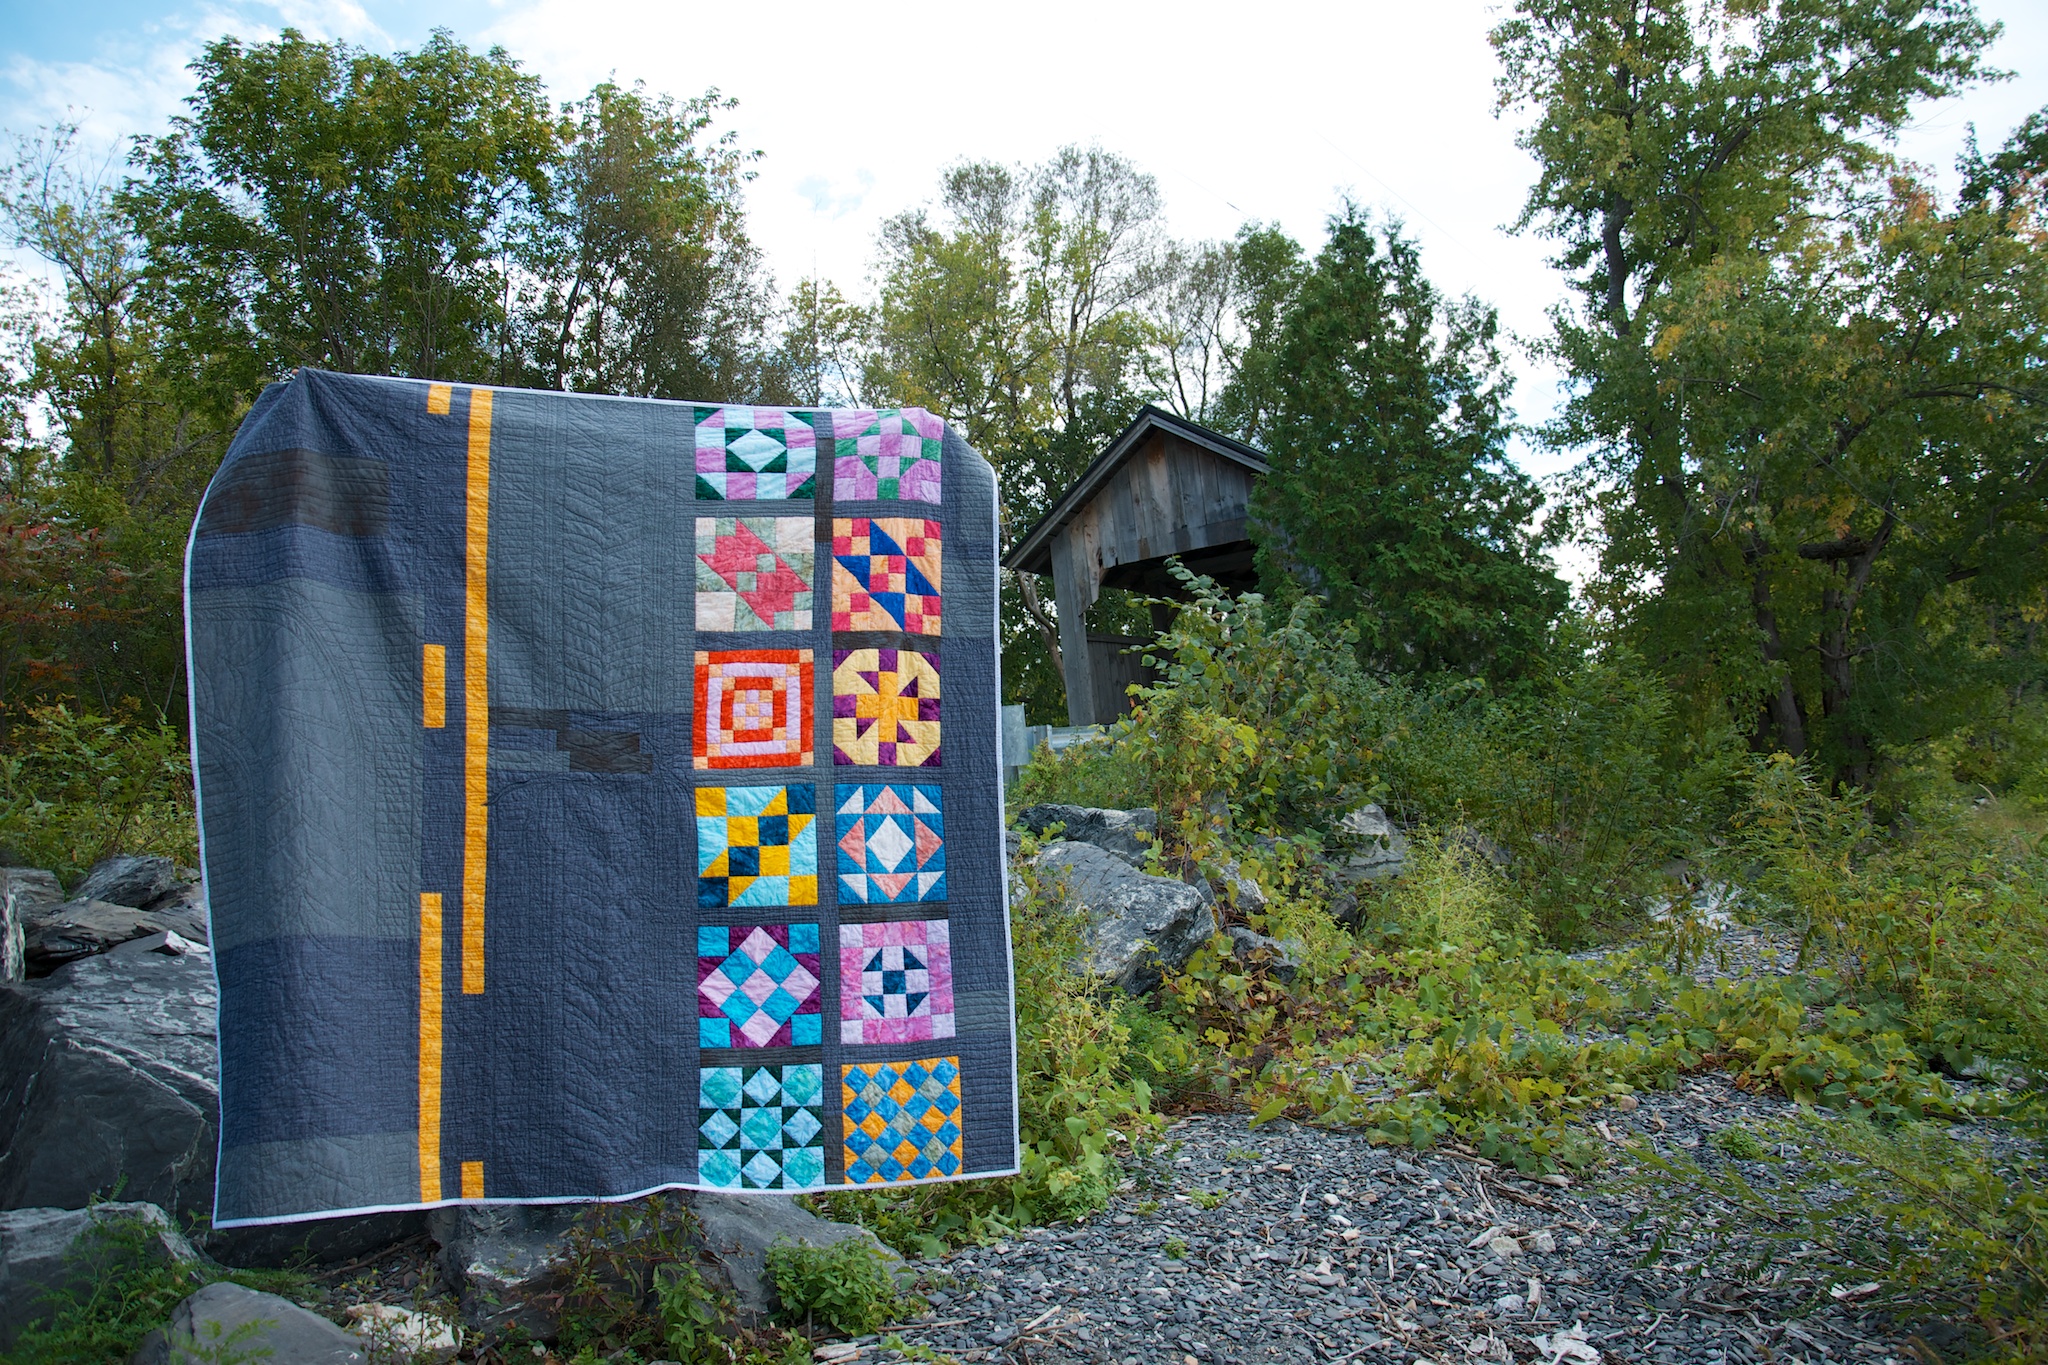
In 2015, I worked my way through some of my oldest unfinished projects, turning boxed-up, almost forgotten fabric into quilts. This second quilt of 2016 is more of the same. This one started life as a pack of 18 fat quarters in February 2011 (my fourth quilt started), and is now a 54×72″ quilt using up almost every bit.

"Miniatures Heart", Rachael Arnold, February 2016, 54"x72".
“Miniatures Heart”, Rachael Arnold, February 2016, 54″x72″. Photo by Carl Pfranger.

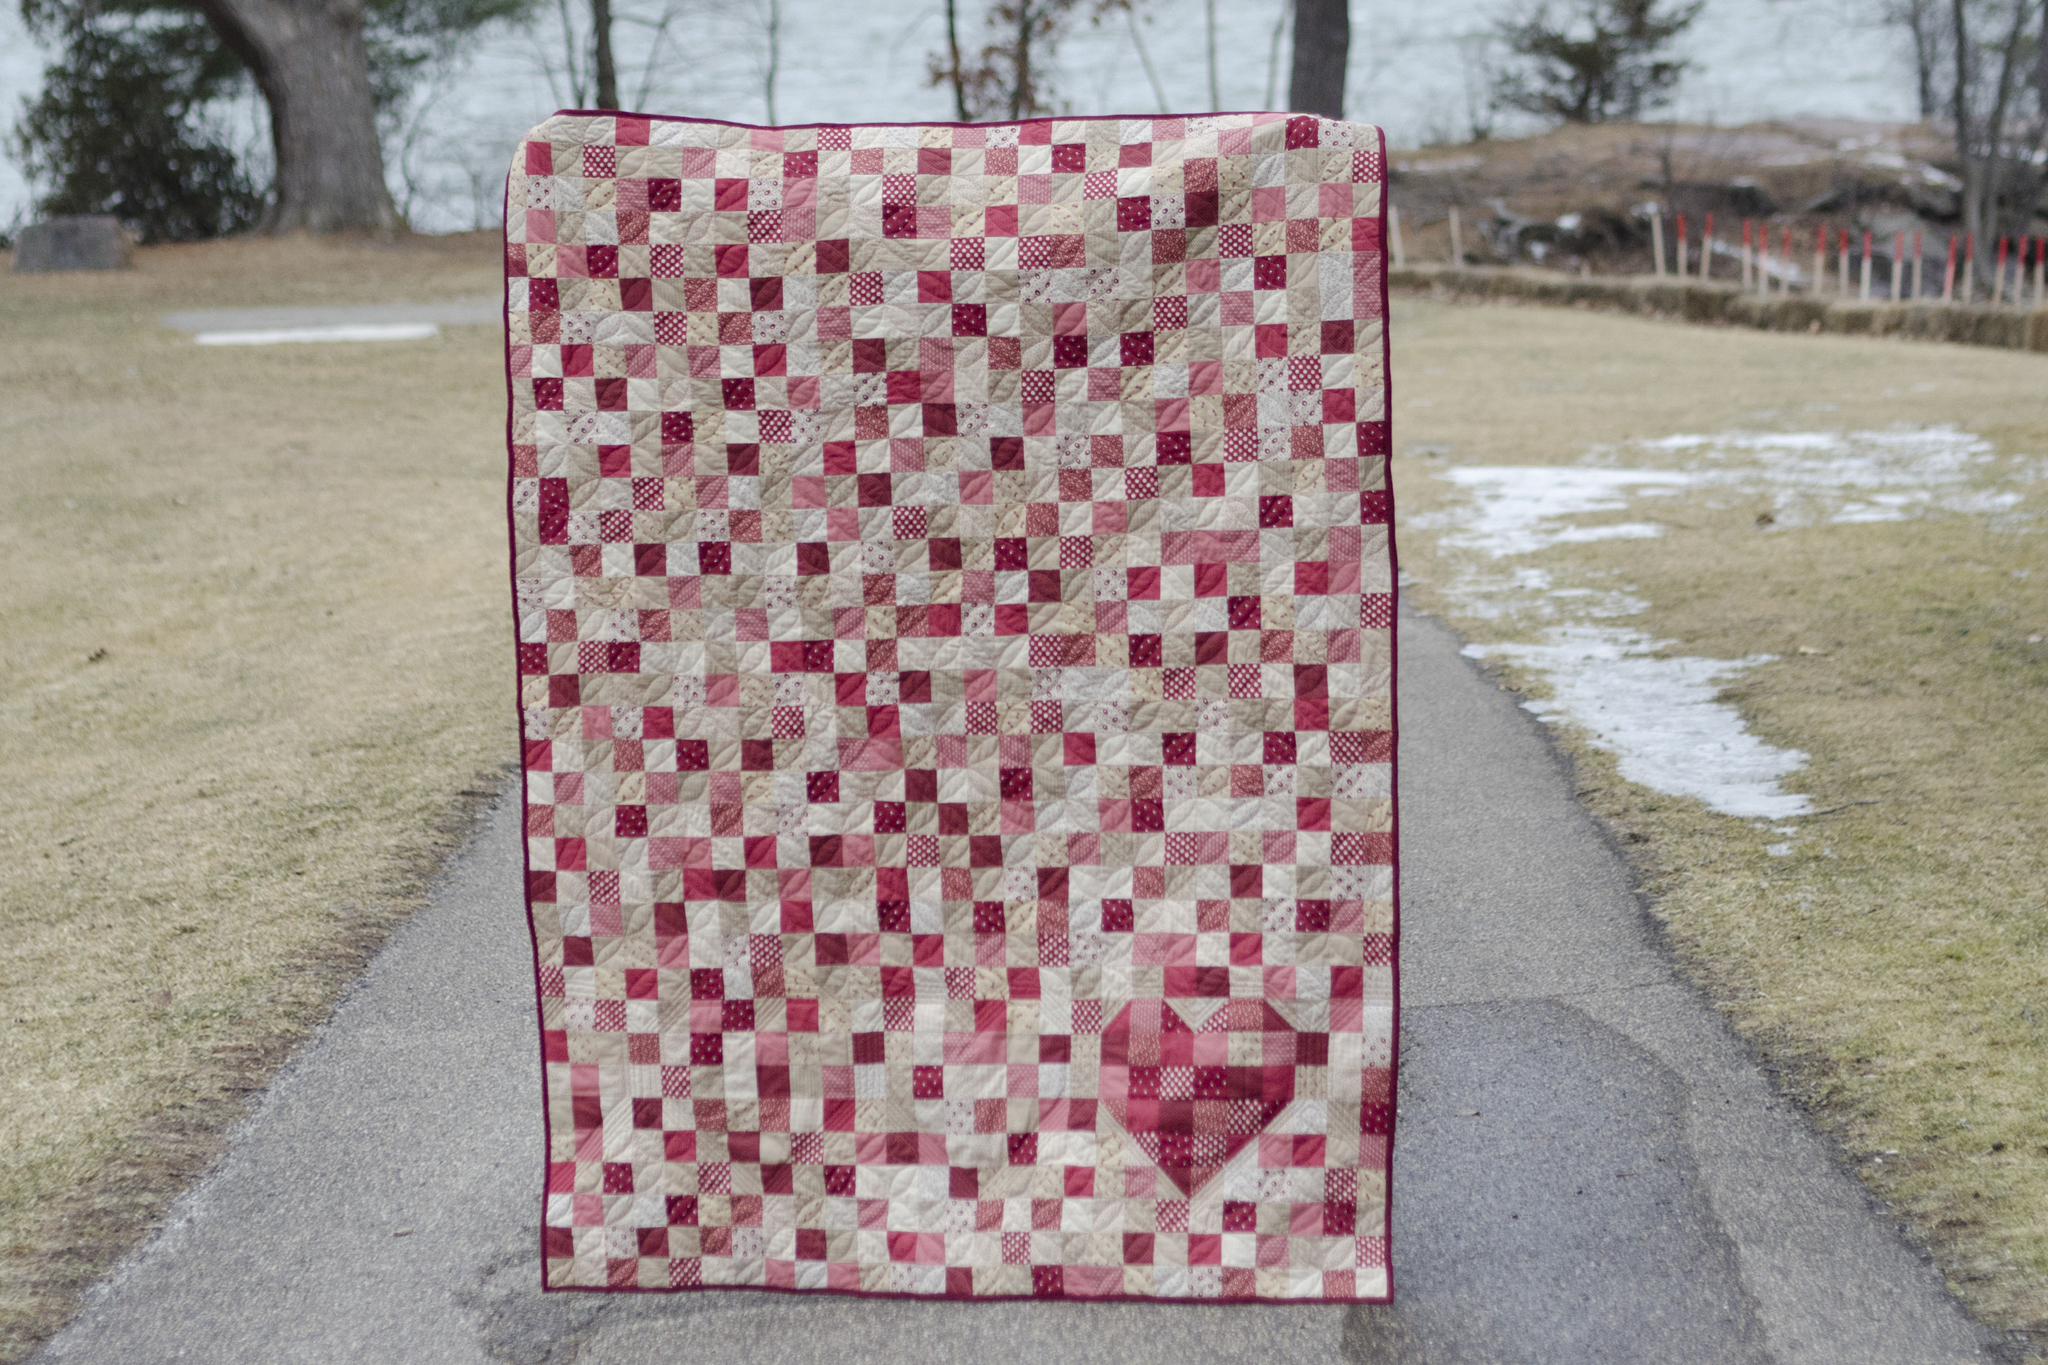
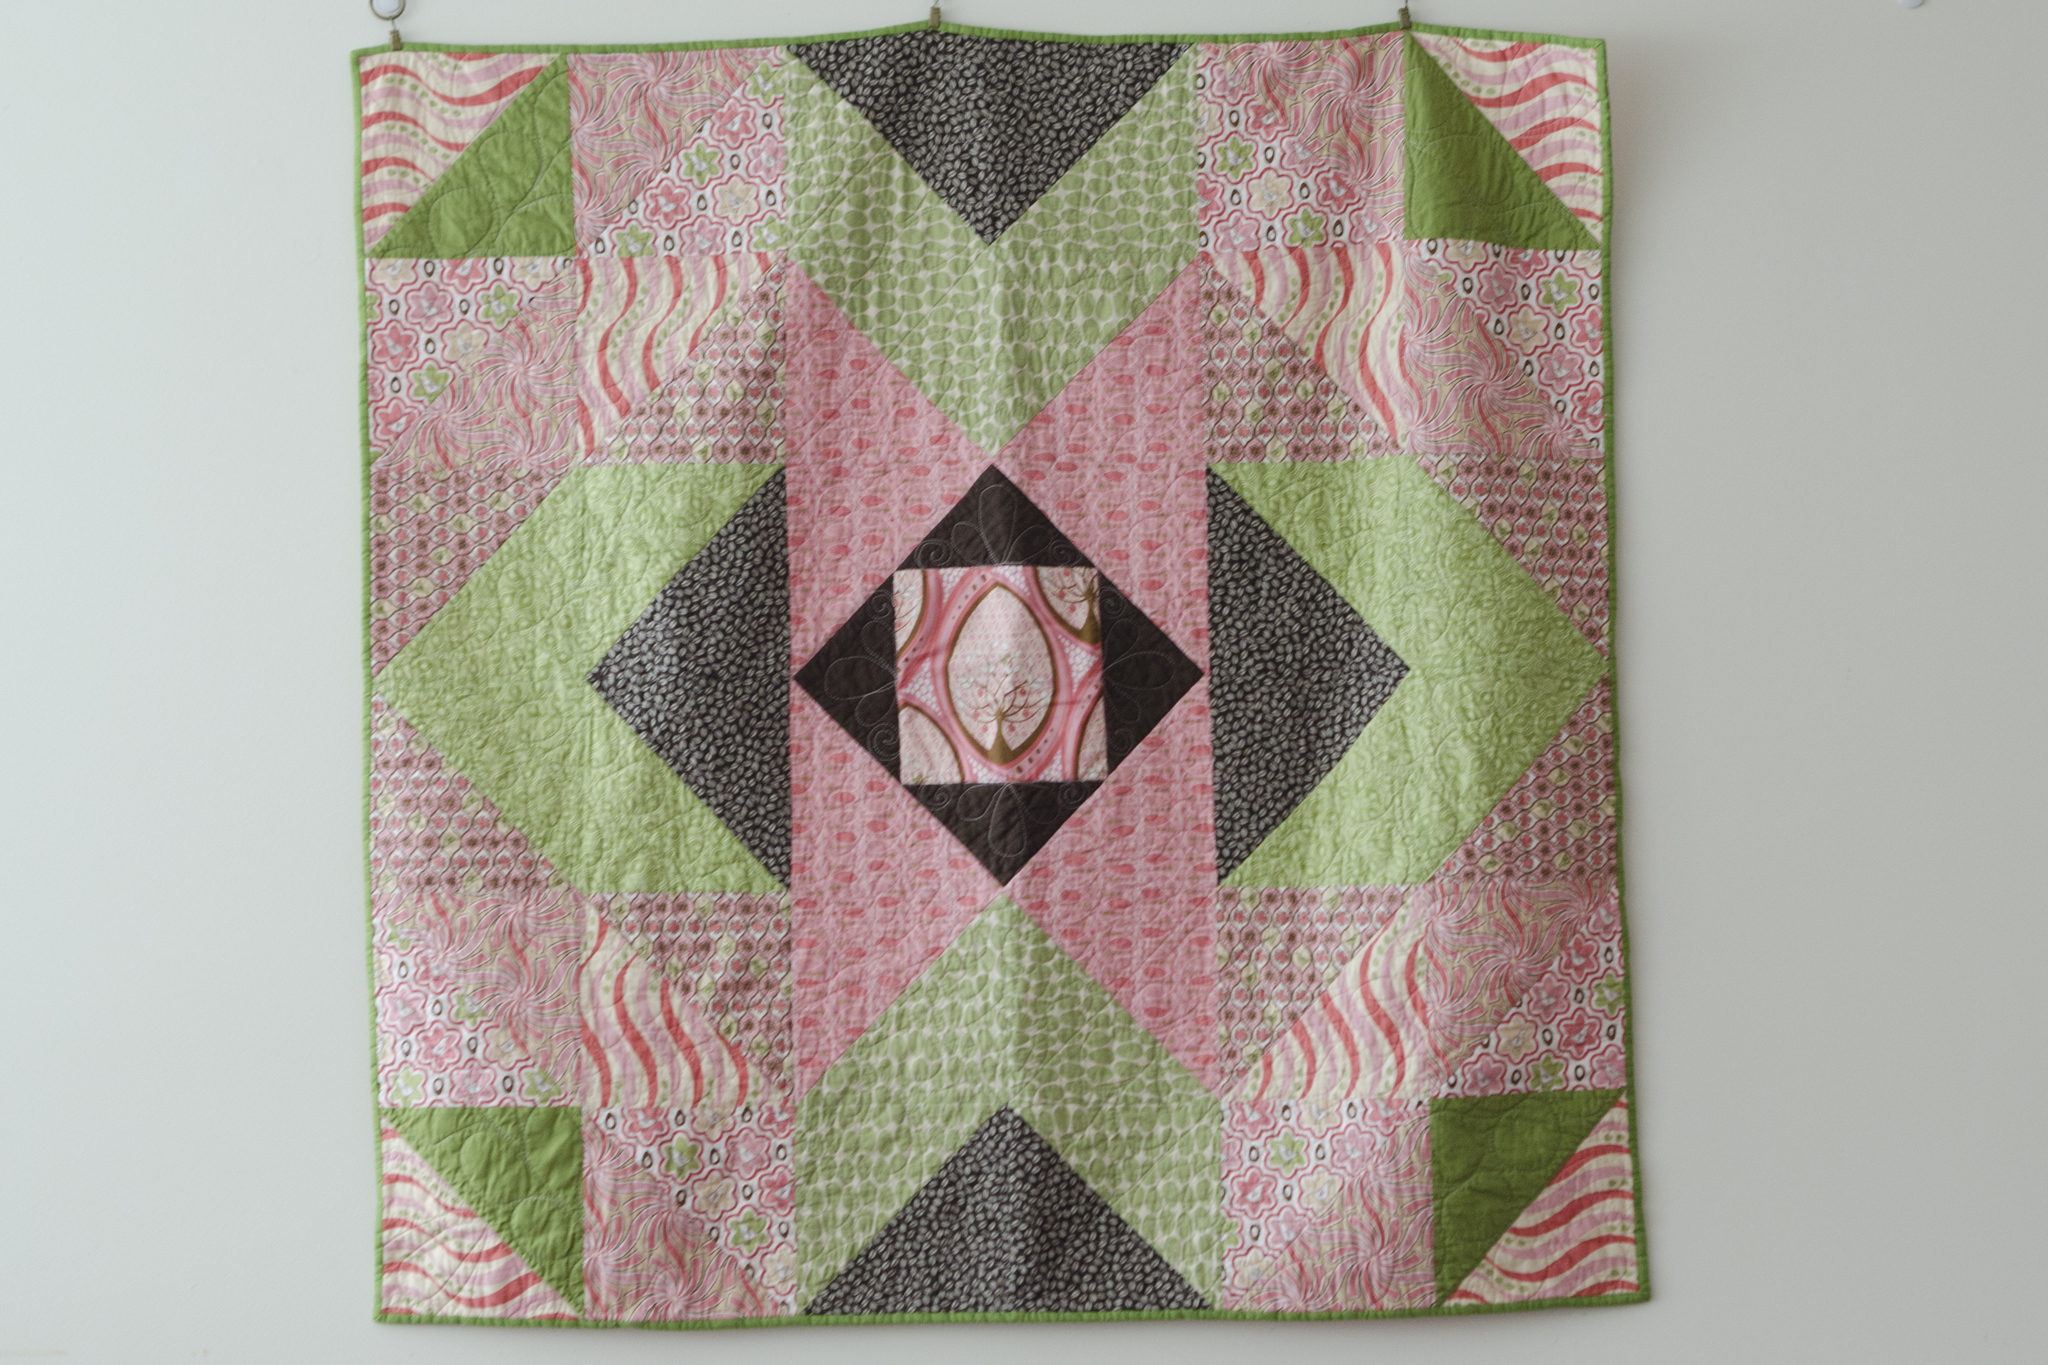
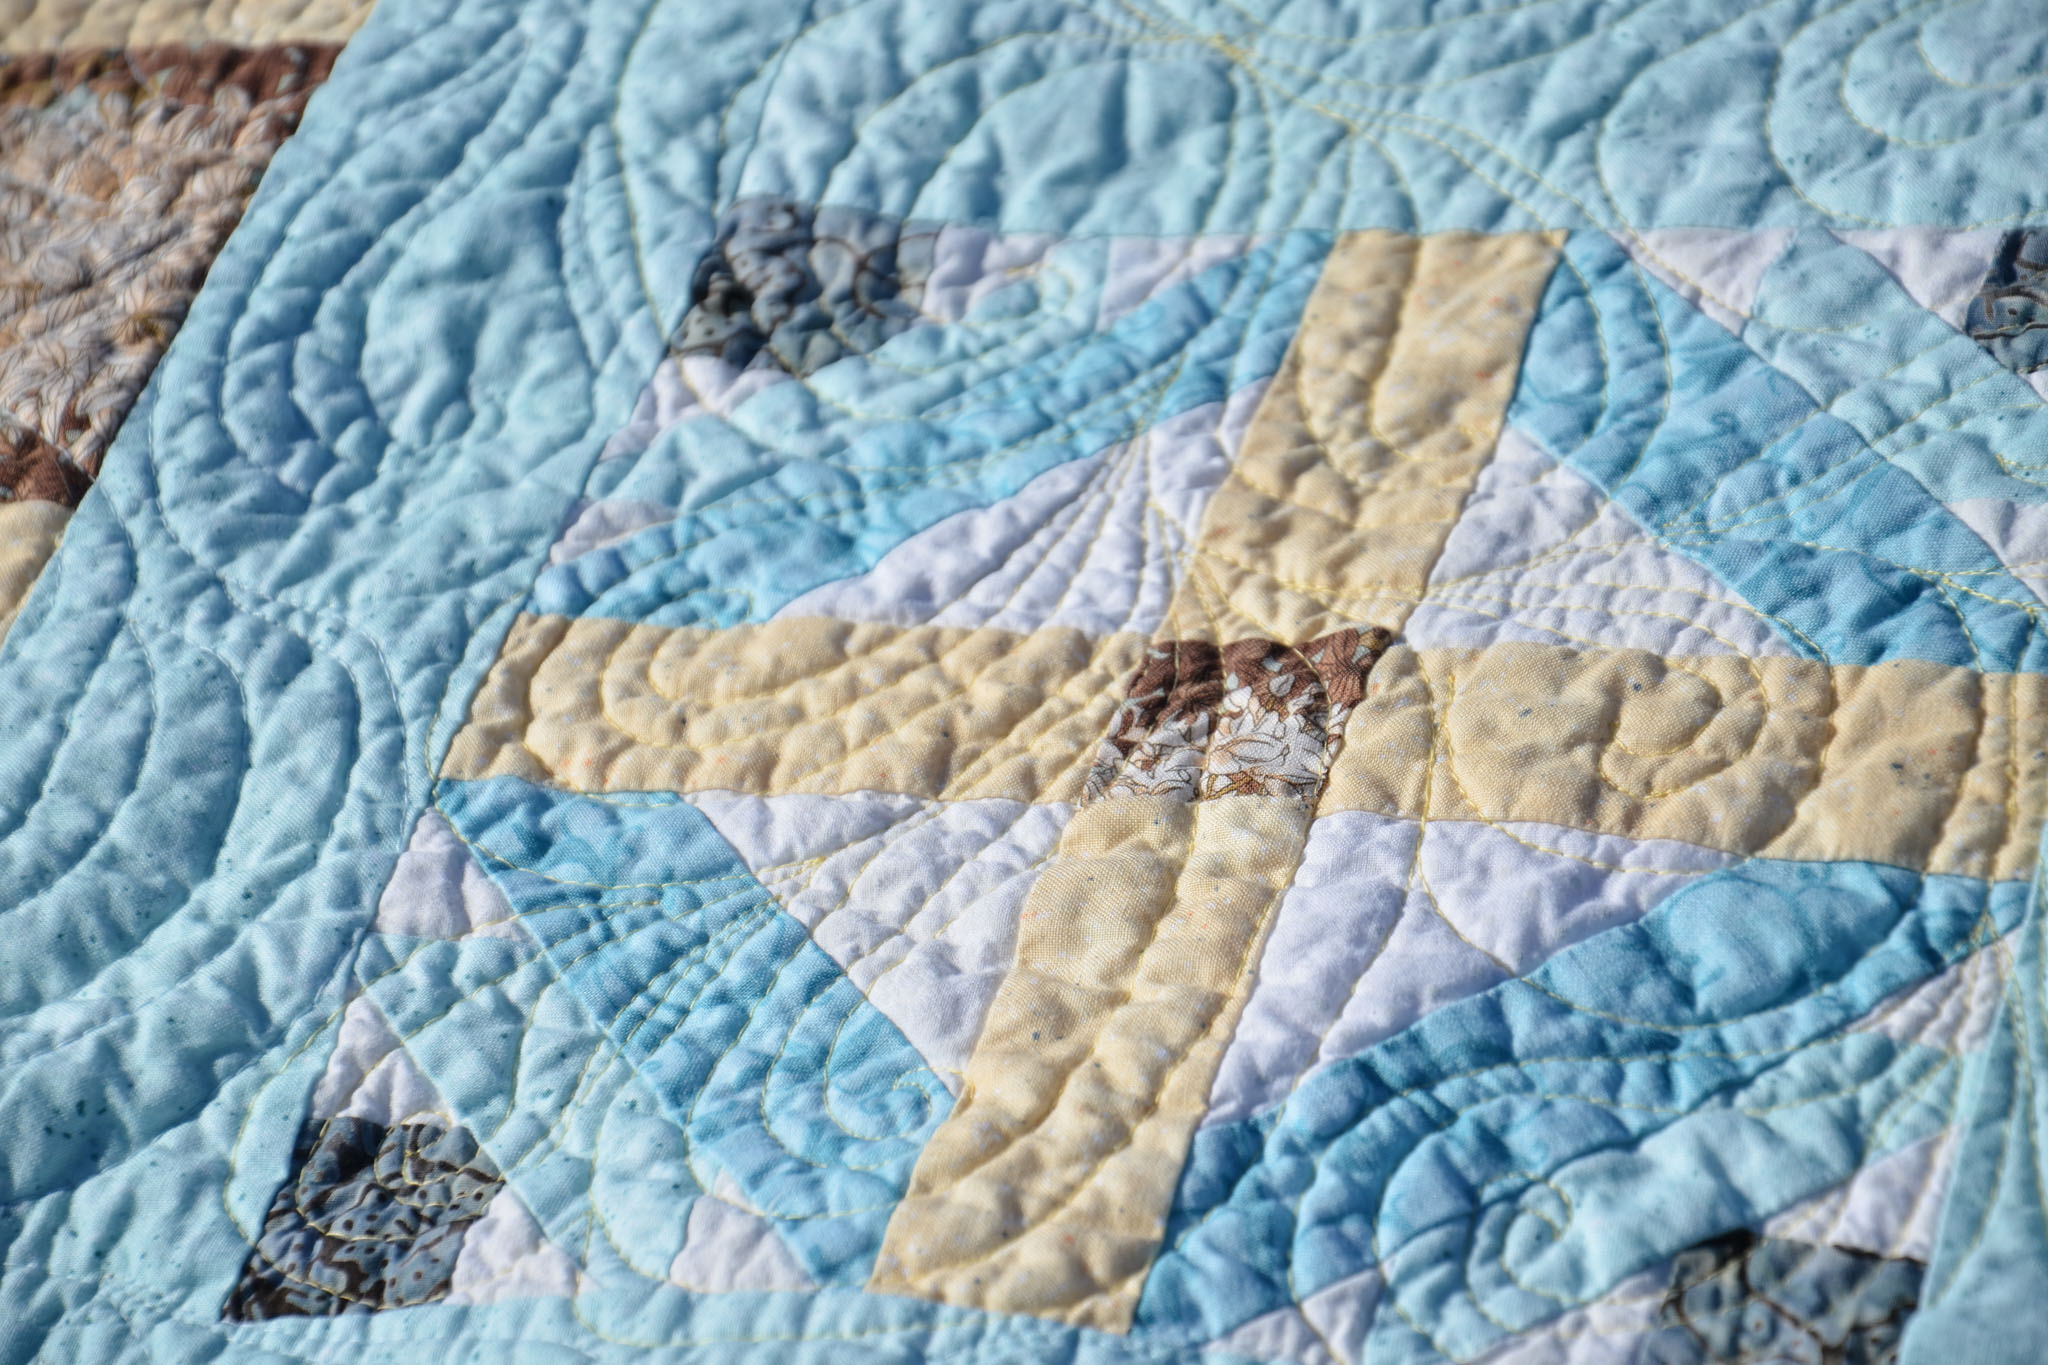
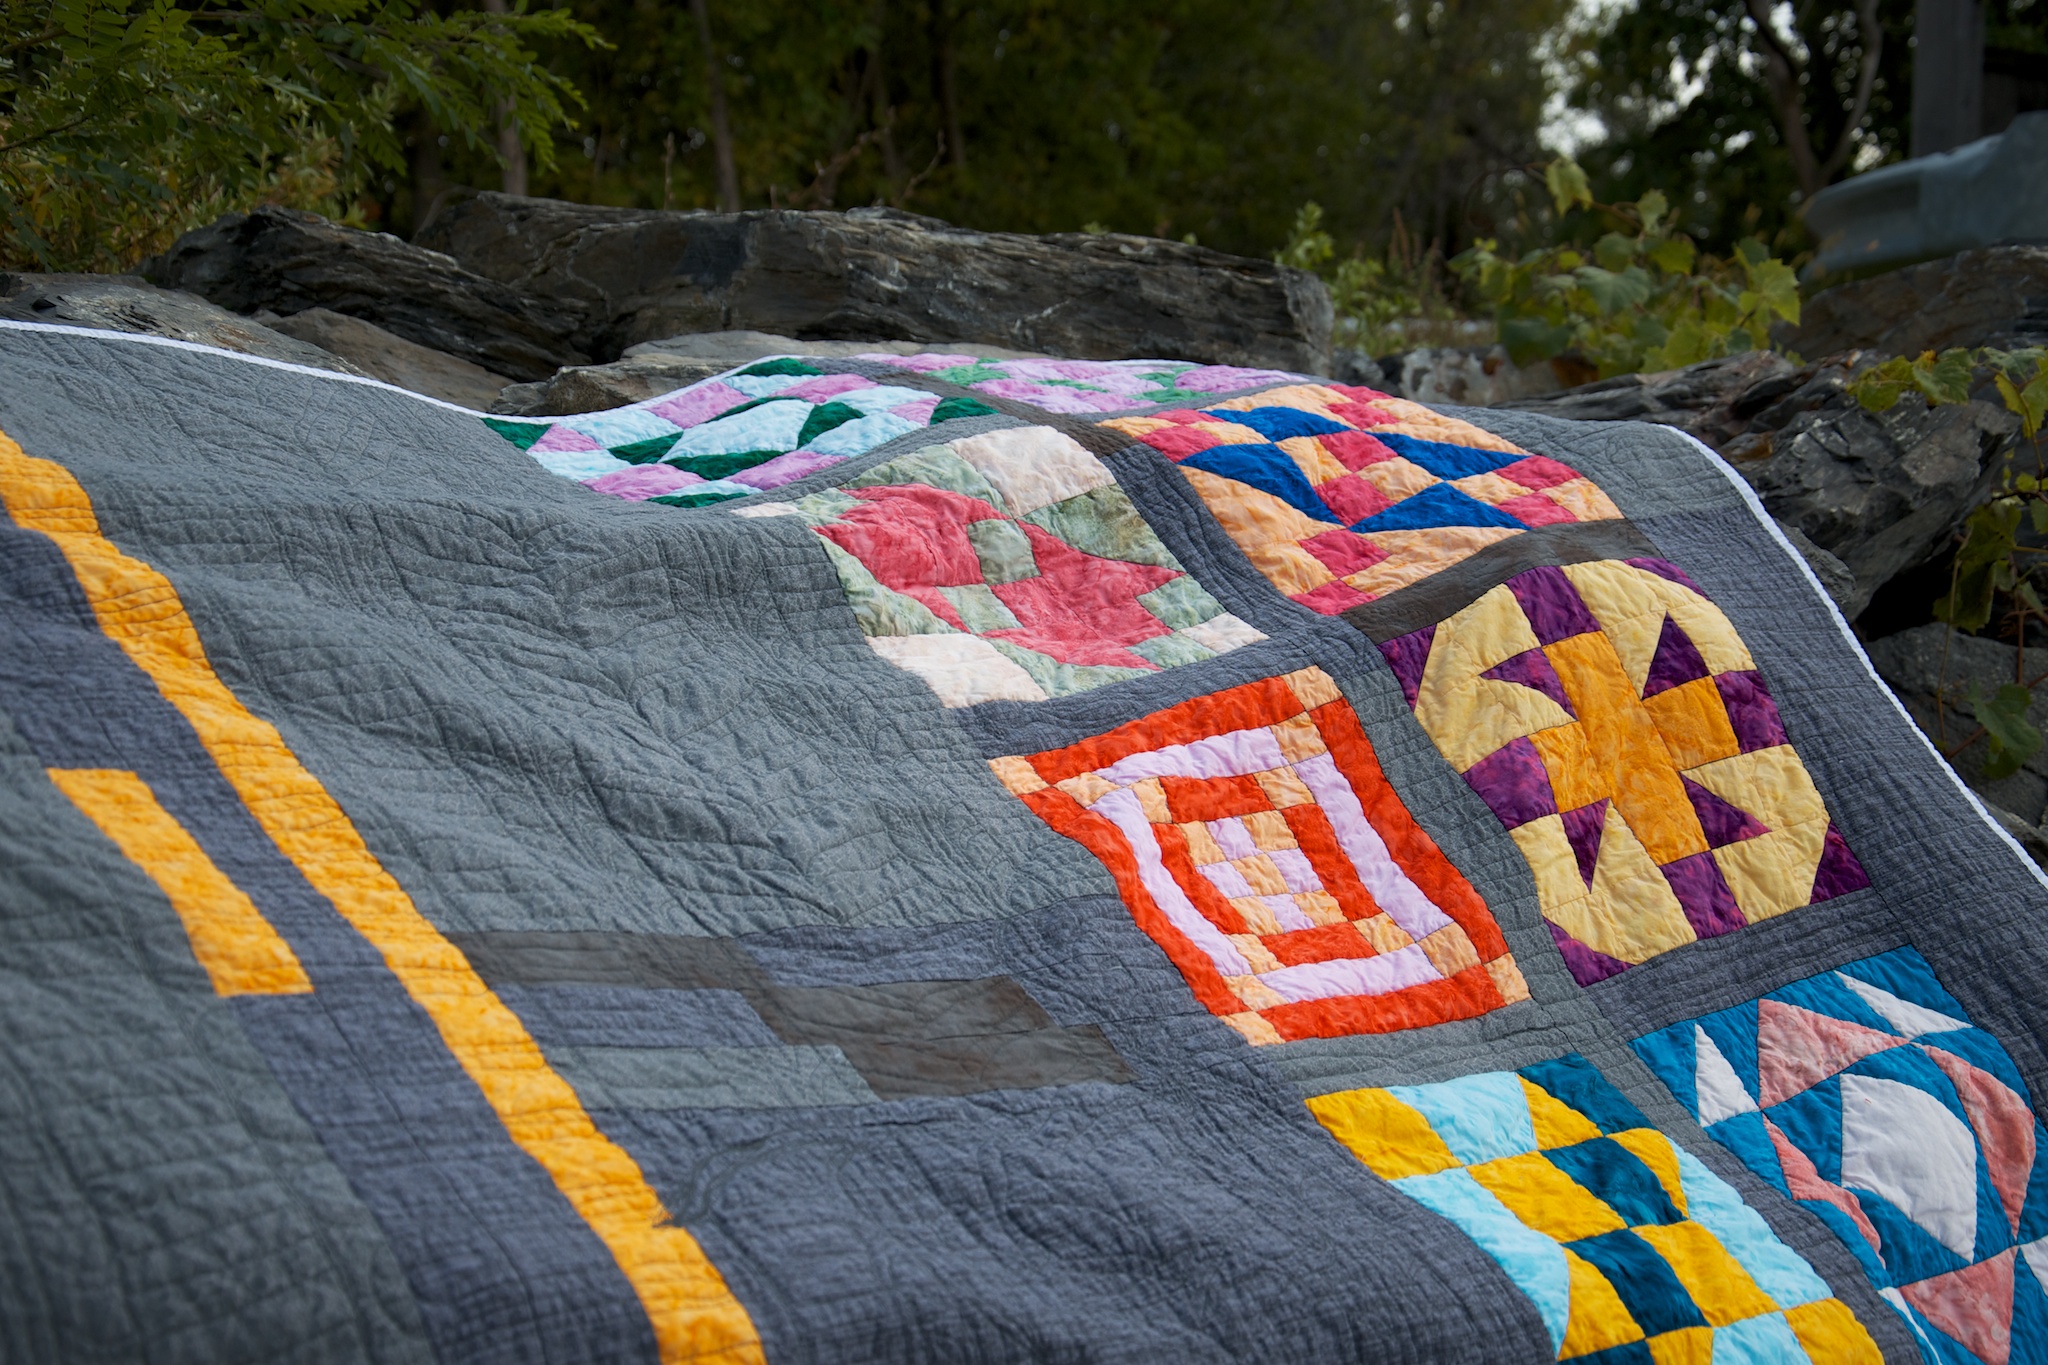
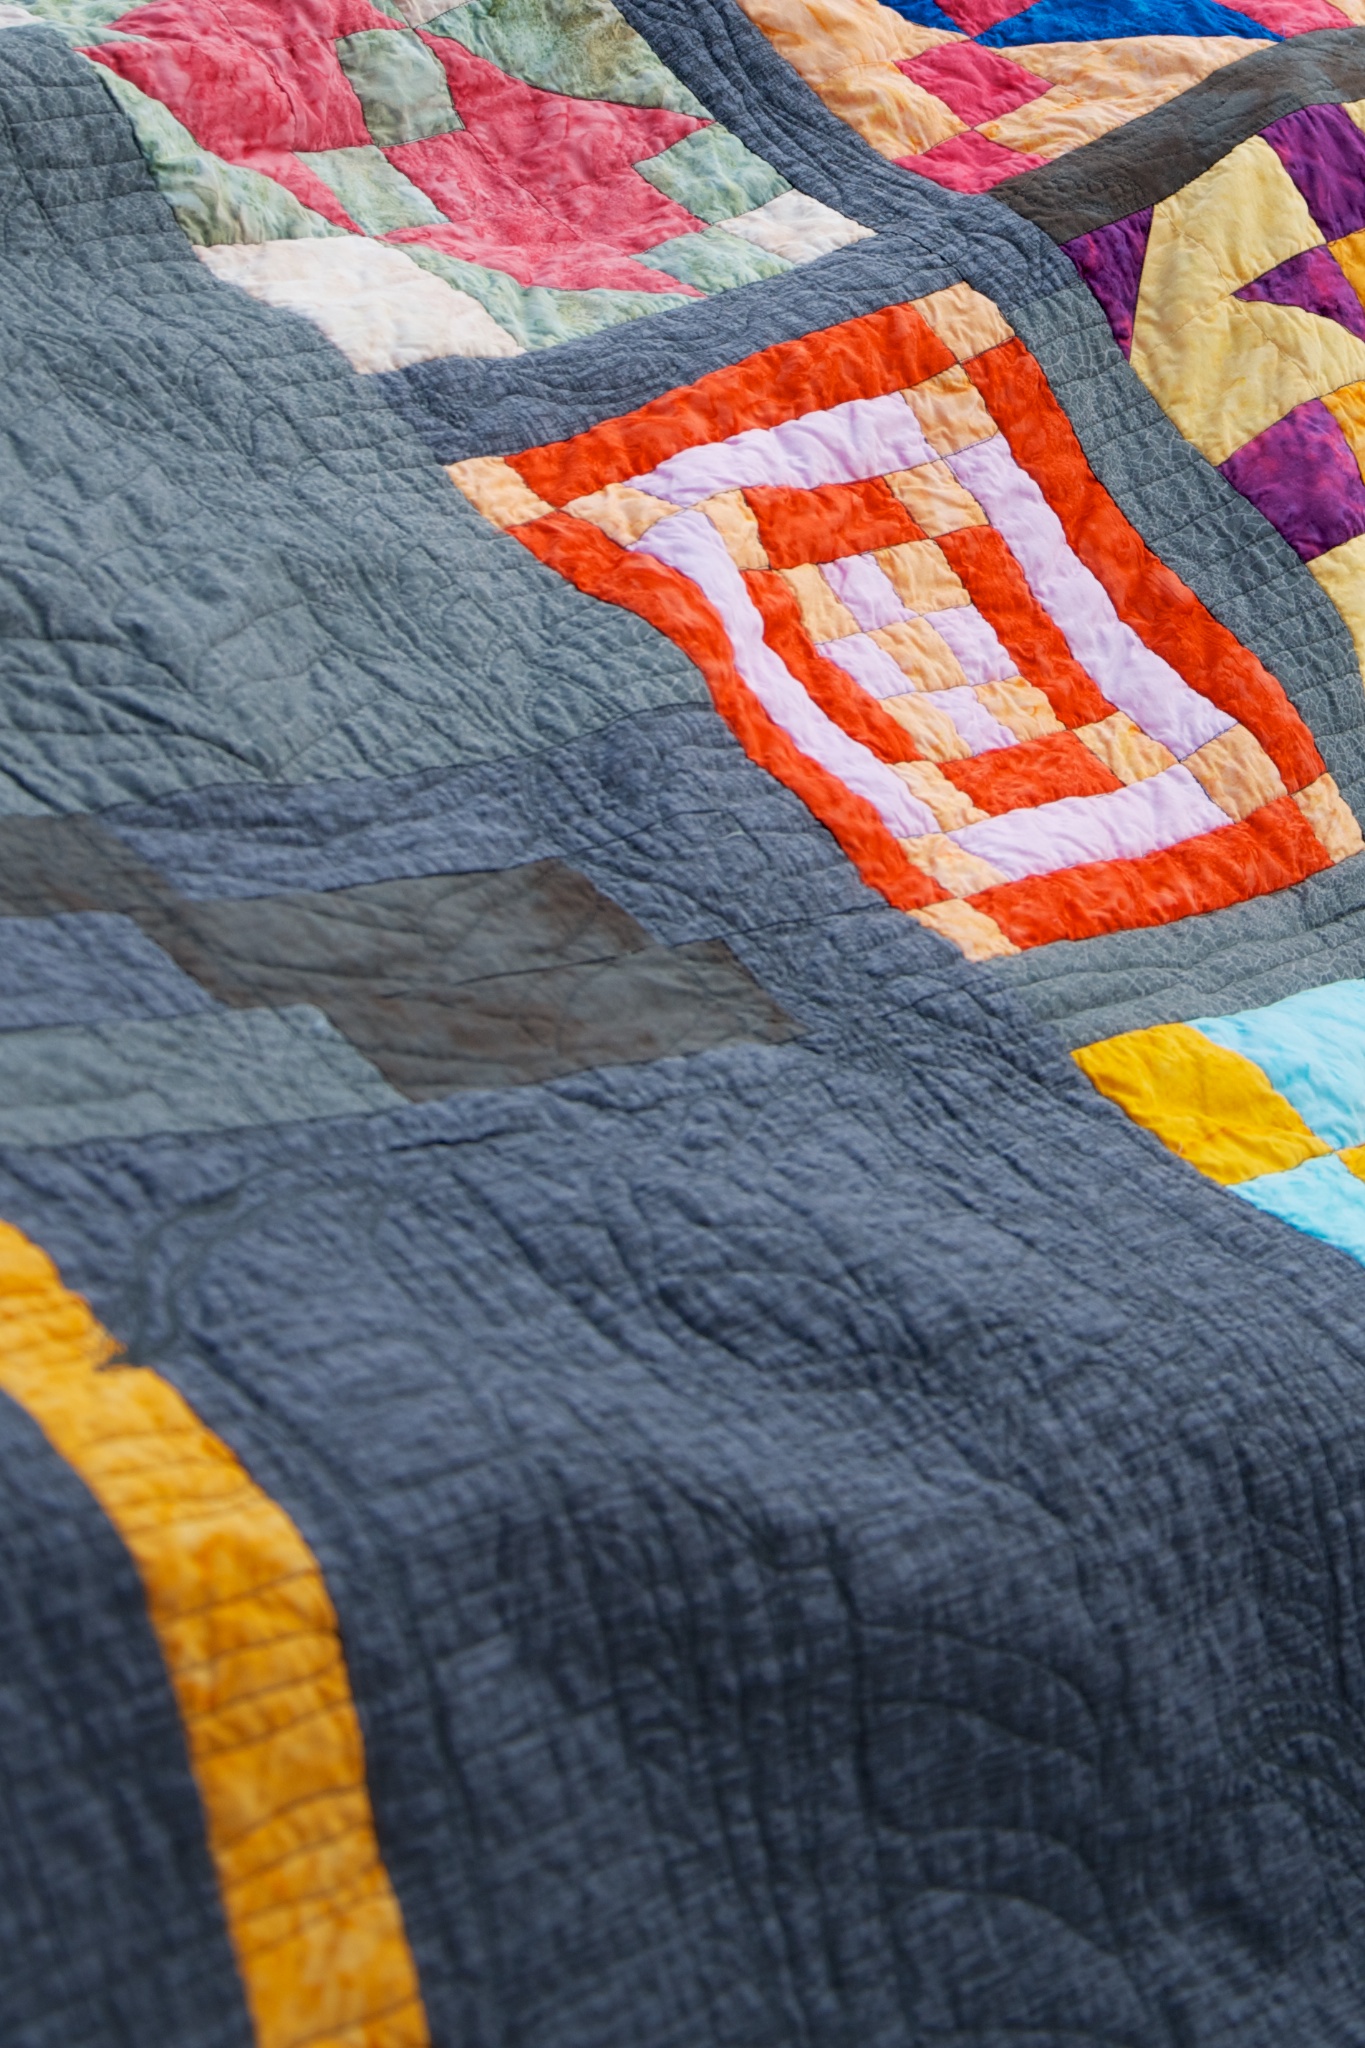
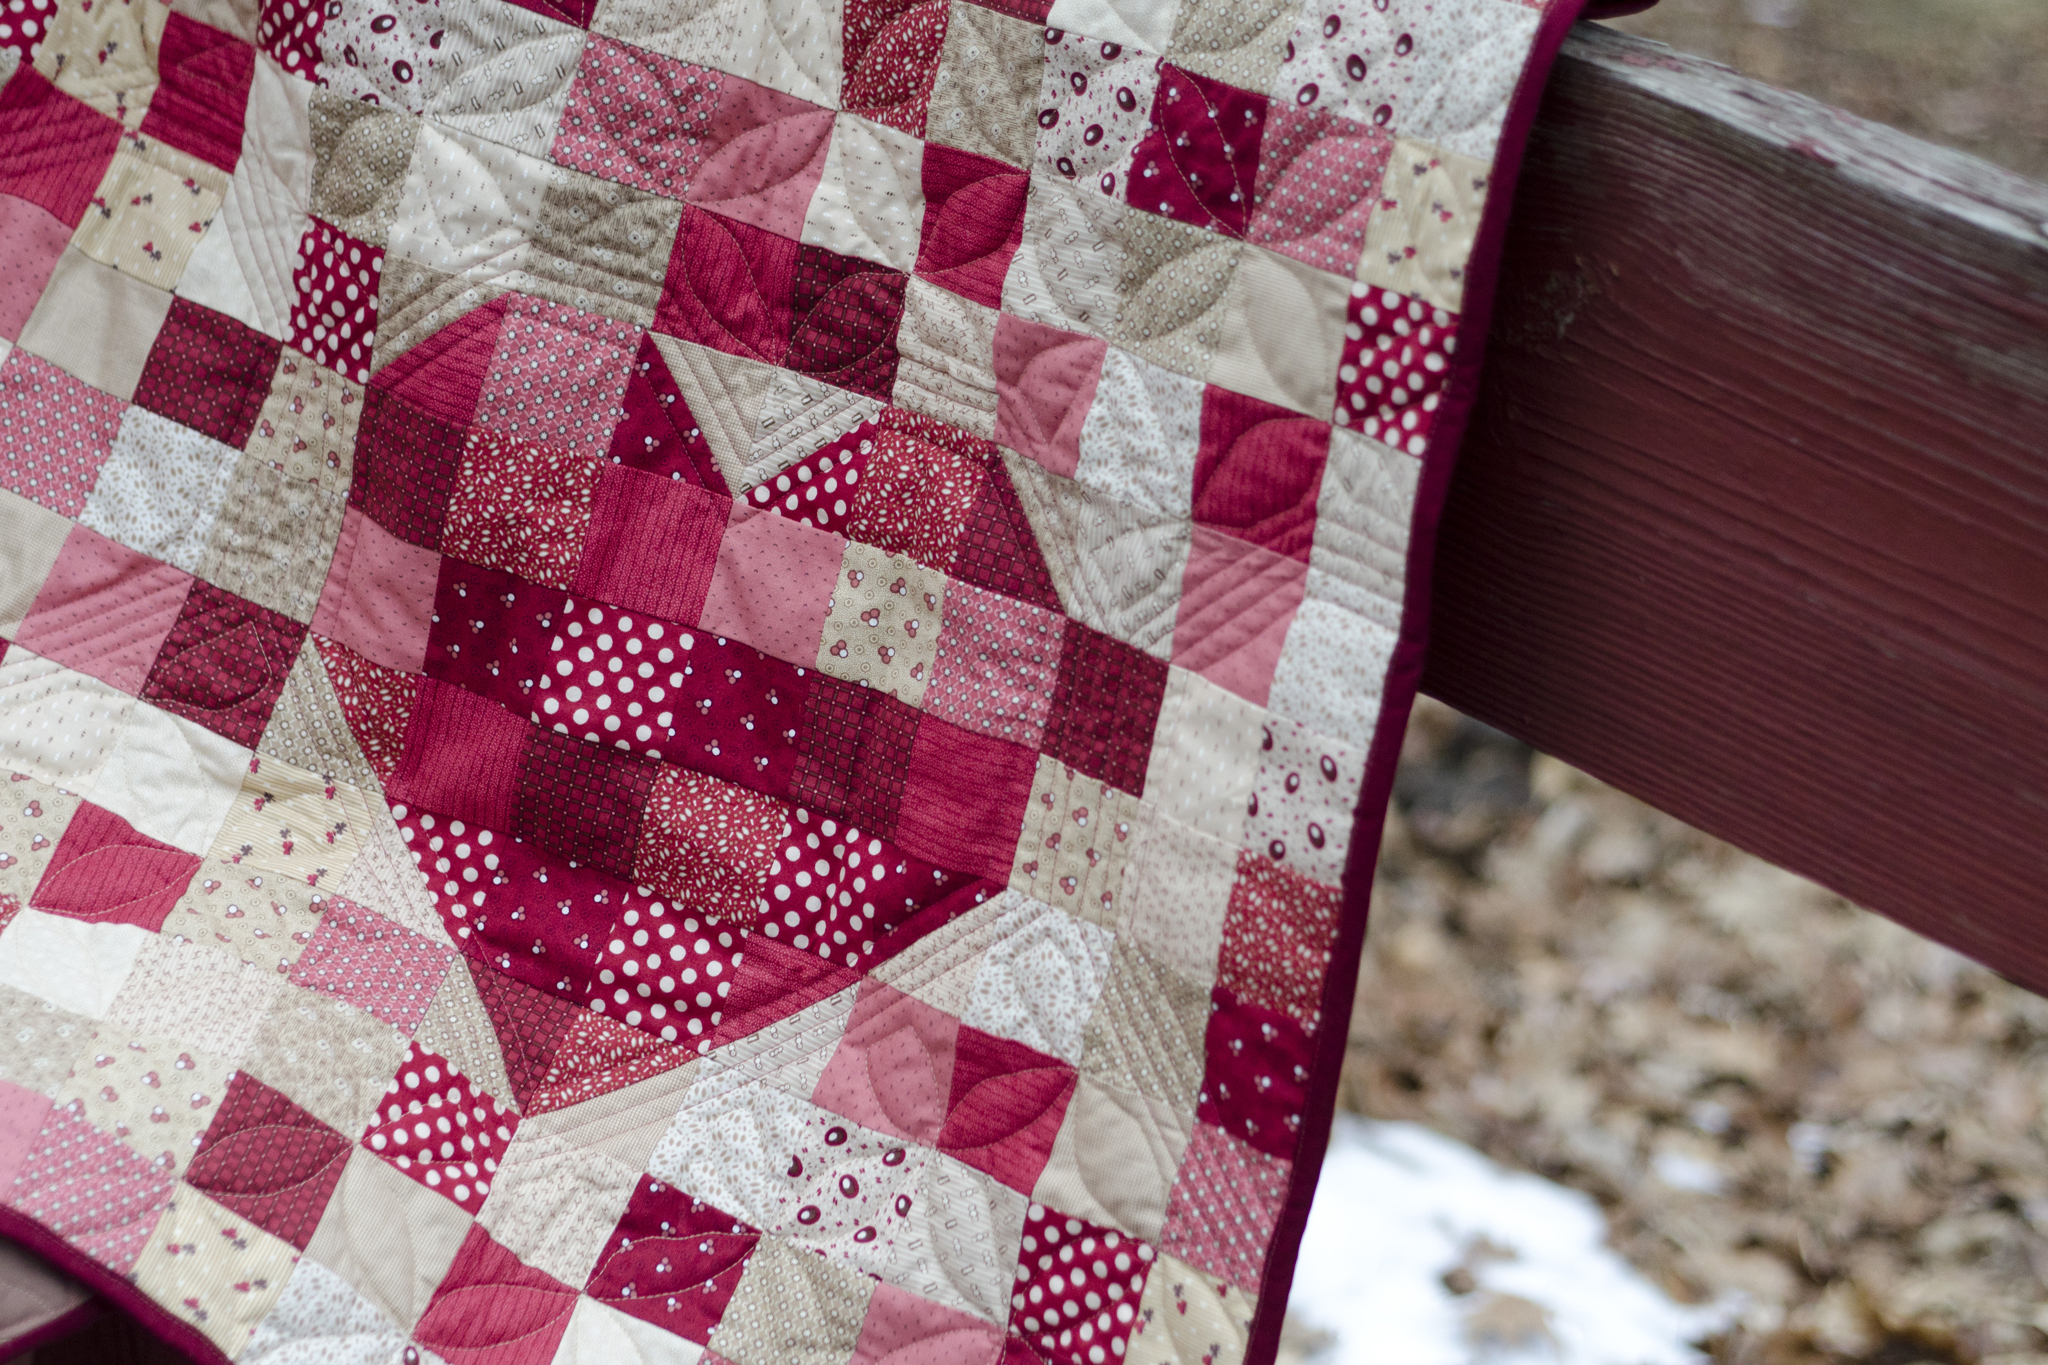
I planned out this nine-patch with a twist, cut all the fabric out, sewed the heart section, and even created all the strip piece components for the blocks, then packed it away. The remaining construction comprised sewing lots of three-patch strips together into nine-patch blocks, then the row and column piecing.

"Miniatures Heart" (detail), Rachael Arnold, February 2016, 54"x72".
“Miniatures Heart” (detail), Rachael Arnold, February 2016, 54″x72″.

I finally finished the top during a self-designed mini retreat when I found myself spending a snowy vacation day in Utica (thanks to Shelly and Sew Wilde Quilt & Co for providing workspace for me and my machine that day!).

"Miniatures Heart" (detail), Rachael Arnold, February 2016, 54"x72".
“Miniatures Heart” (detail), Rachael Arnold, February 2016, 54″x72″. Photo by Carl Pfranger.

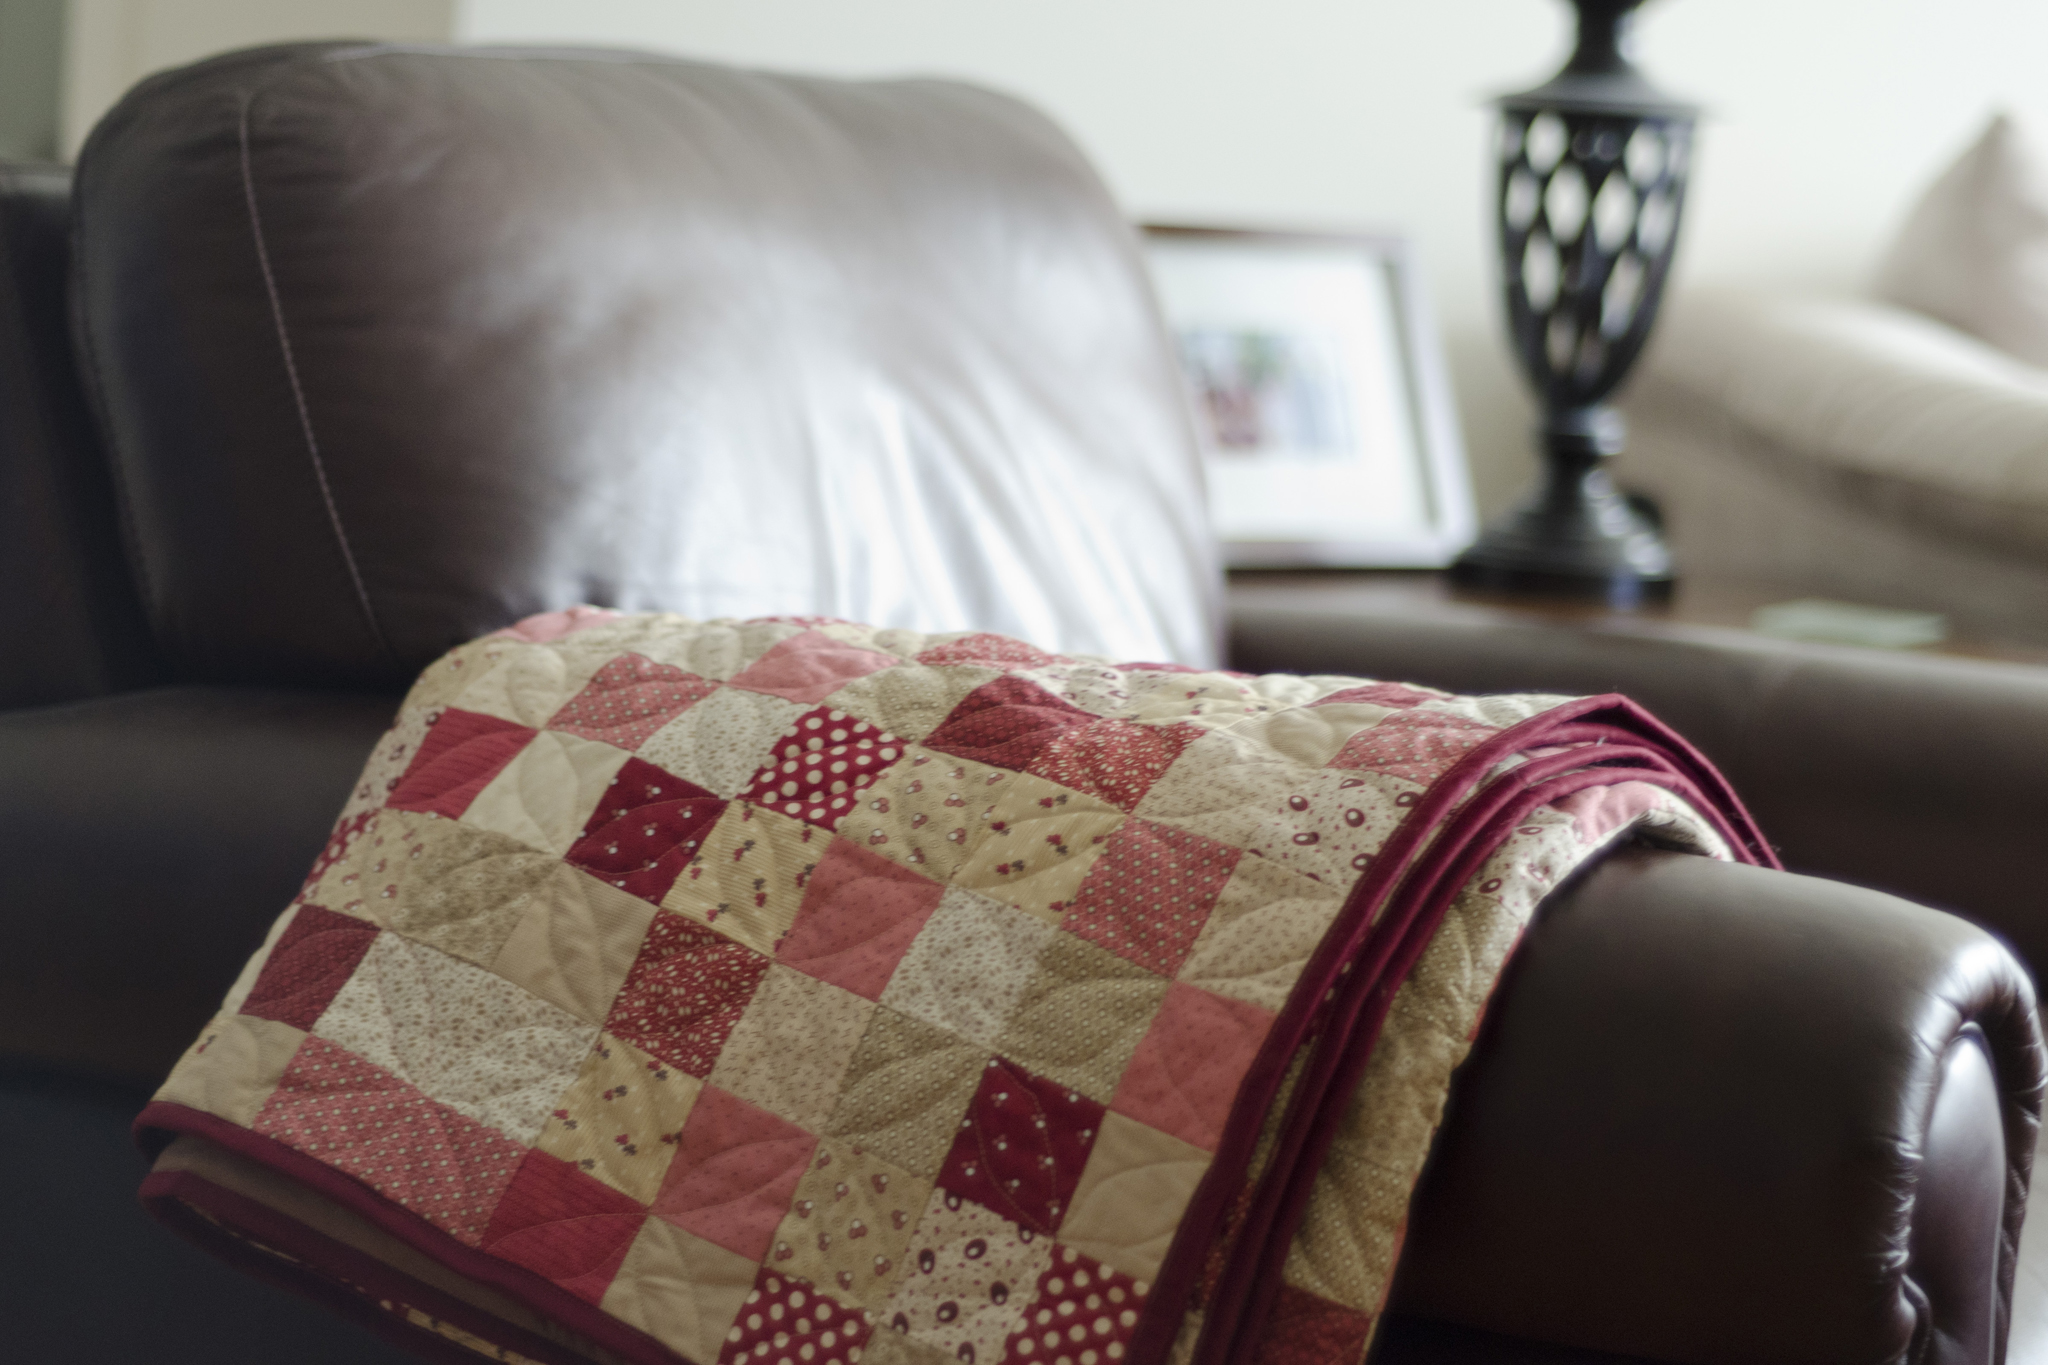
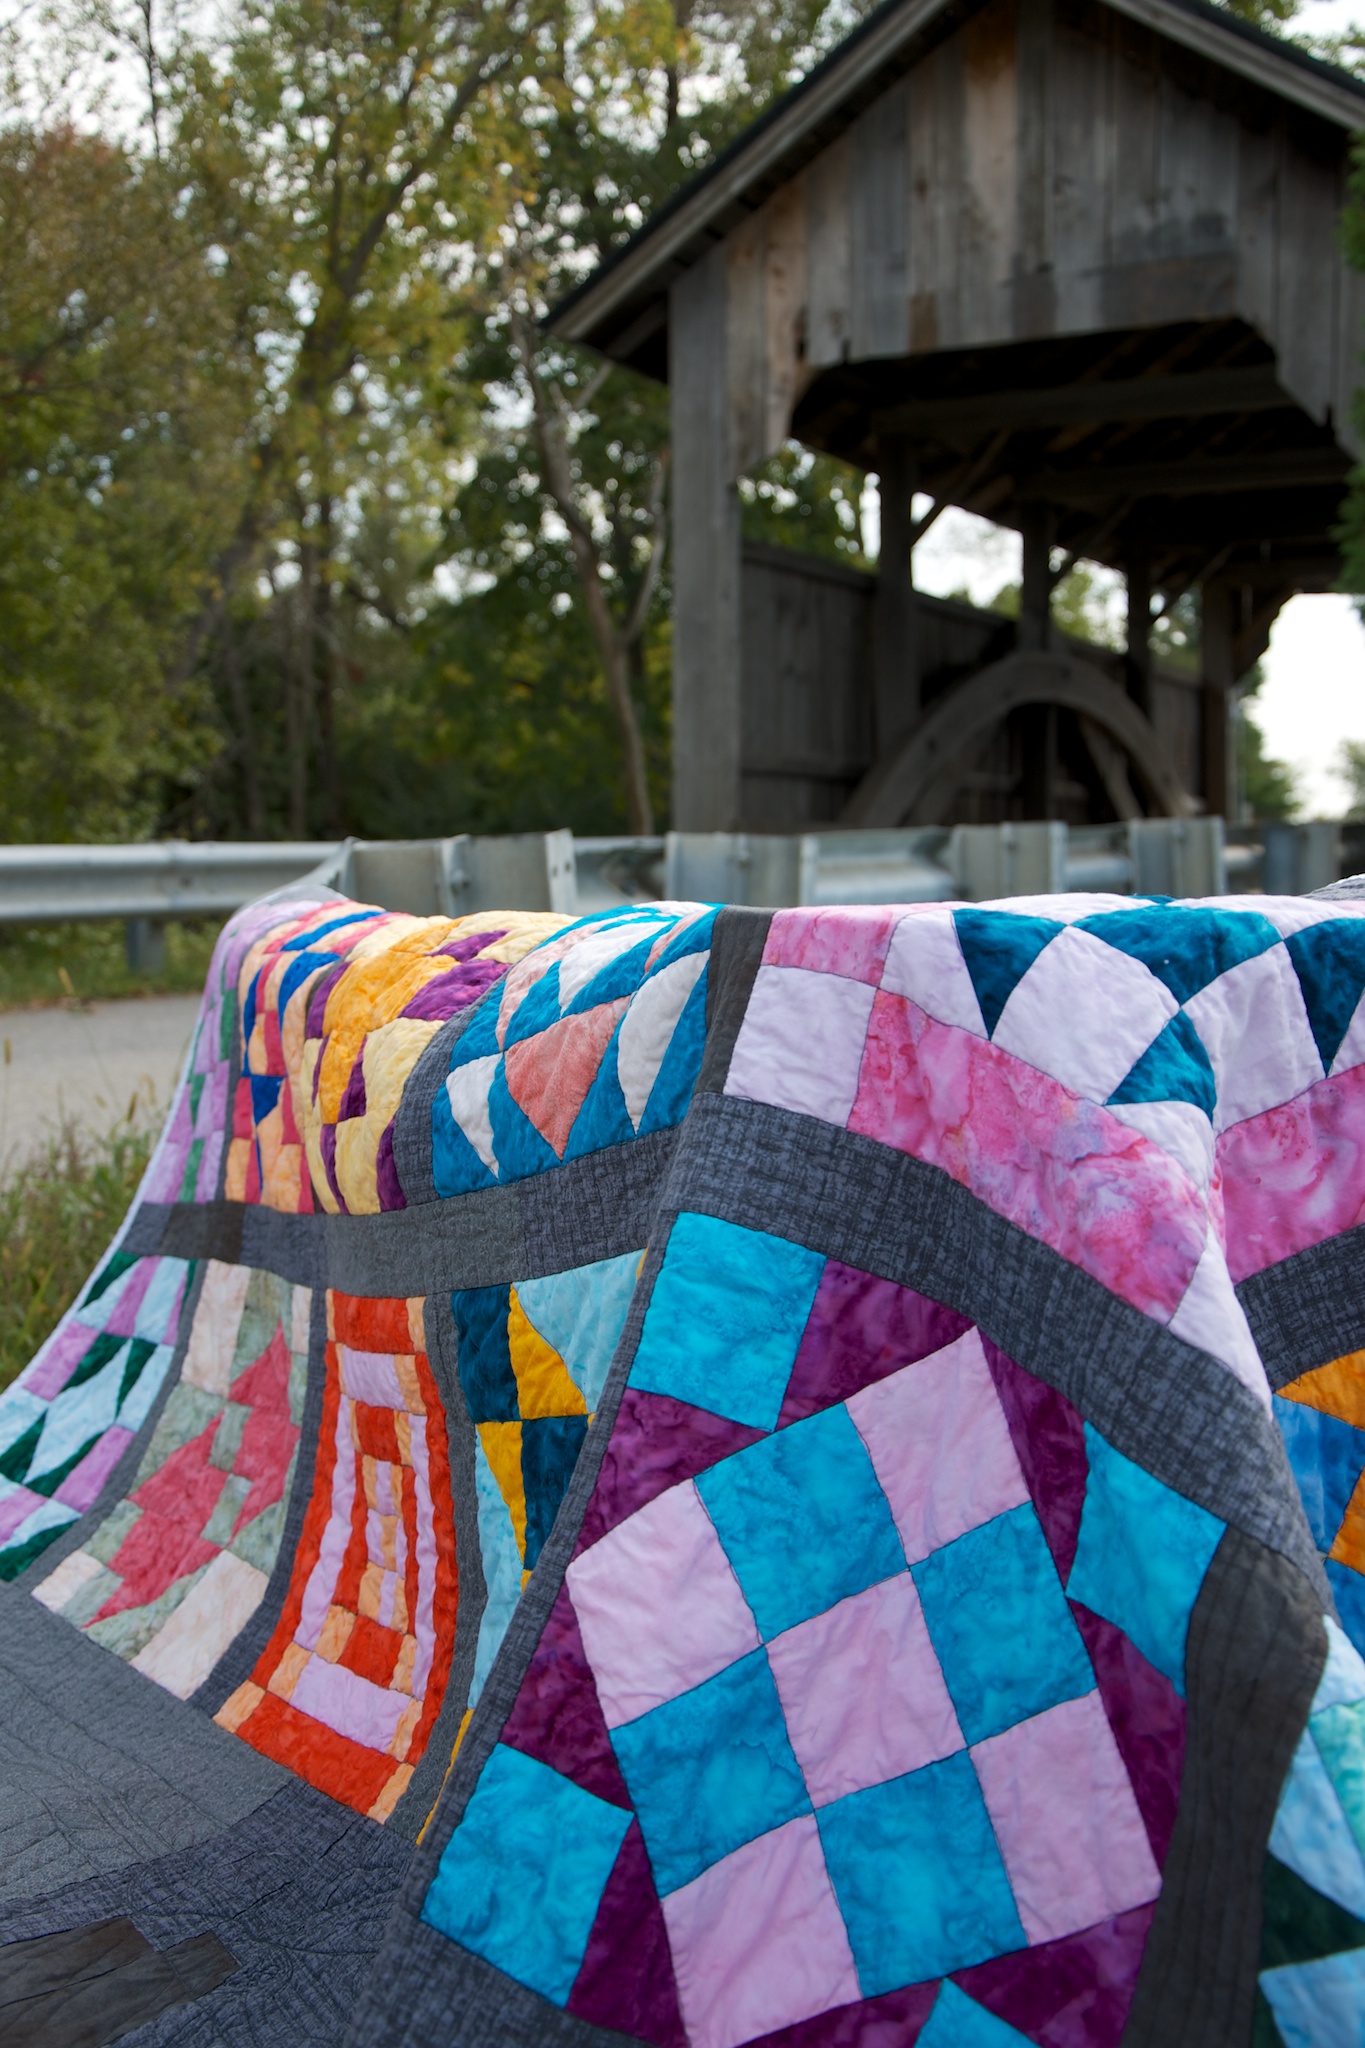
I don’t recall why I purchased the fabric or started this quilt (although I think the inner dialogue may have been “hey, buy, buy, fabric, sale, sale, Fat Quarter Shop, buy, buy buy”). I do vaguely remember wanting to quilt it ambitiously for one of my first few quilts, but can’t pinpoint exactly how. The end is a rather scrappy quilt with very little thought into where each block would go apart from the pieced heart, and quilting that is far beyond anything I’d previously attempted when I cut the first pieces.

"Miniatures Heart" (back), Rachael Arnold, February 2016, 54"x72".
“Miniatures Heart” (back), Rachael Arnold, February 2016, 54″x72″. Photo by Carl Pfranger.

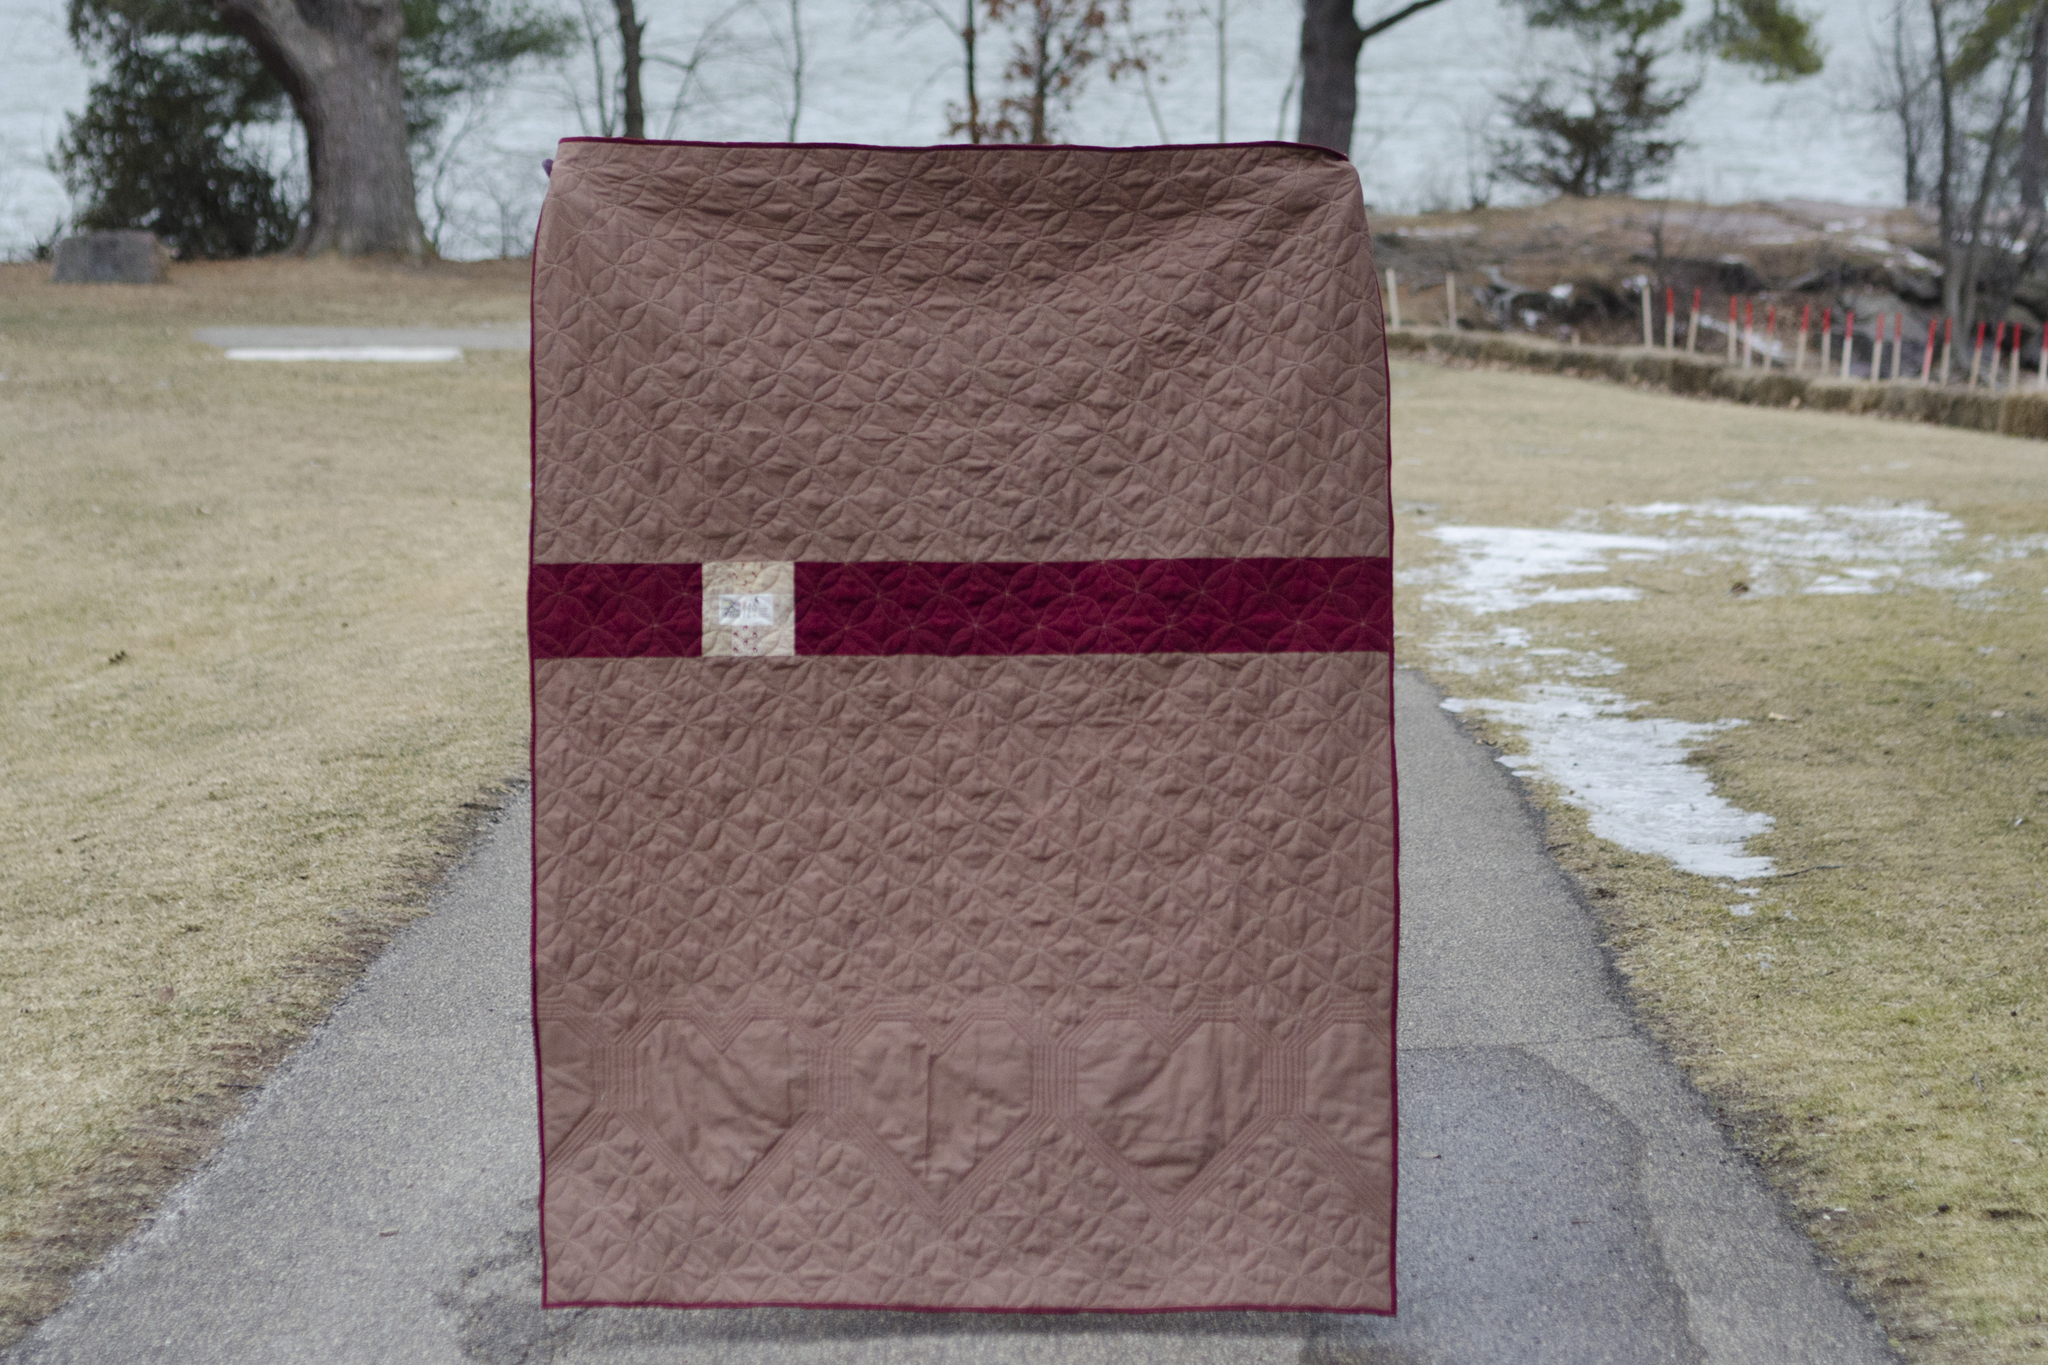
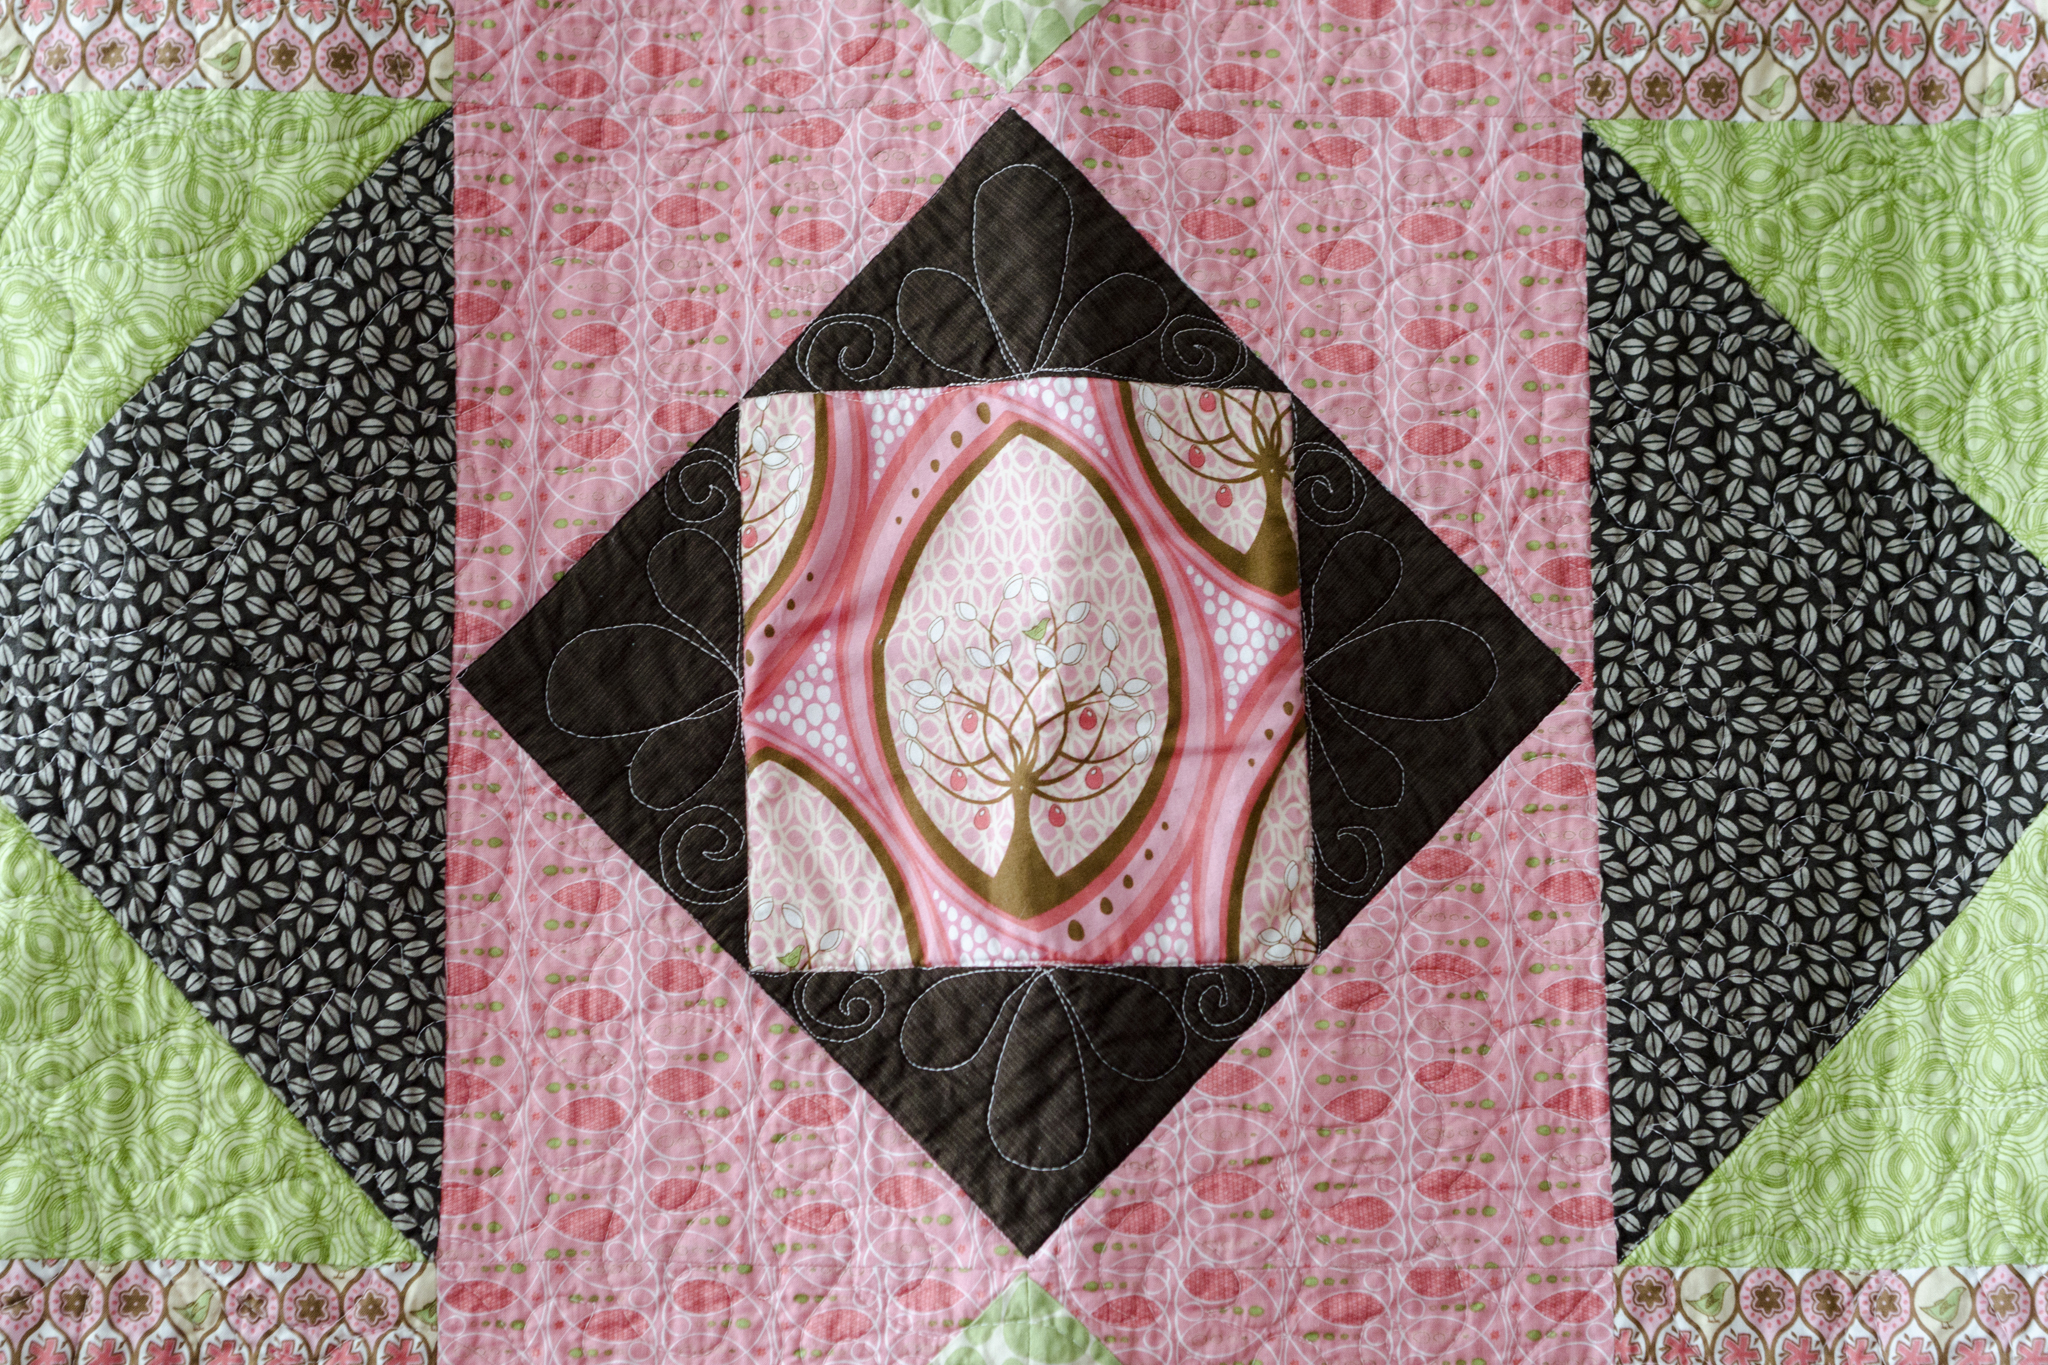
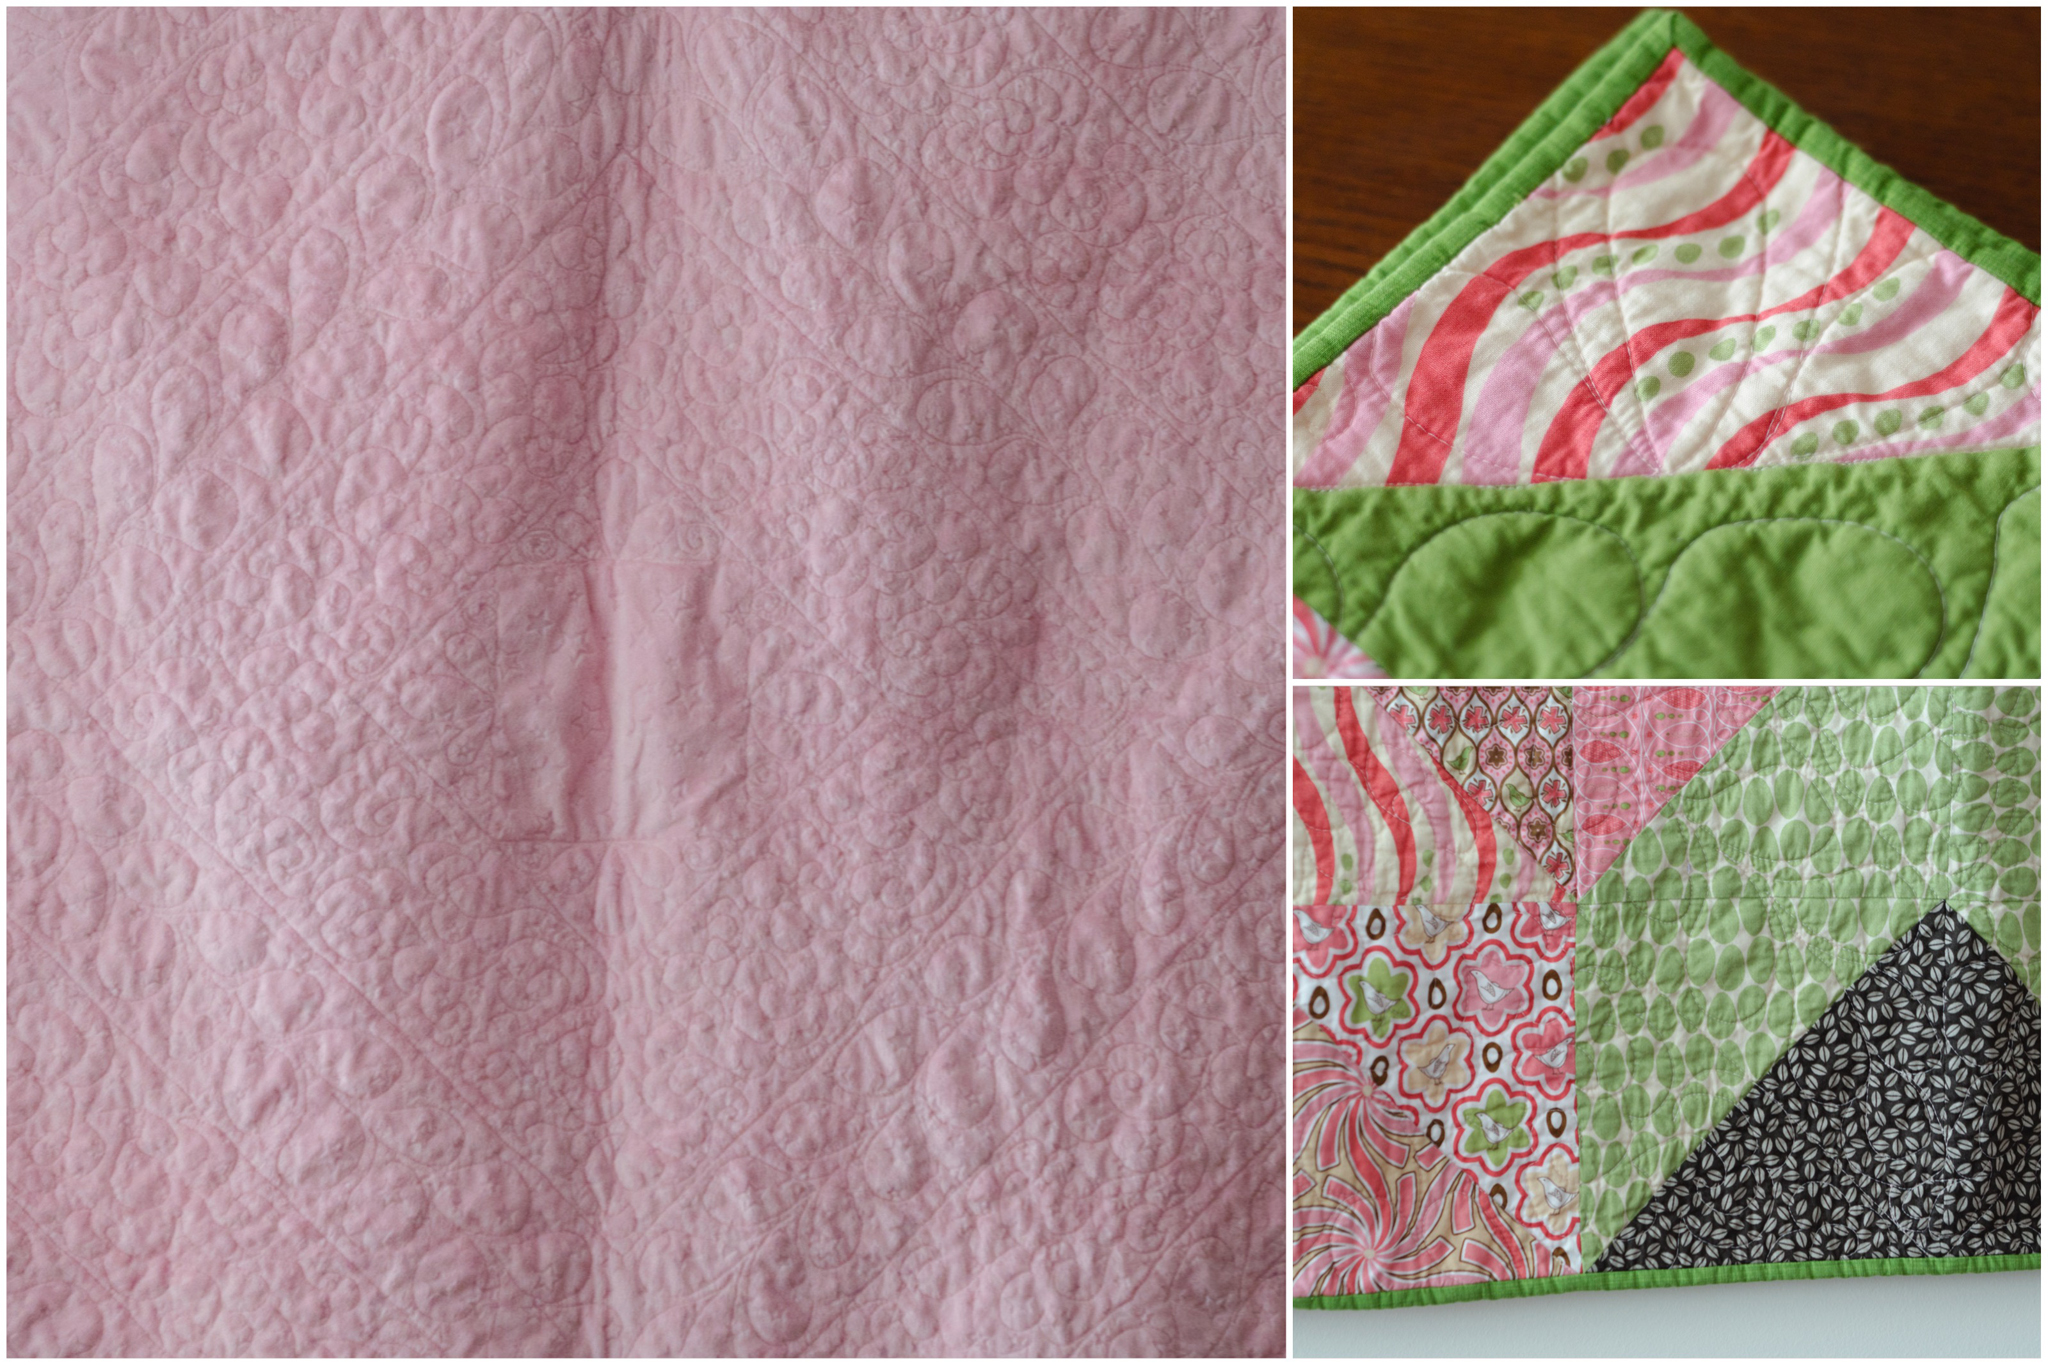
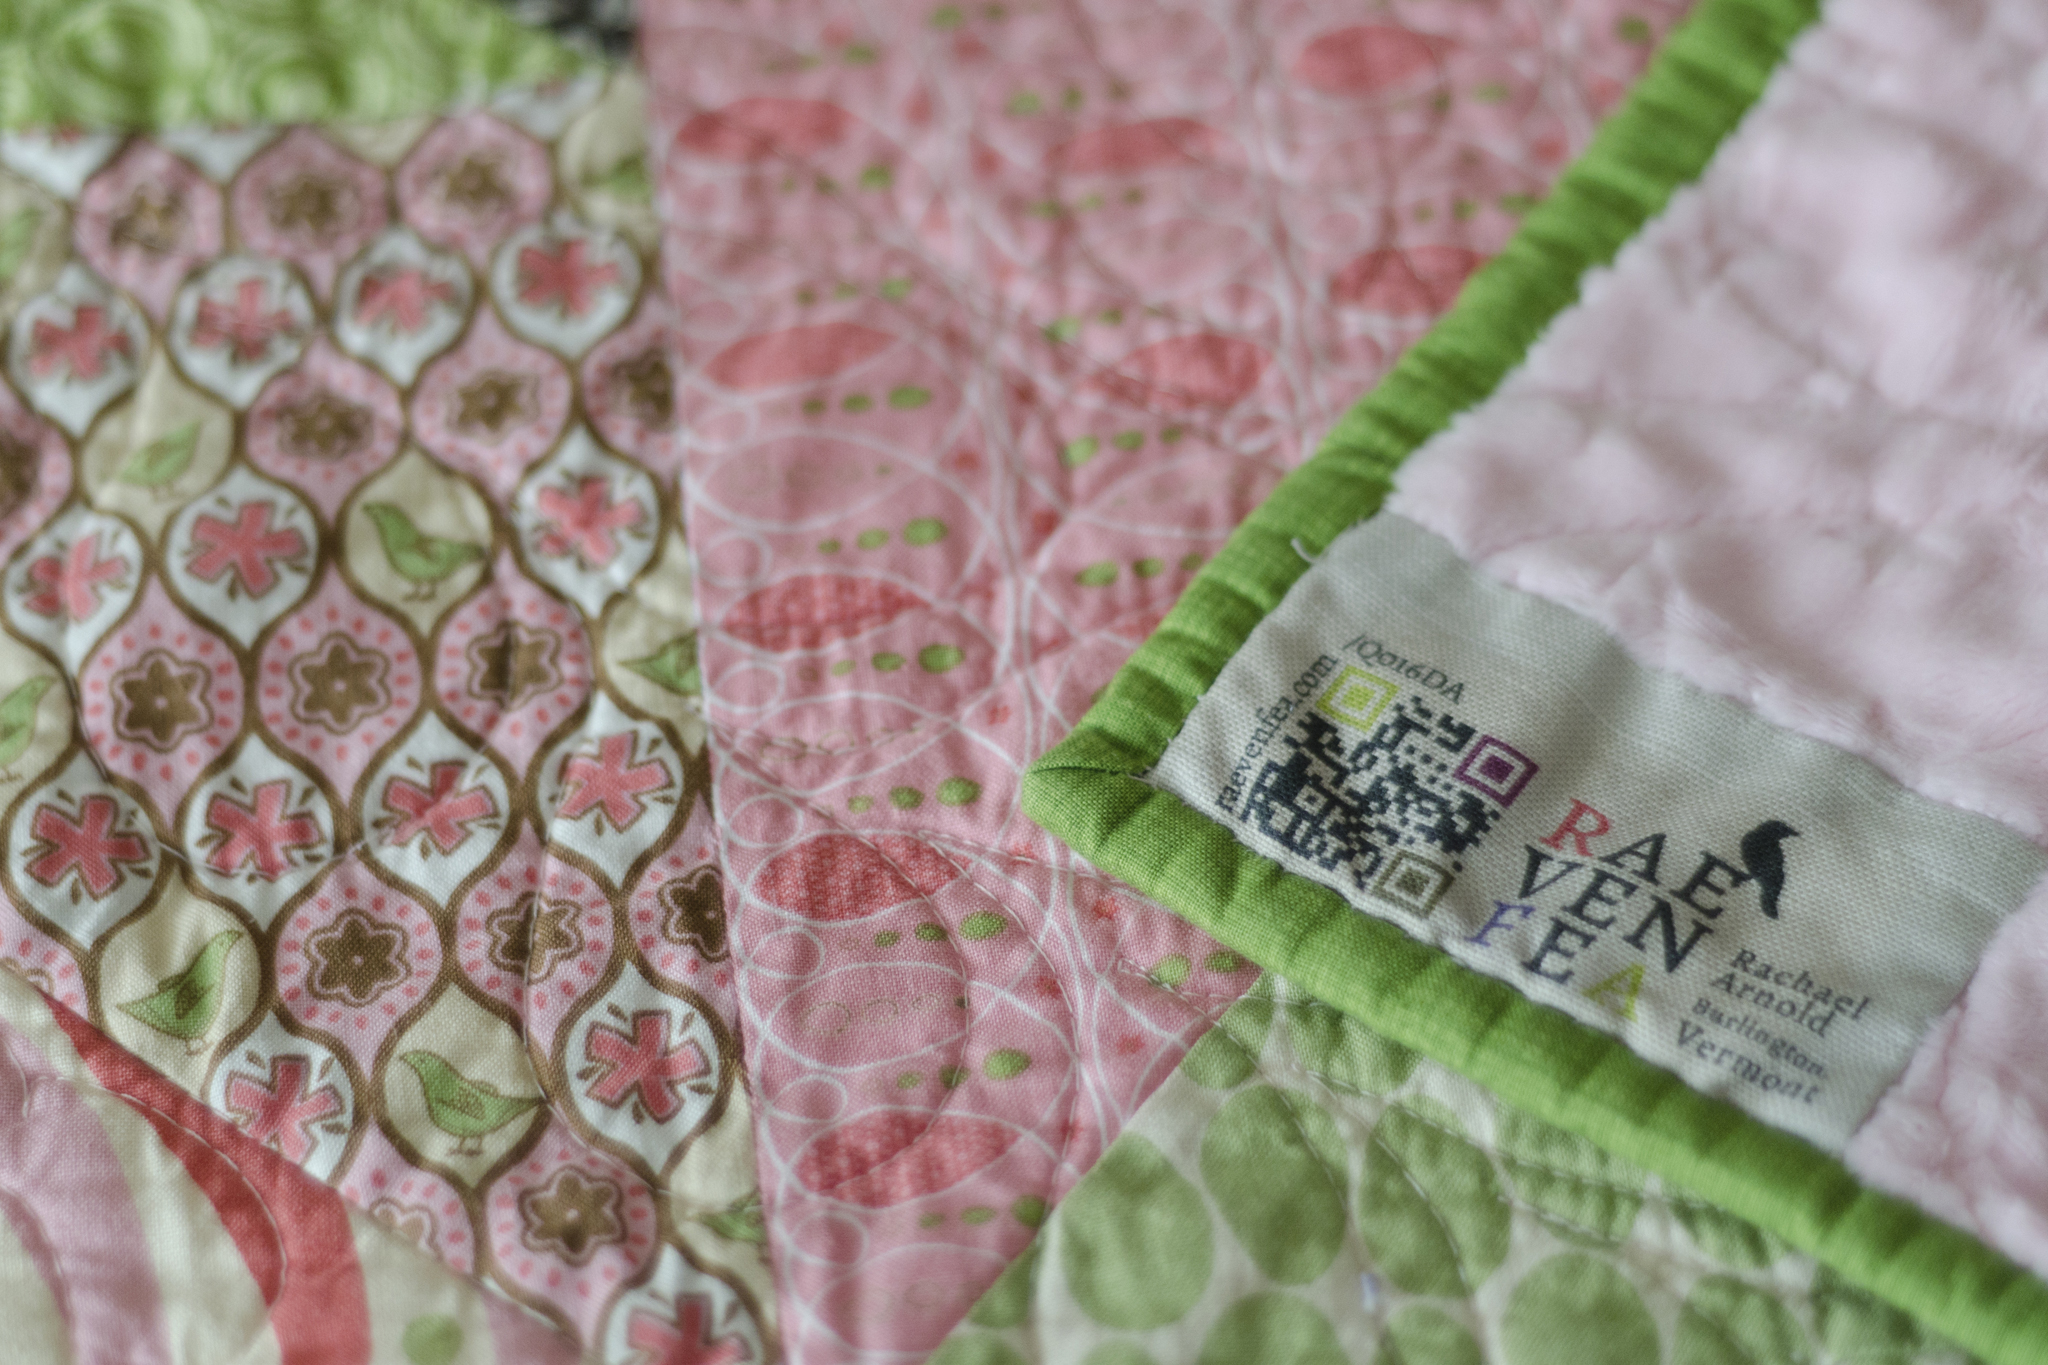
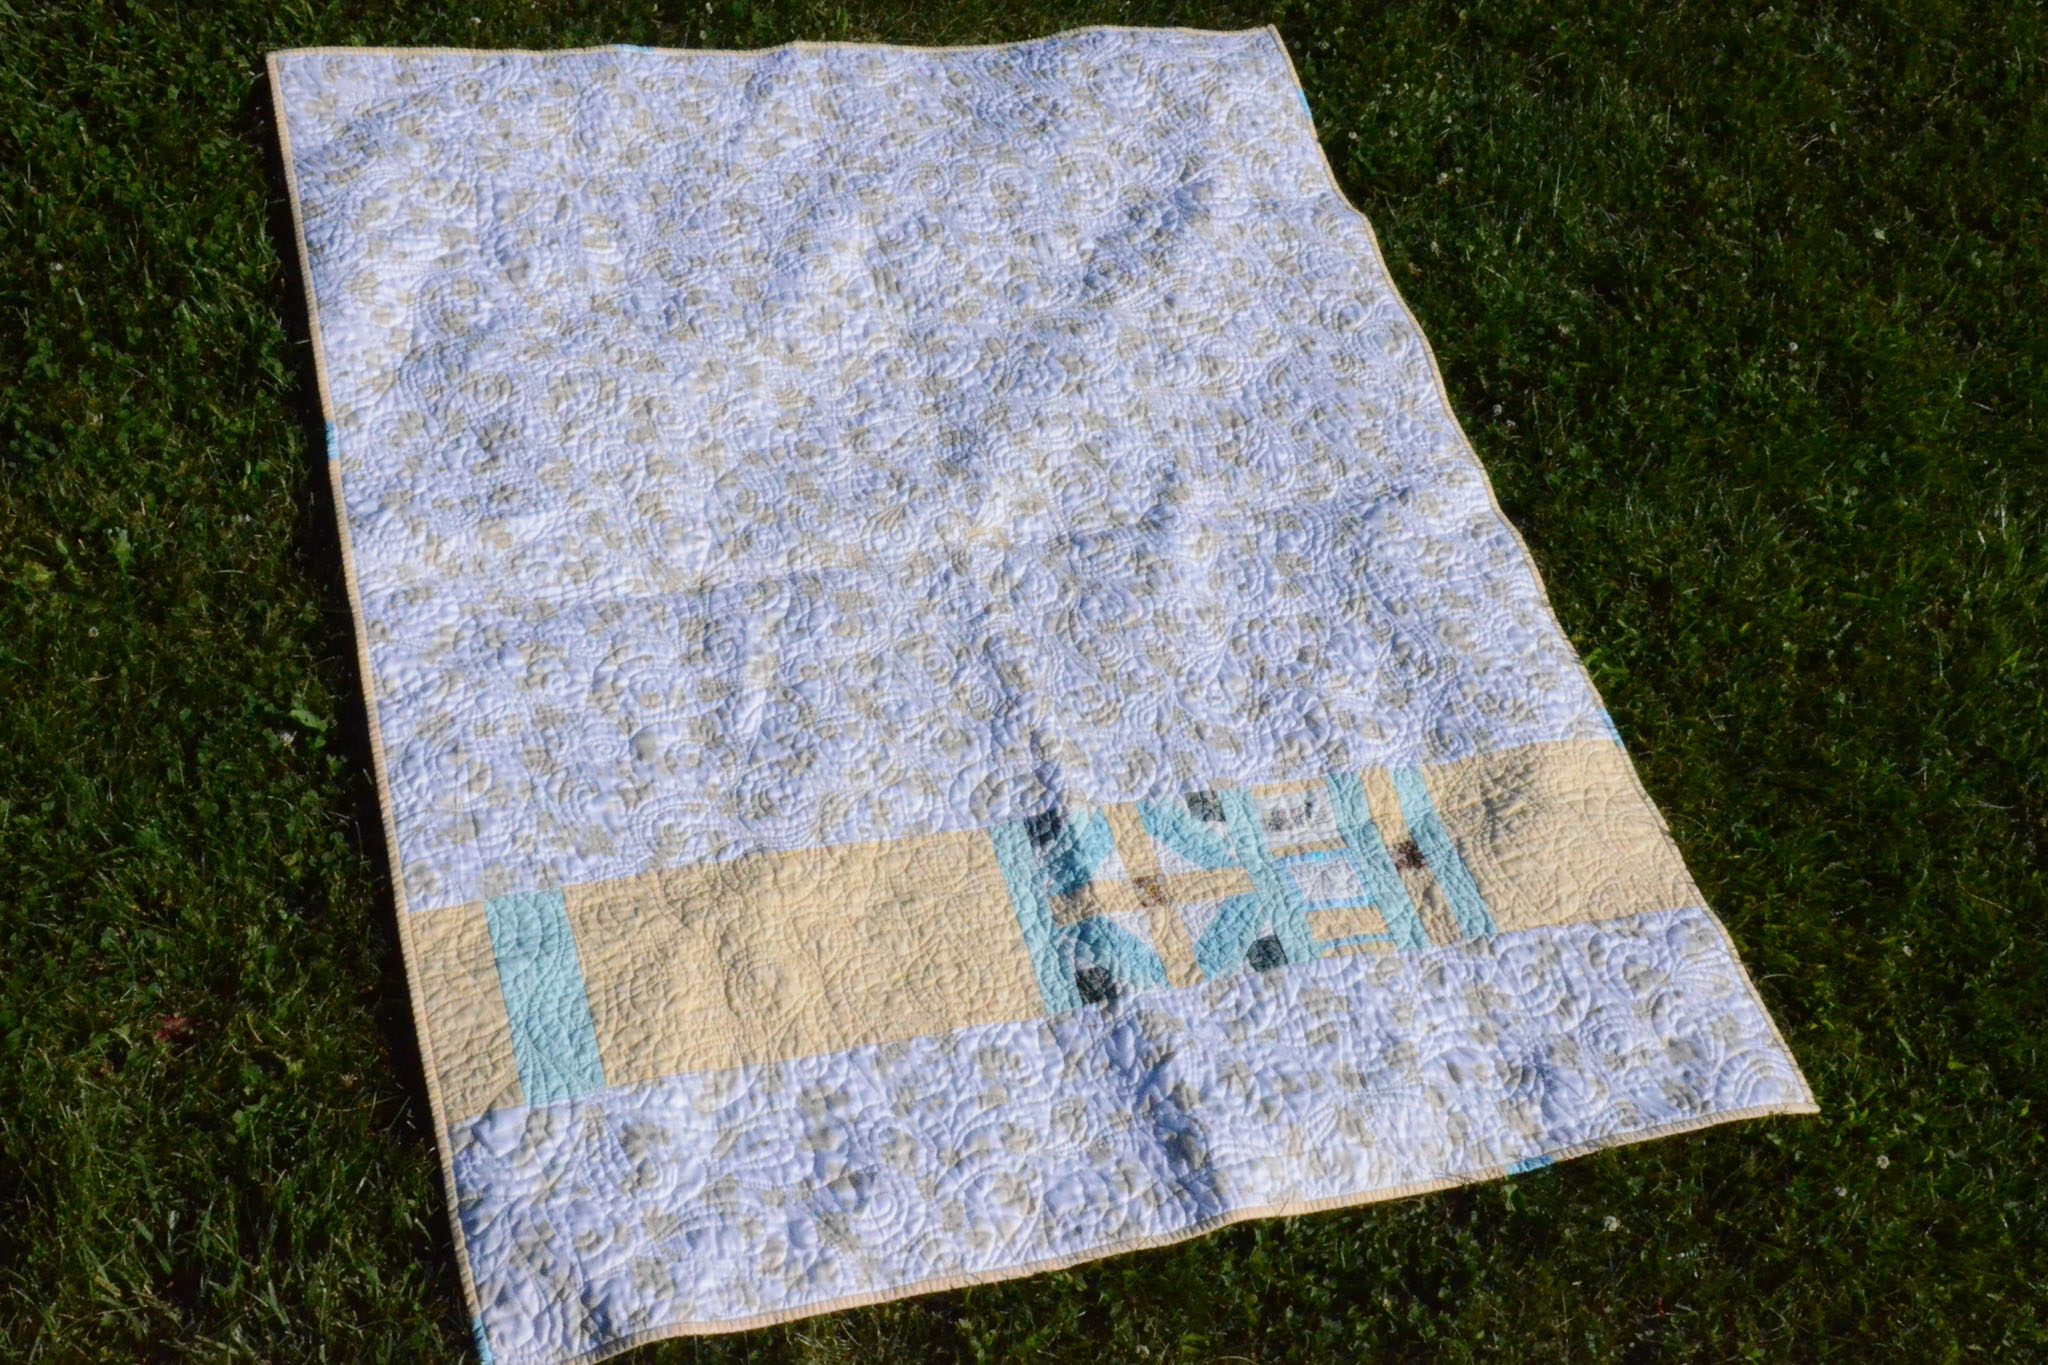
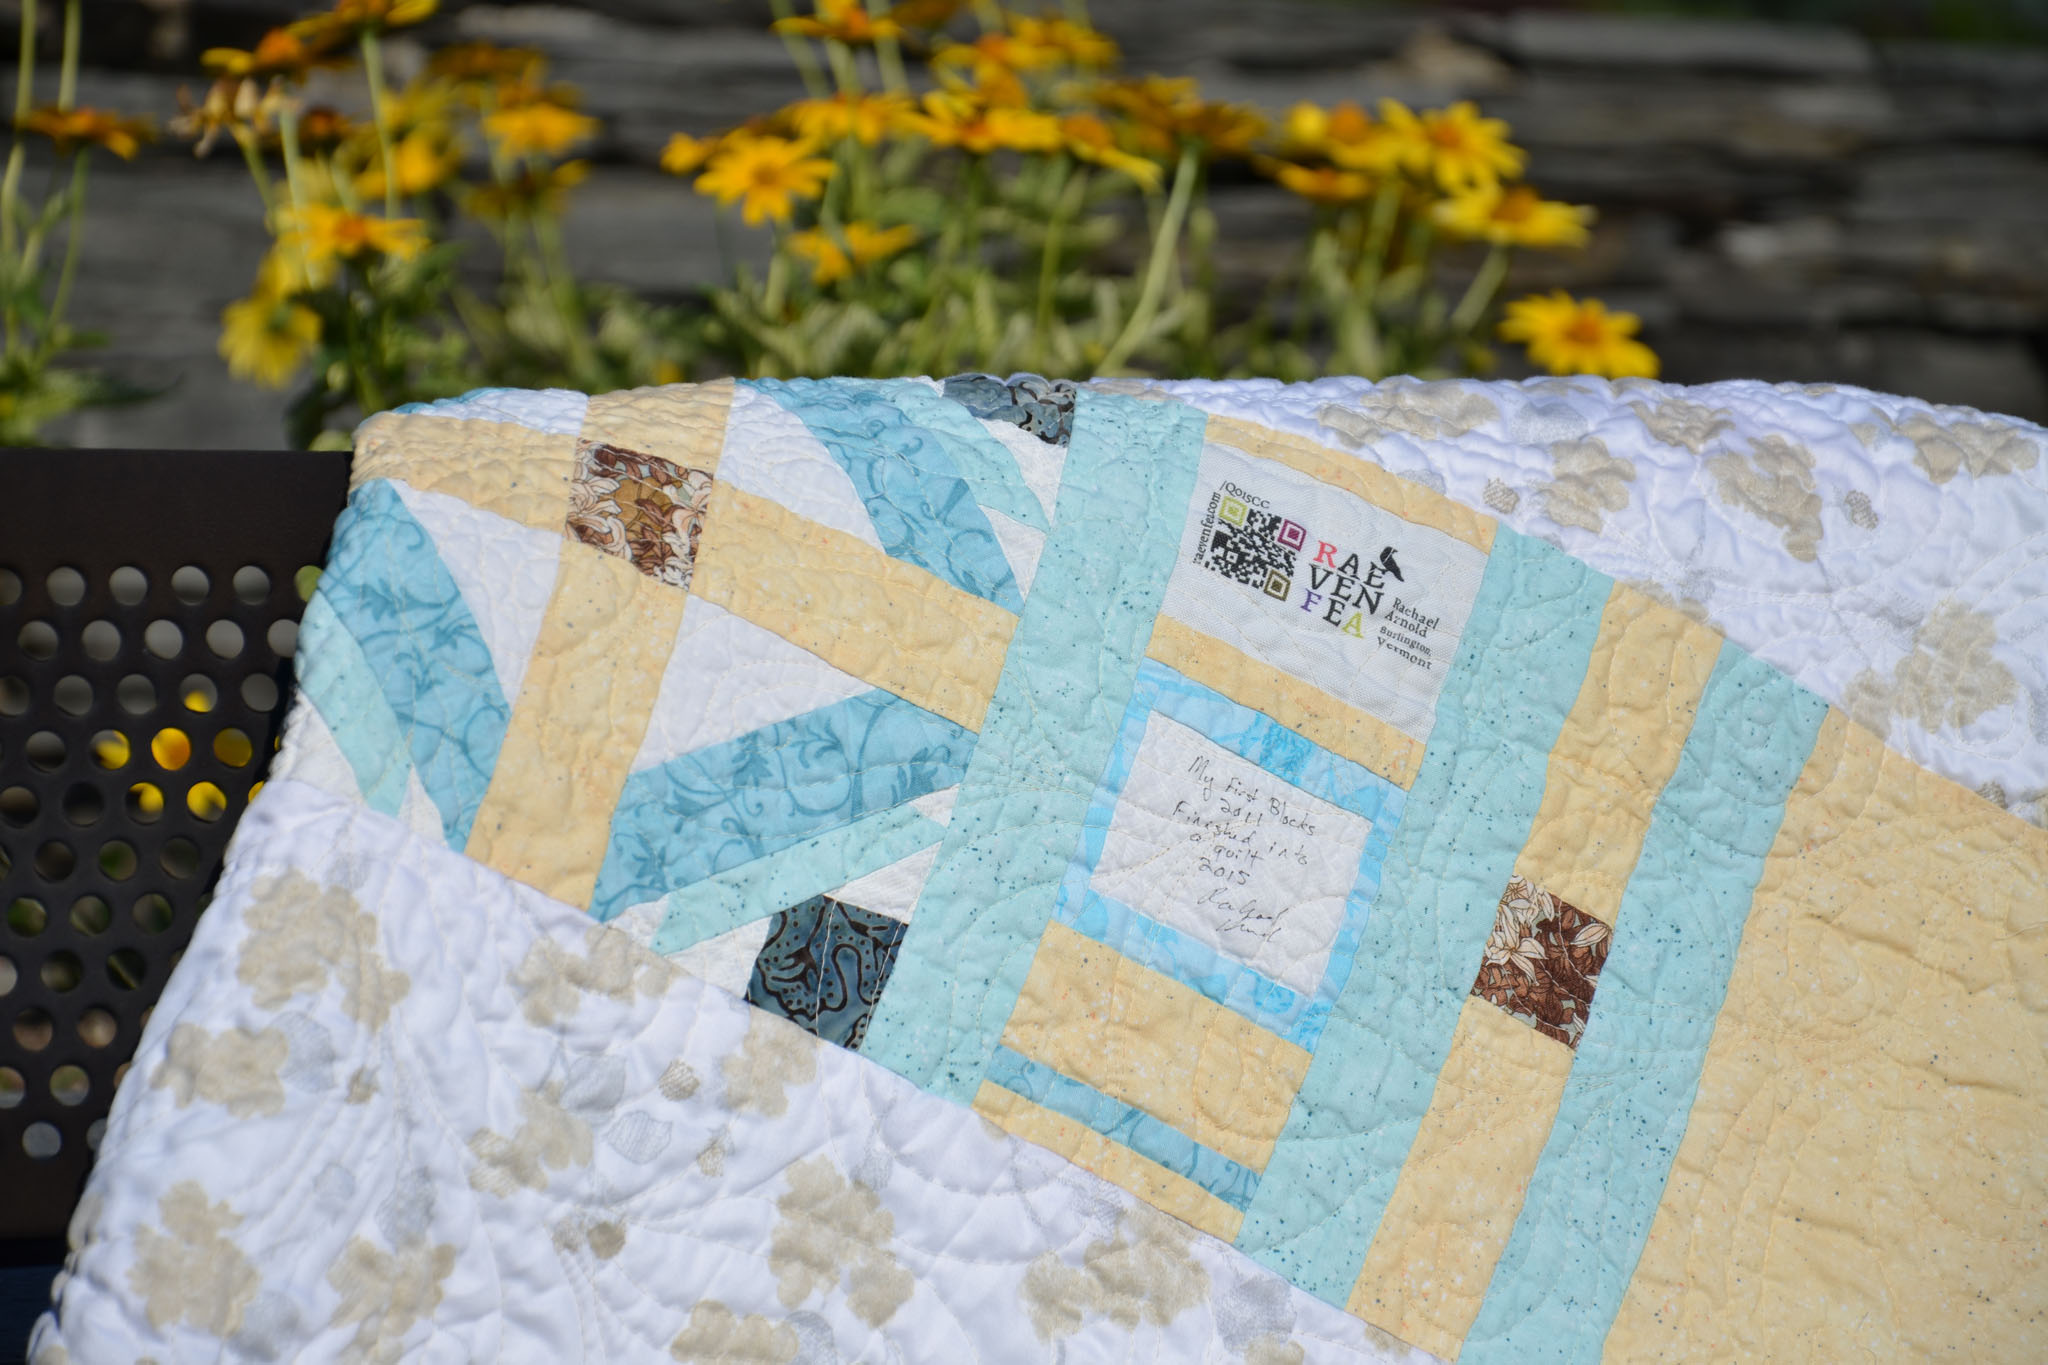
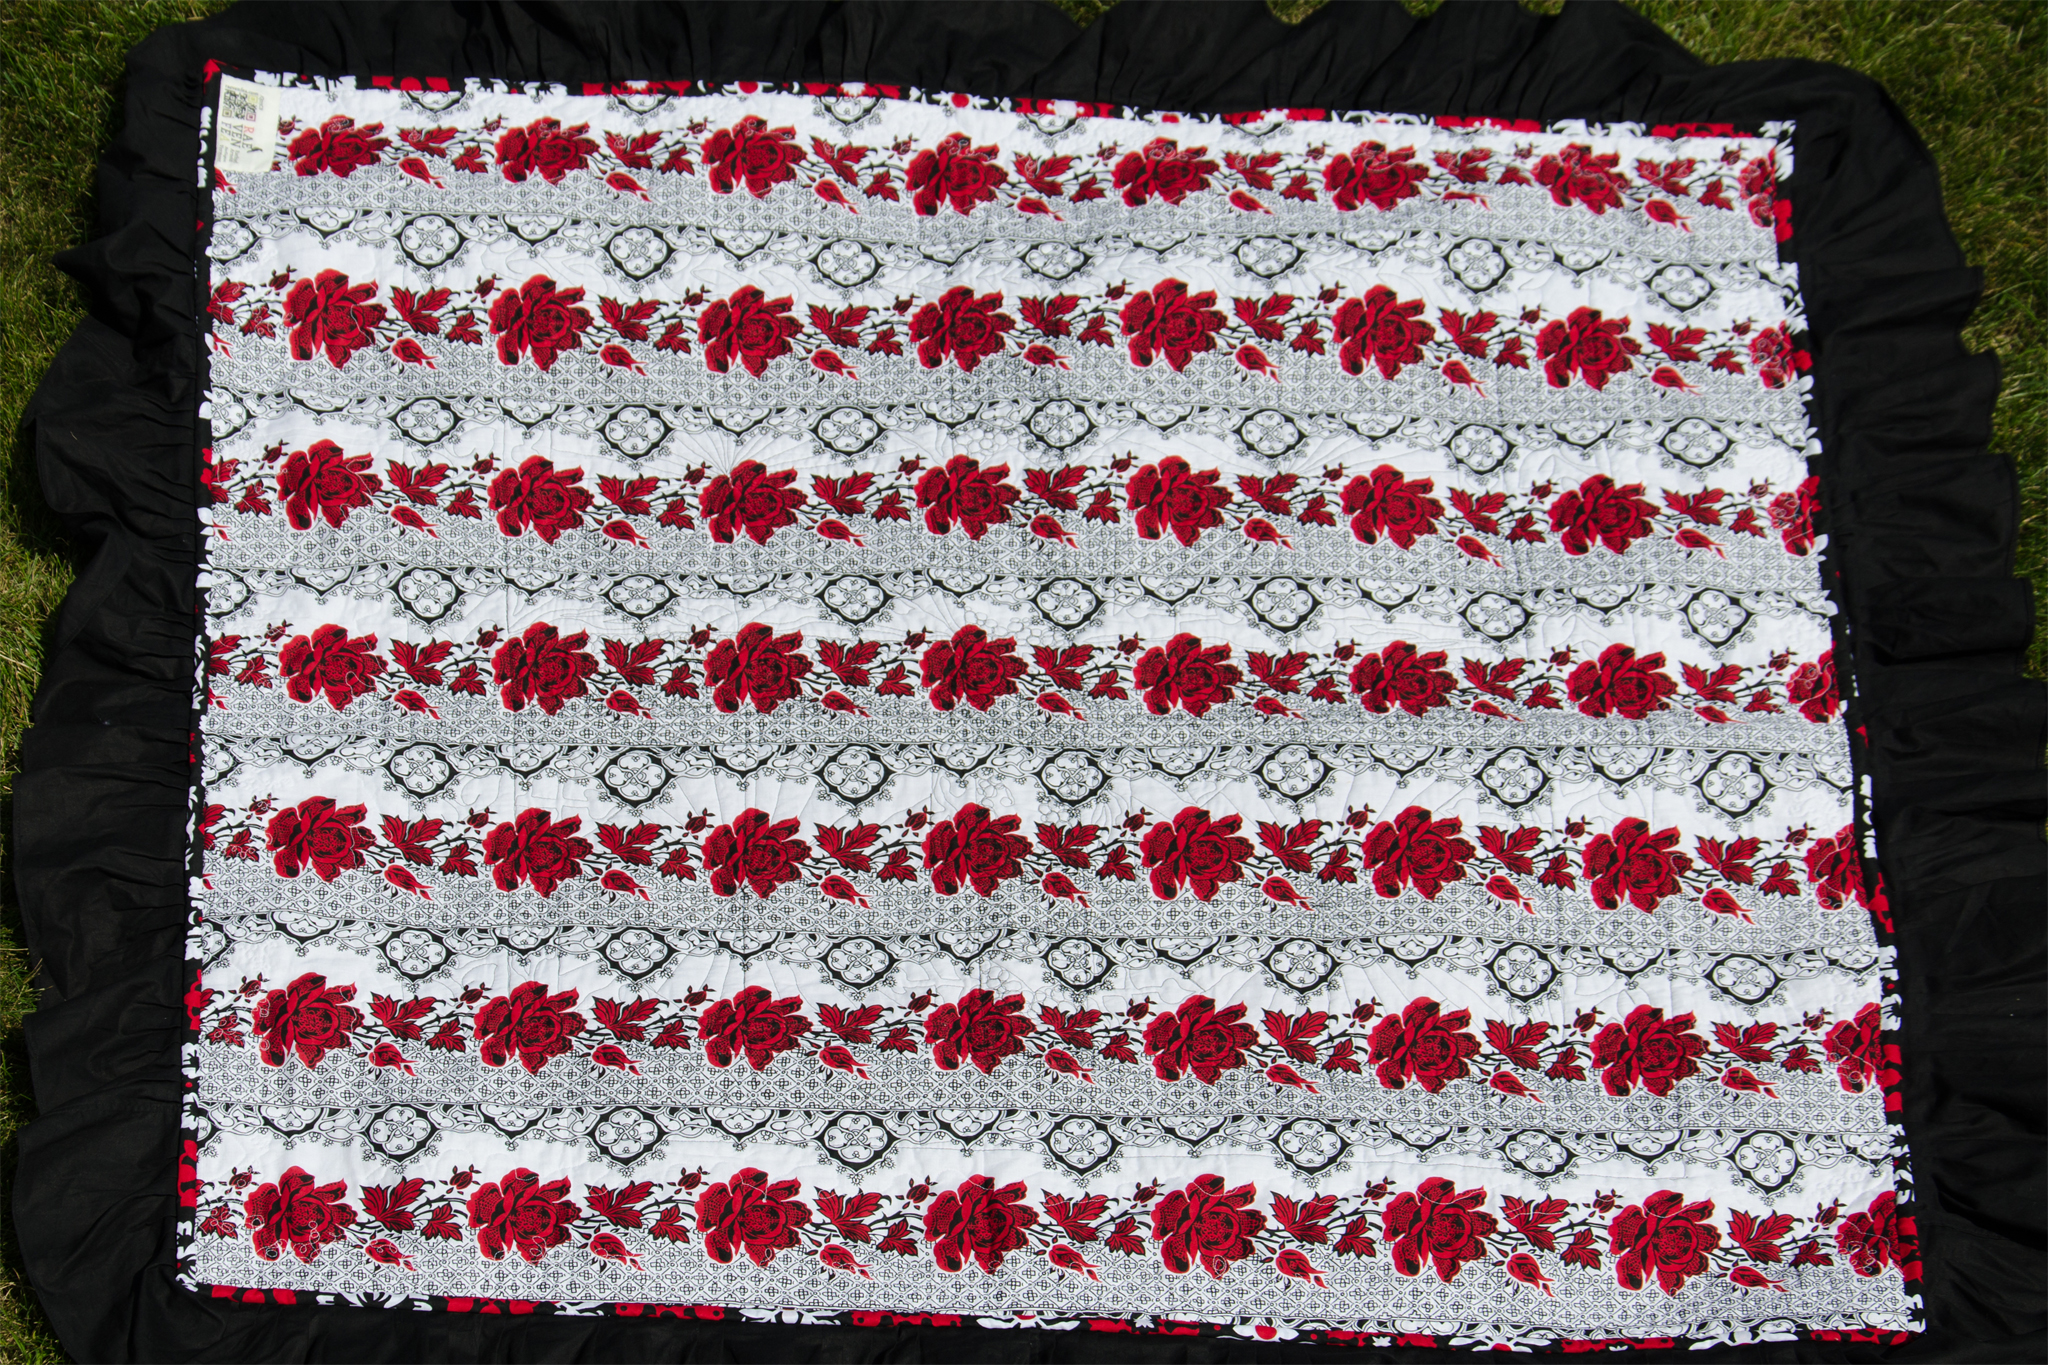
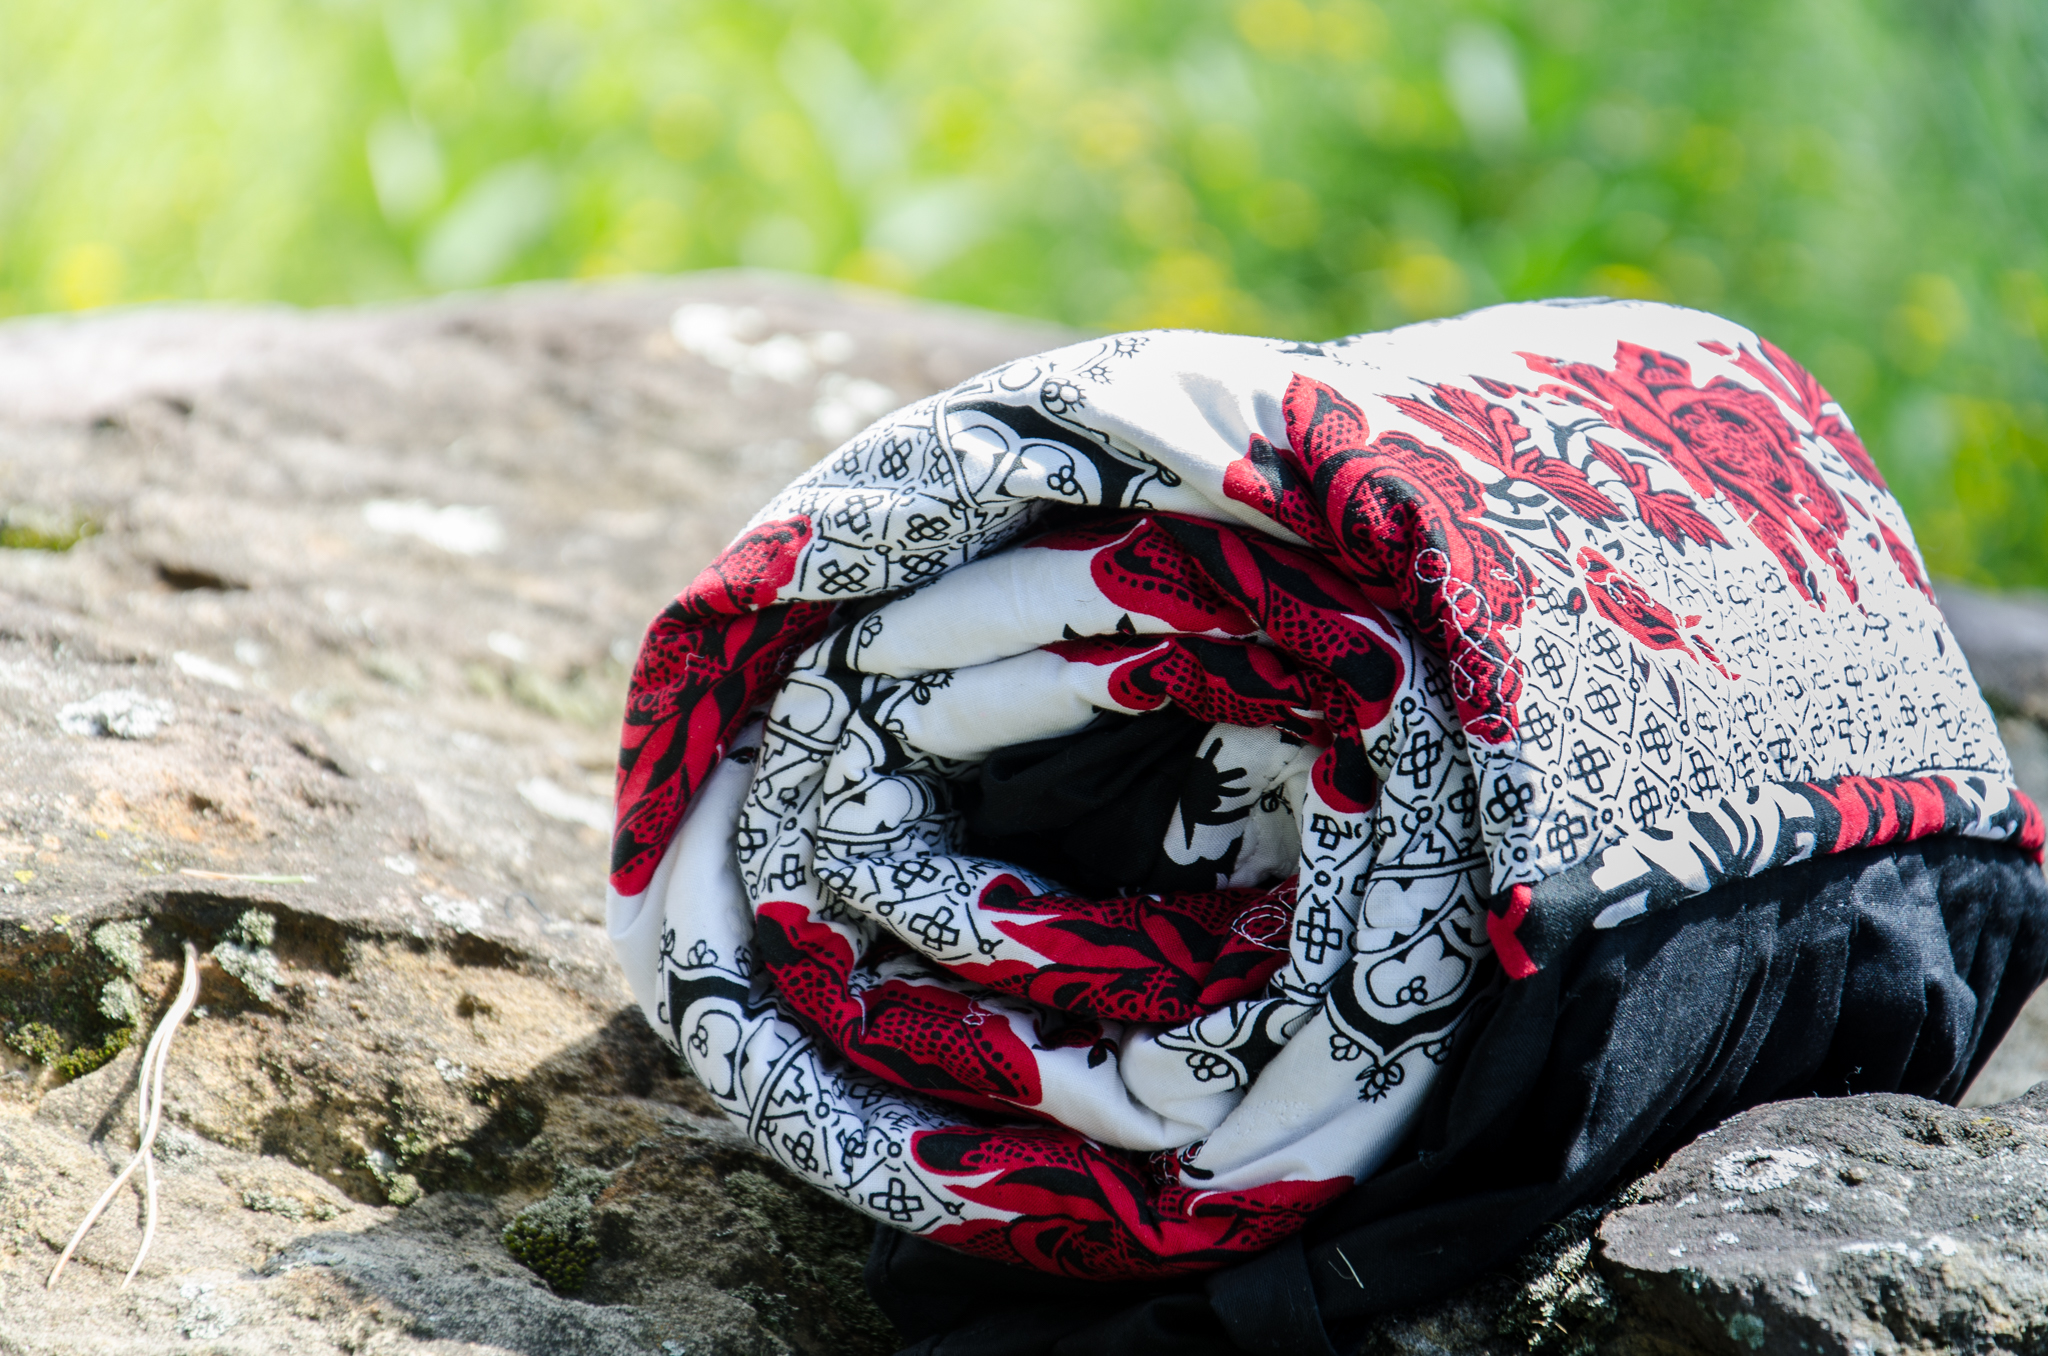
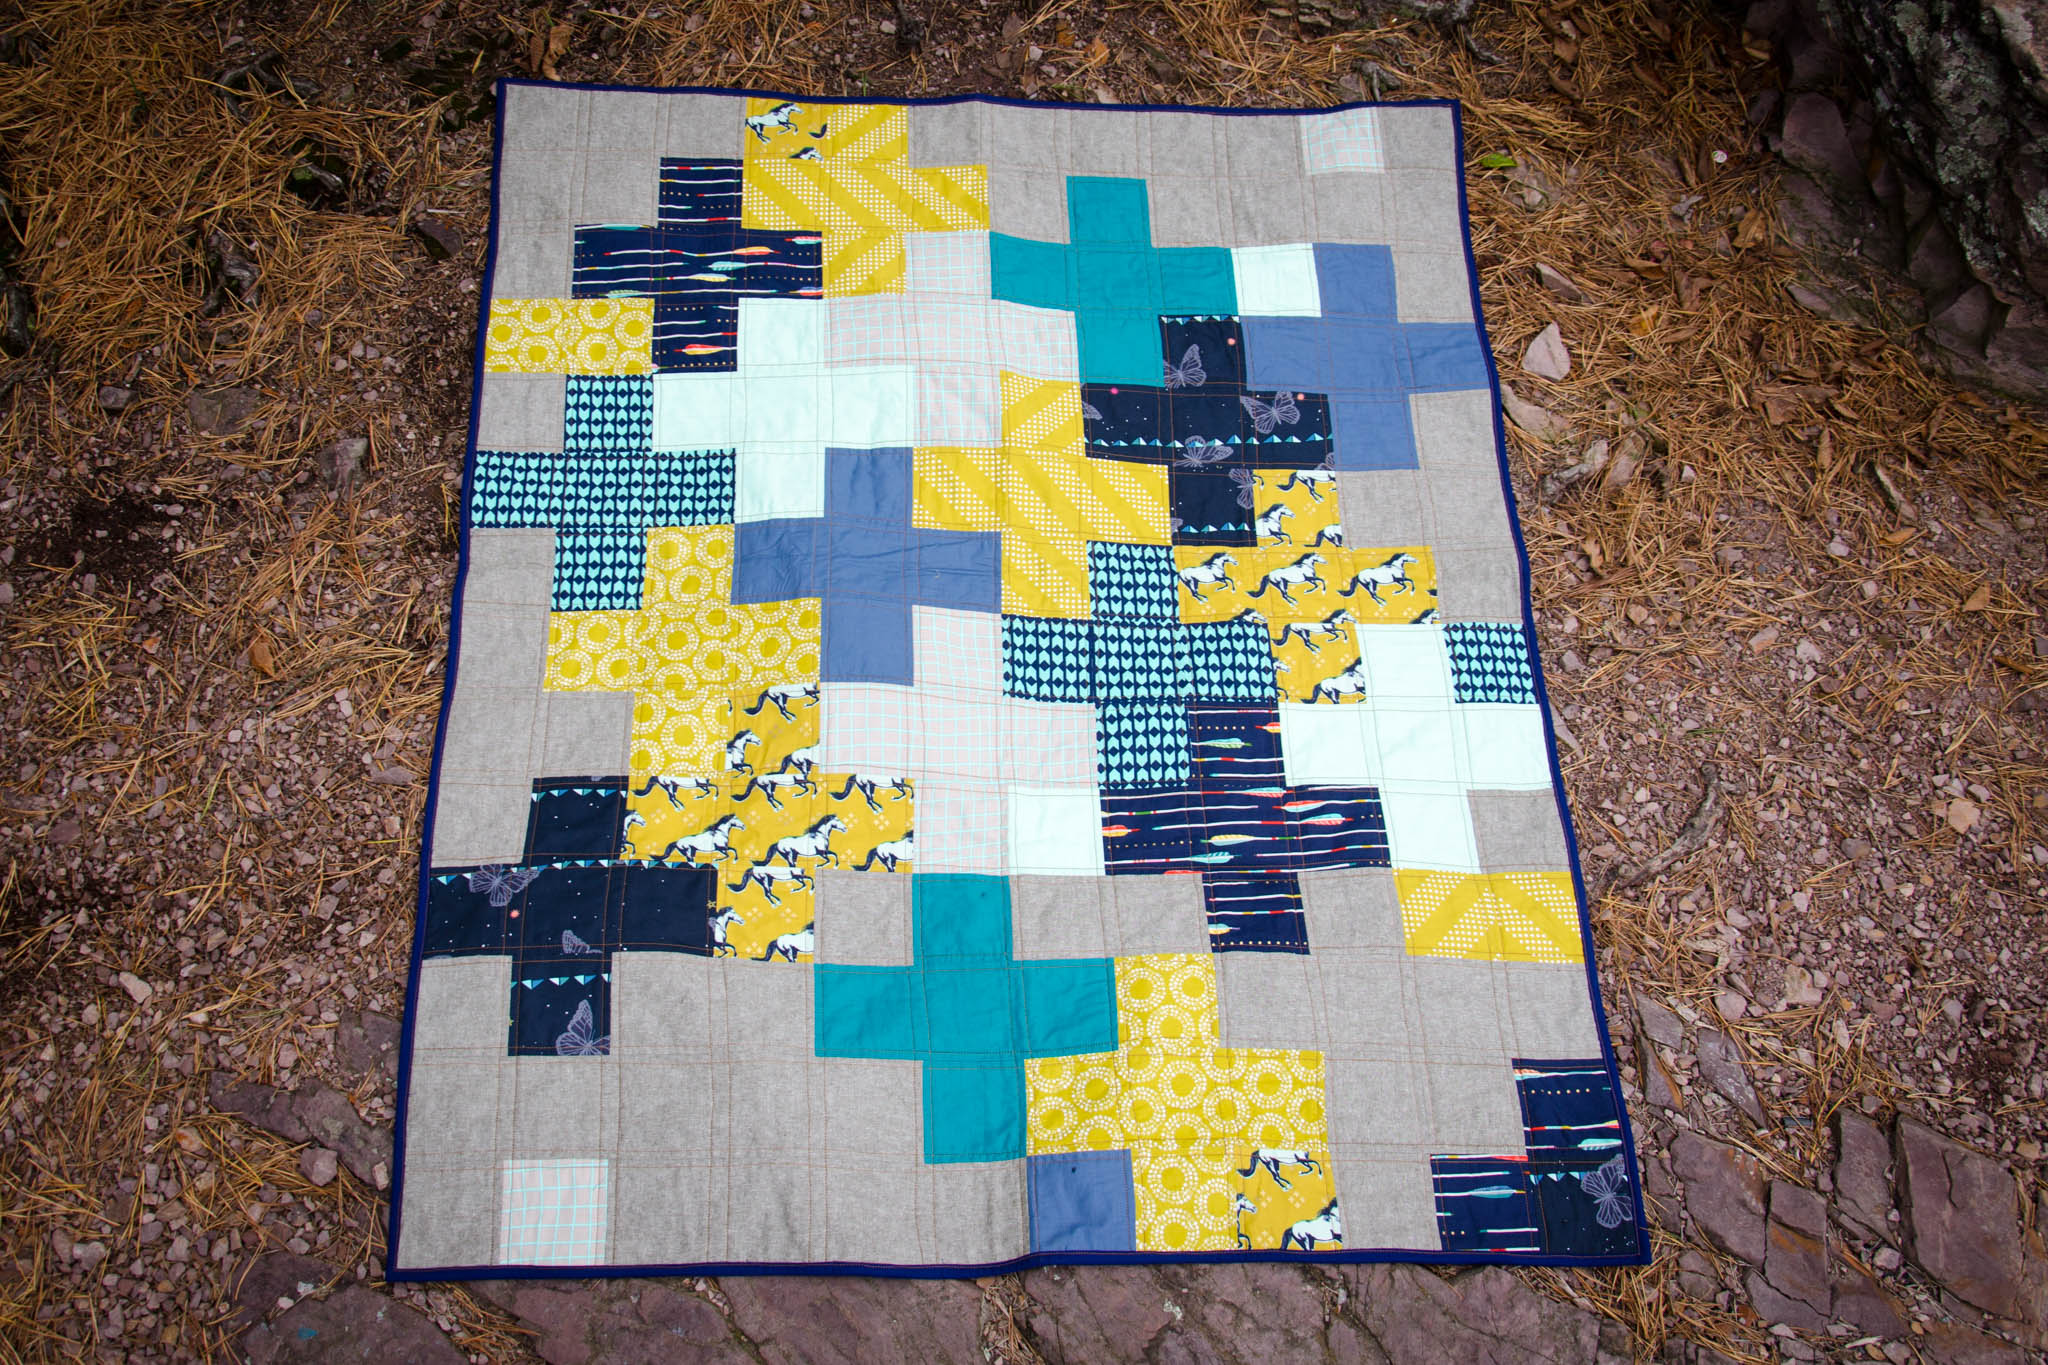
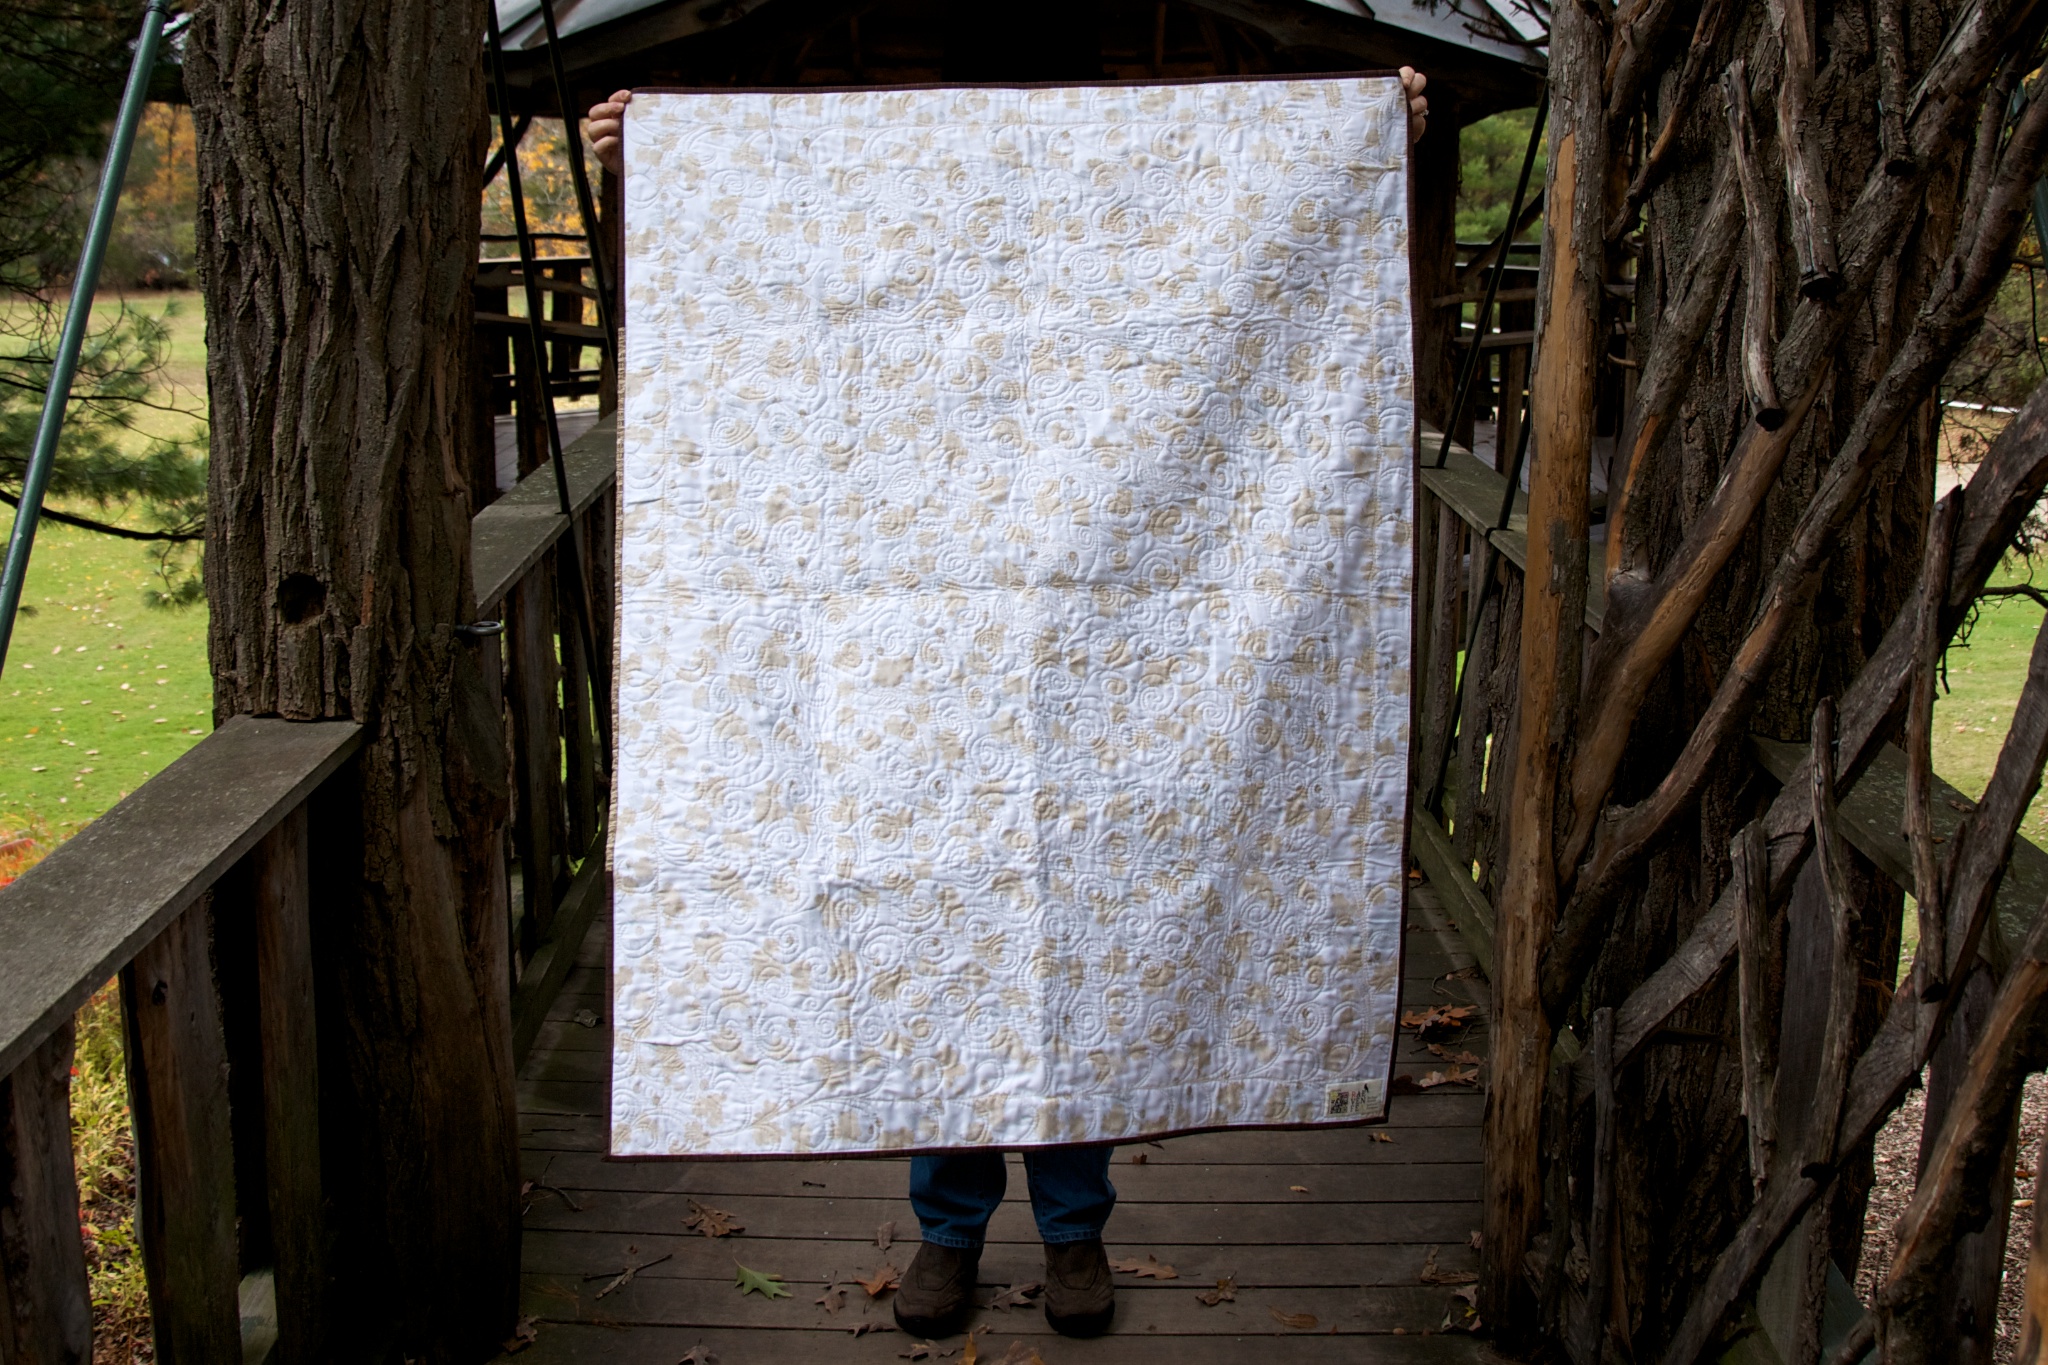
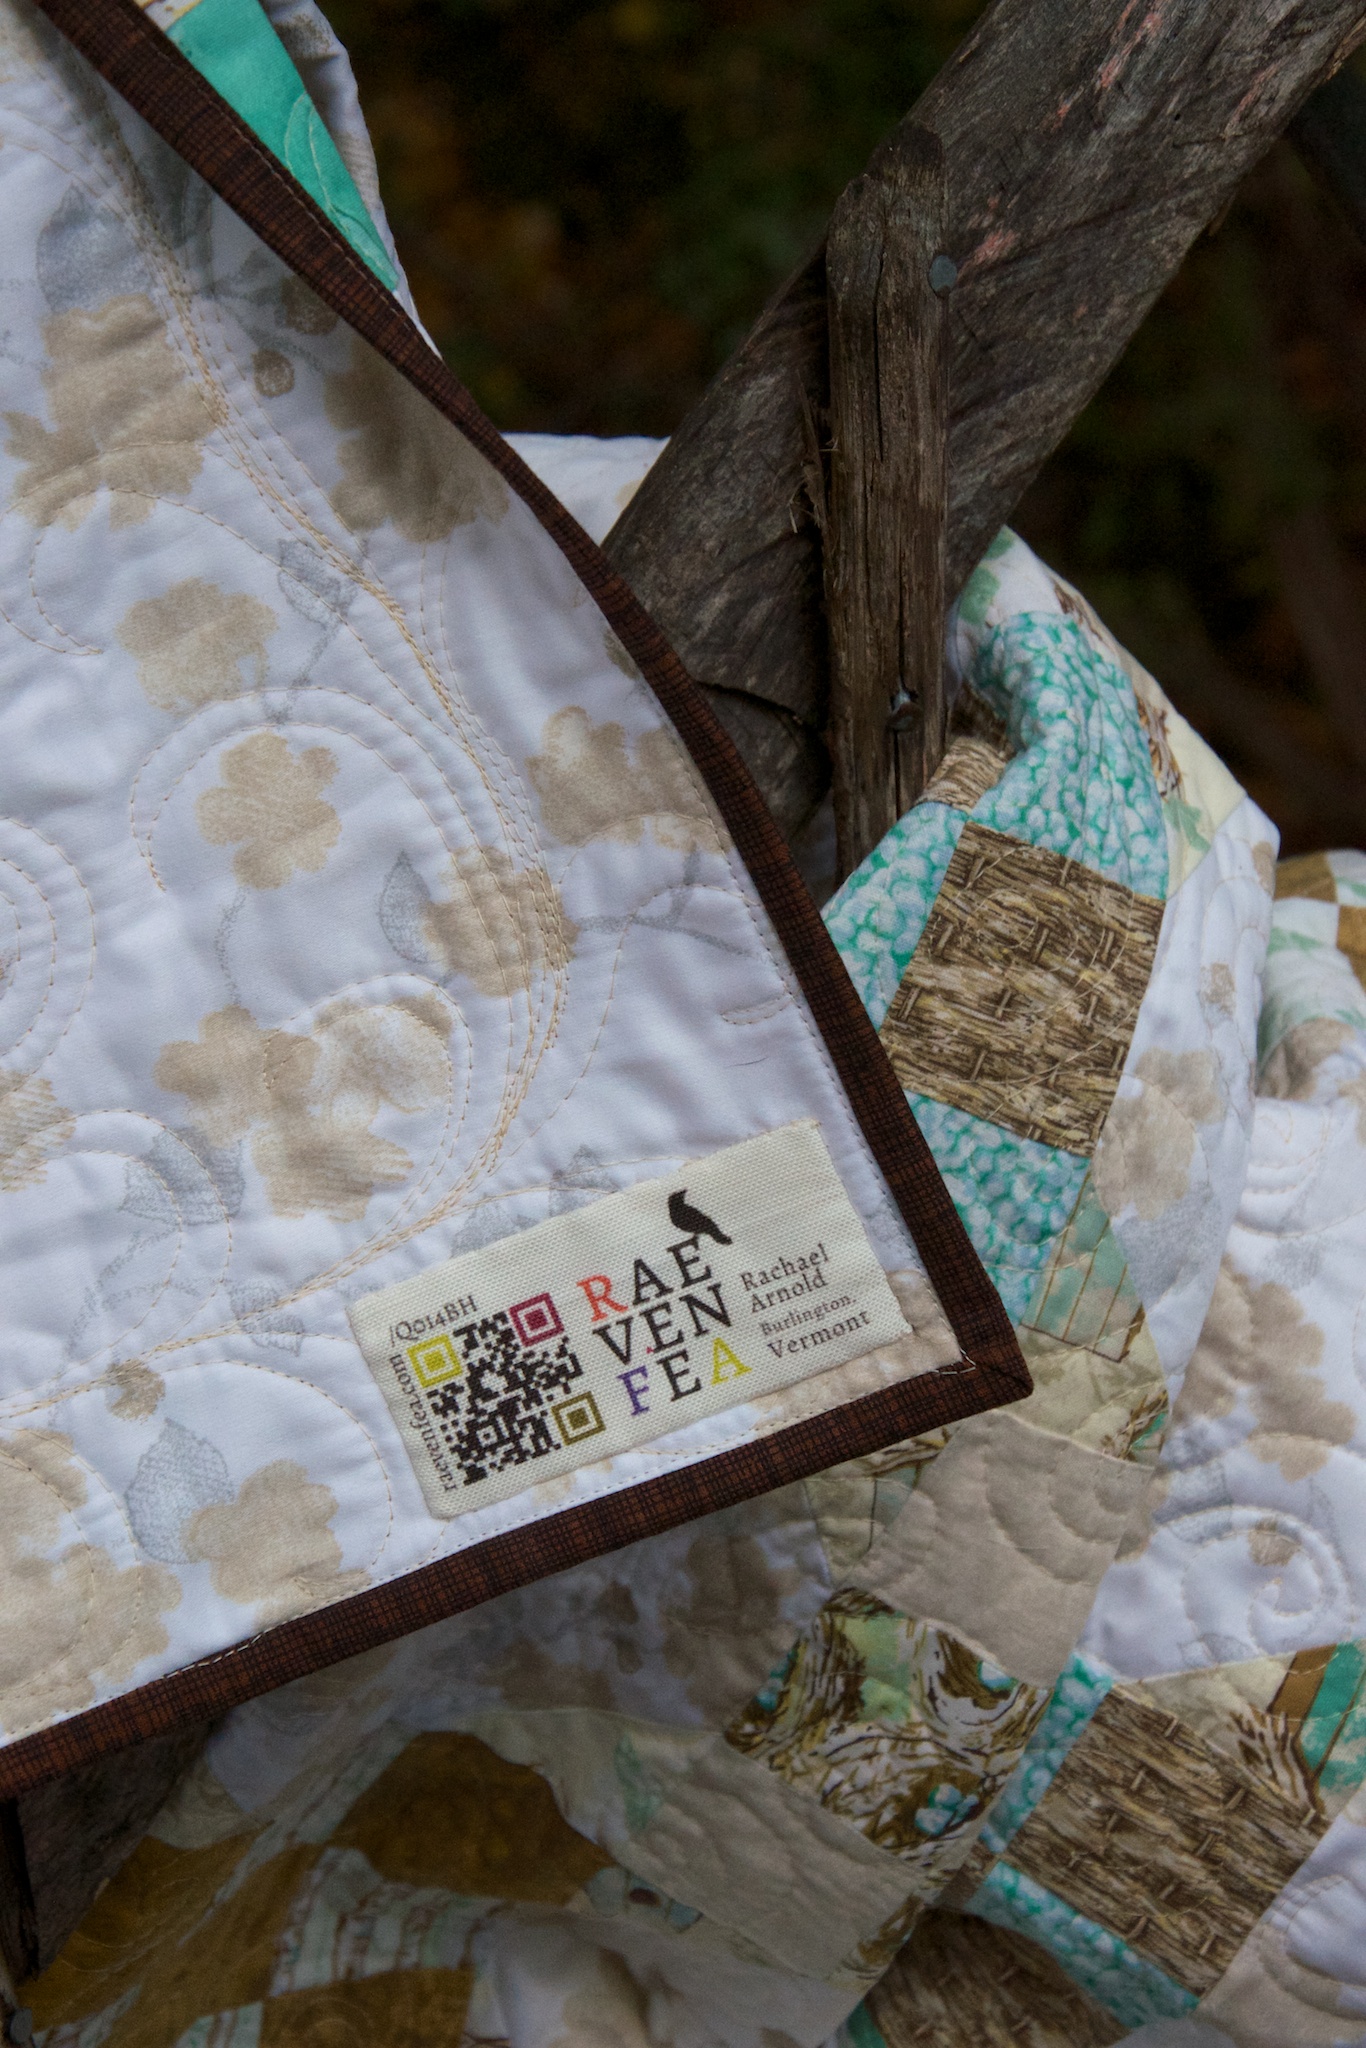
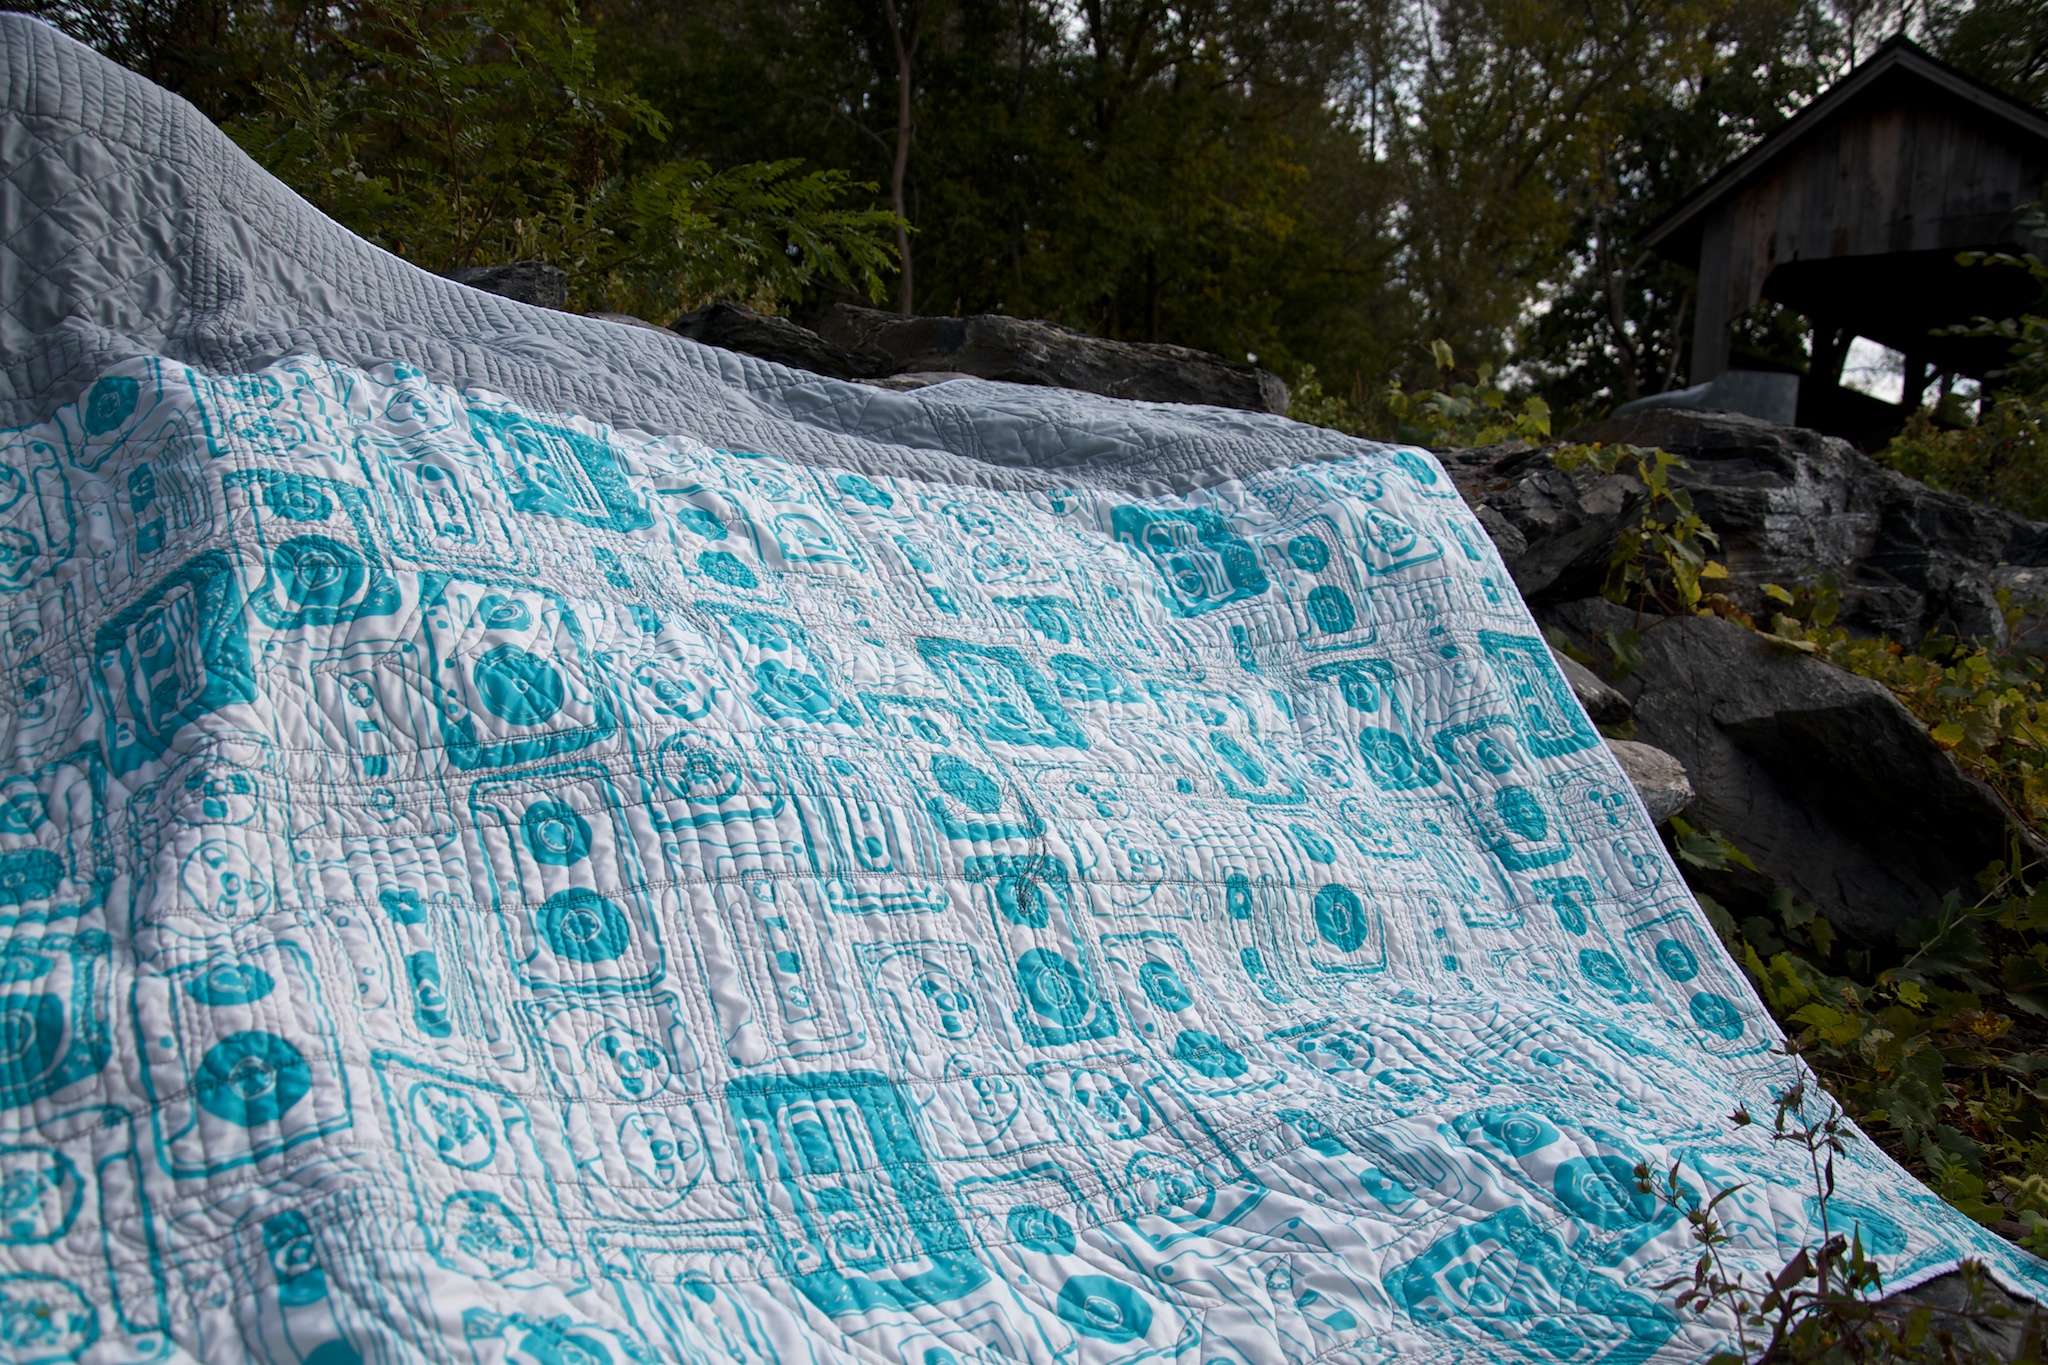
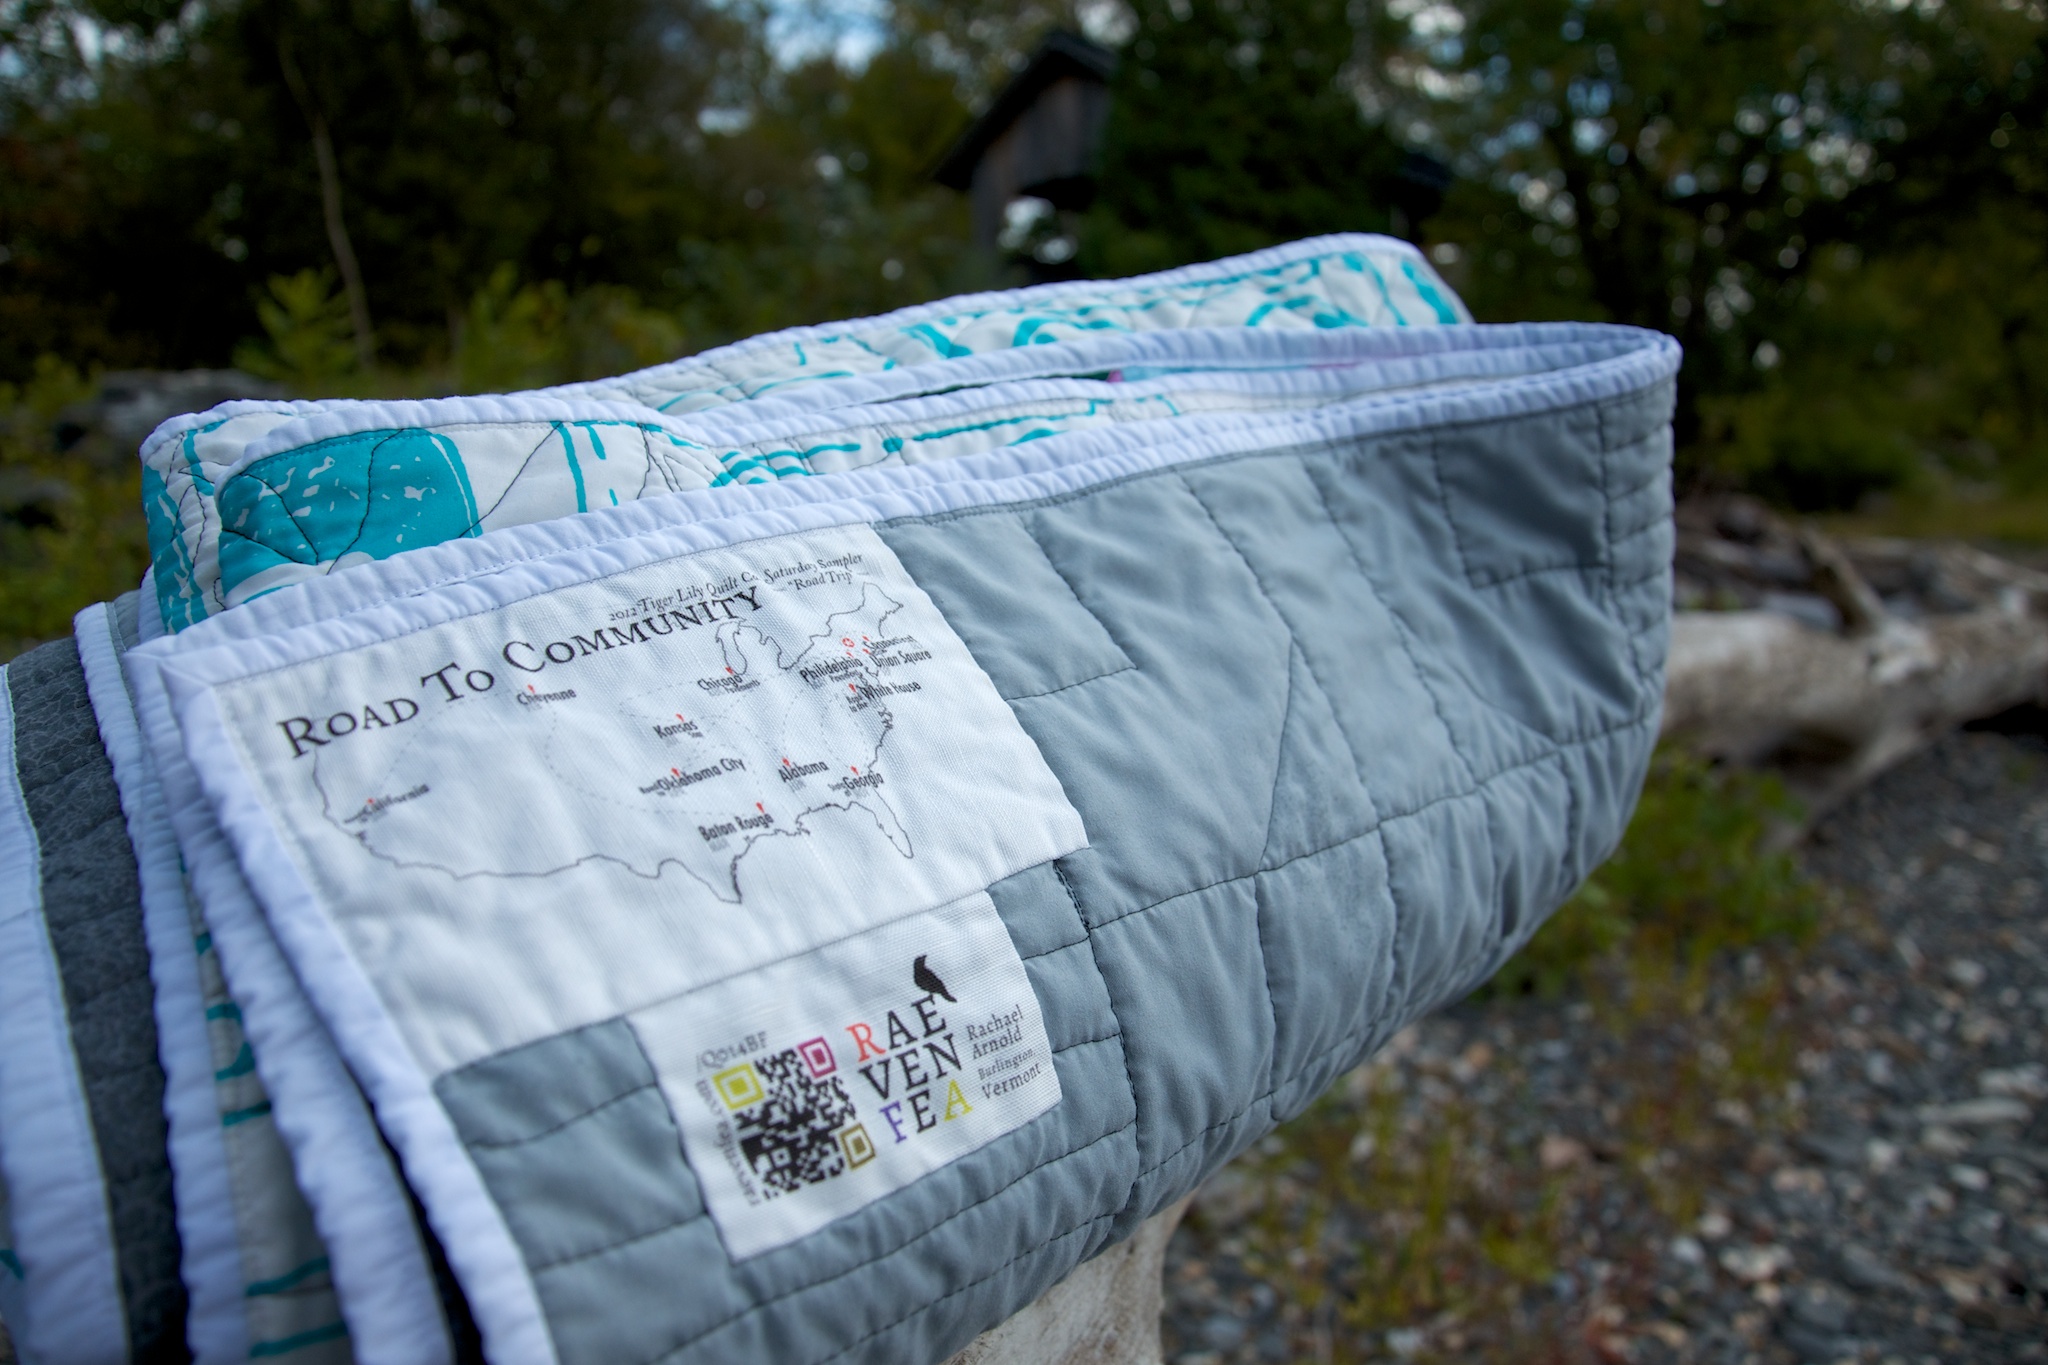
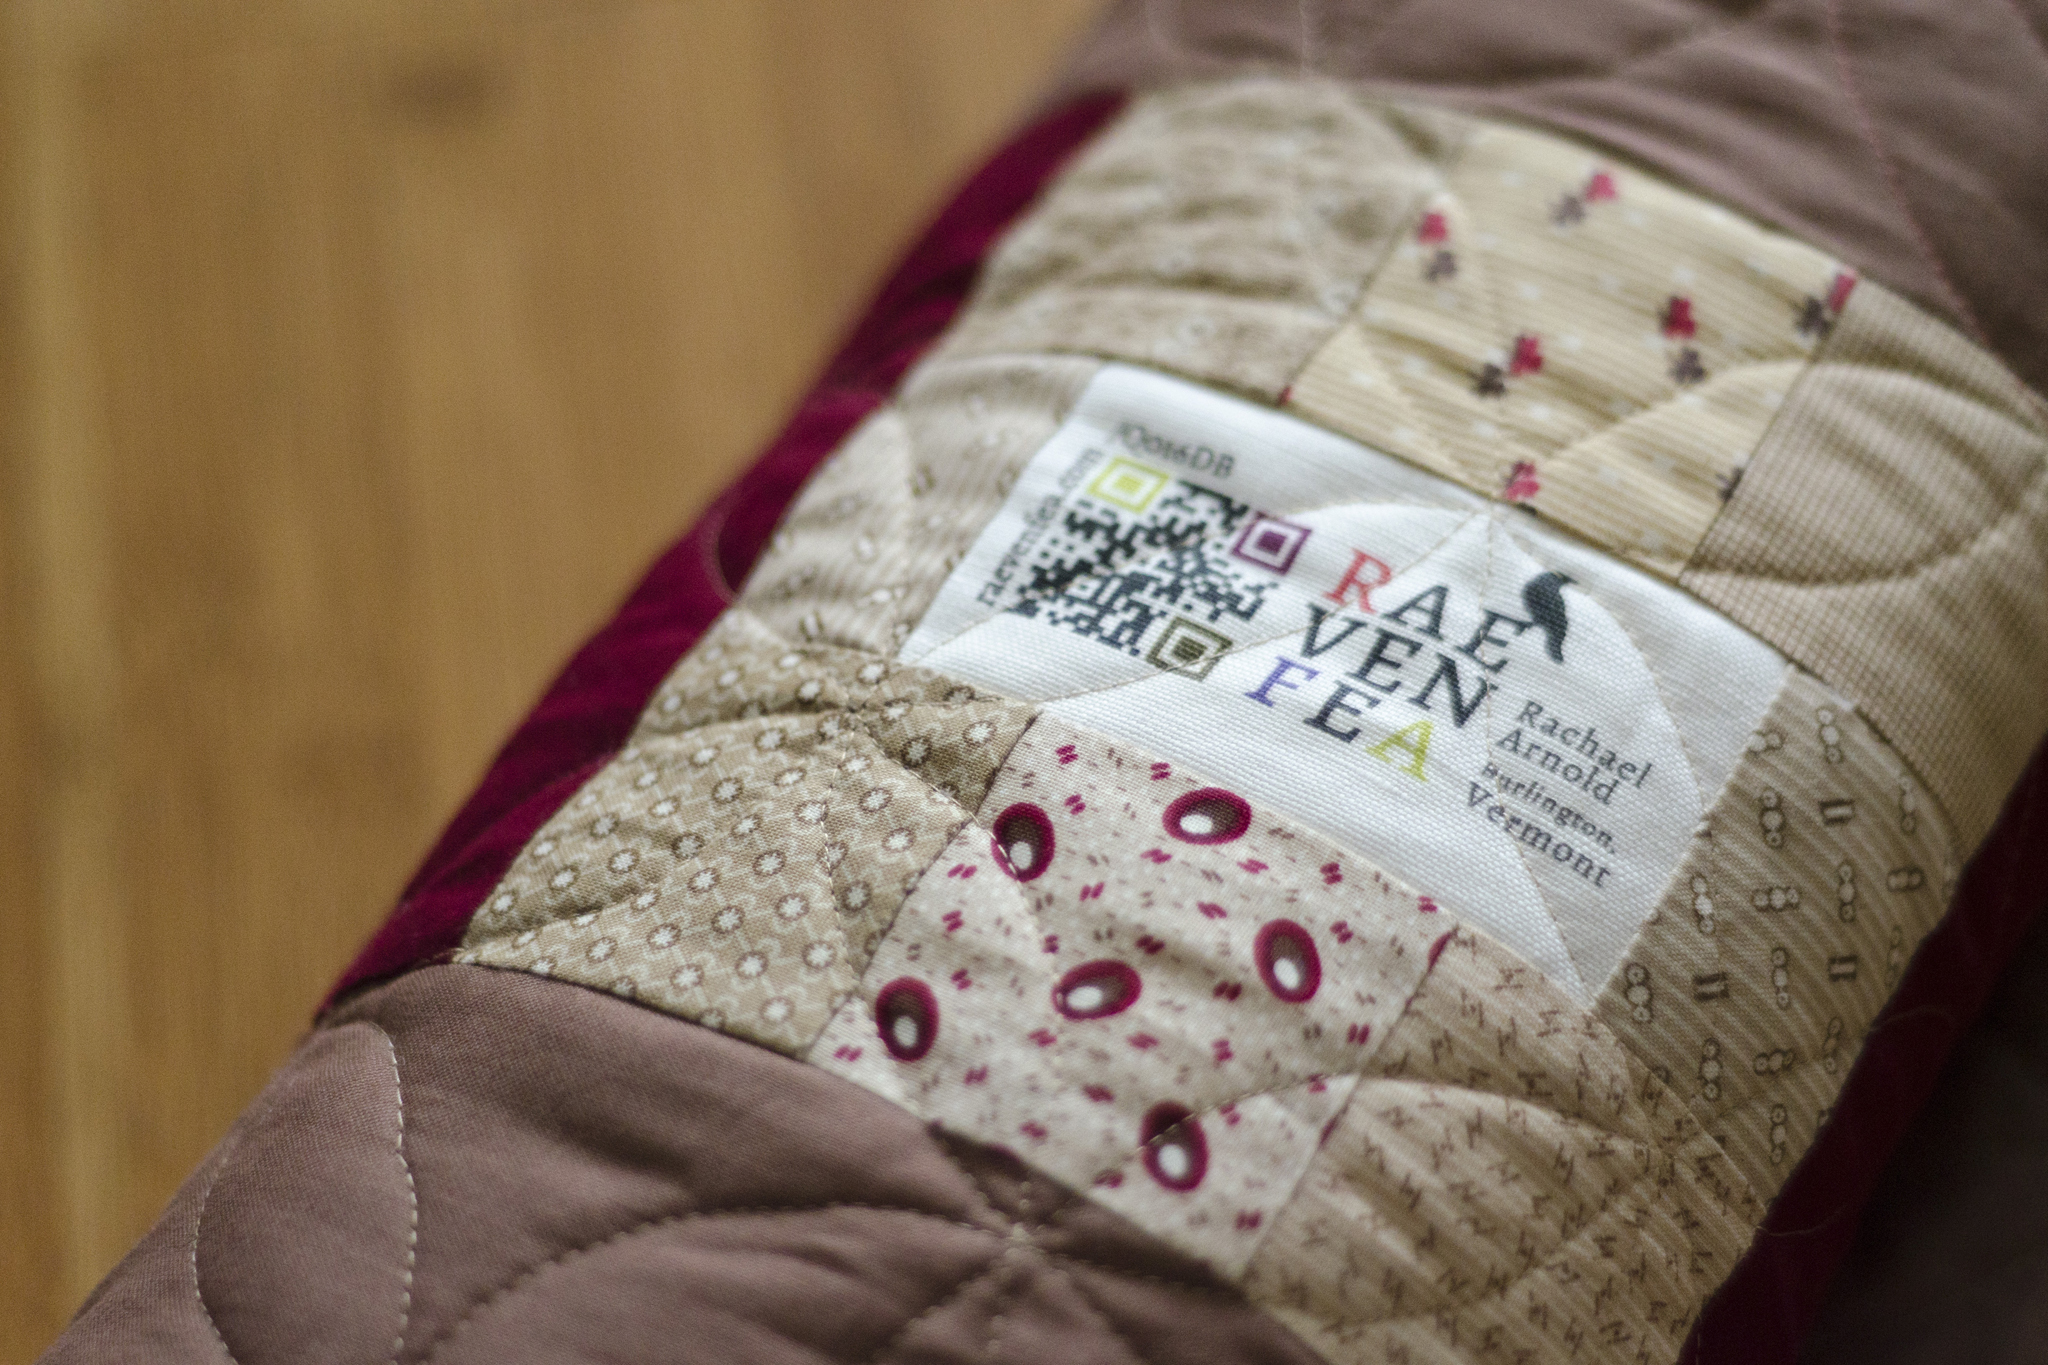
The backing and binding are solids that I bought years ago for this quilt. While not my first choice as my style has evolved, I stuck with them to get them out of stash. I considered doing something more complicated in piecing the back together somehow, but I only had the six 2.5″ squares leftover after finishing the top and a nine-patch for my history quilt. The brown reminds me of the ubiquitous brown glazed underlining in Victorian bodices, continuing the theme of old-timey romanticism with the color scheme, heart, and reproduction fabrics.

"Miniatures Heart" (detail), Rachael Arnold, February 2016, 54"x72".
“Miniatures Heart” (detail), Rachael Arnold, February 2016, 54″x72″. Photo by Carl Pfranger.

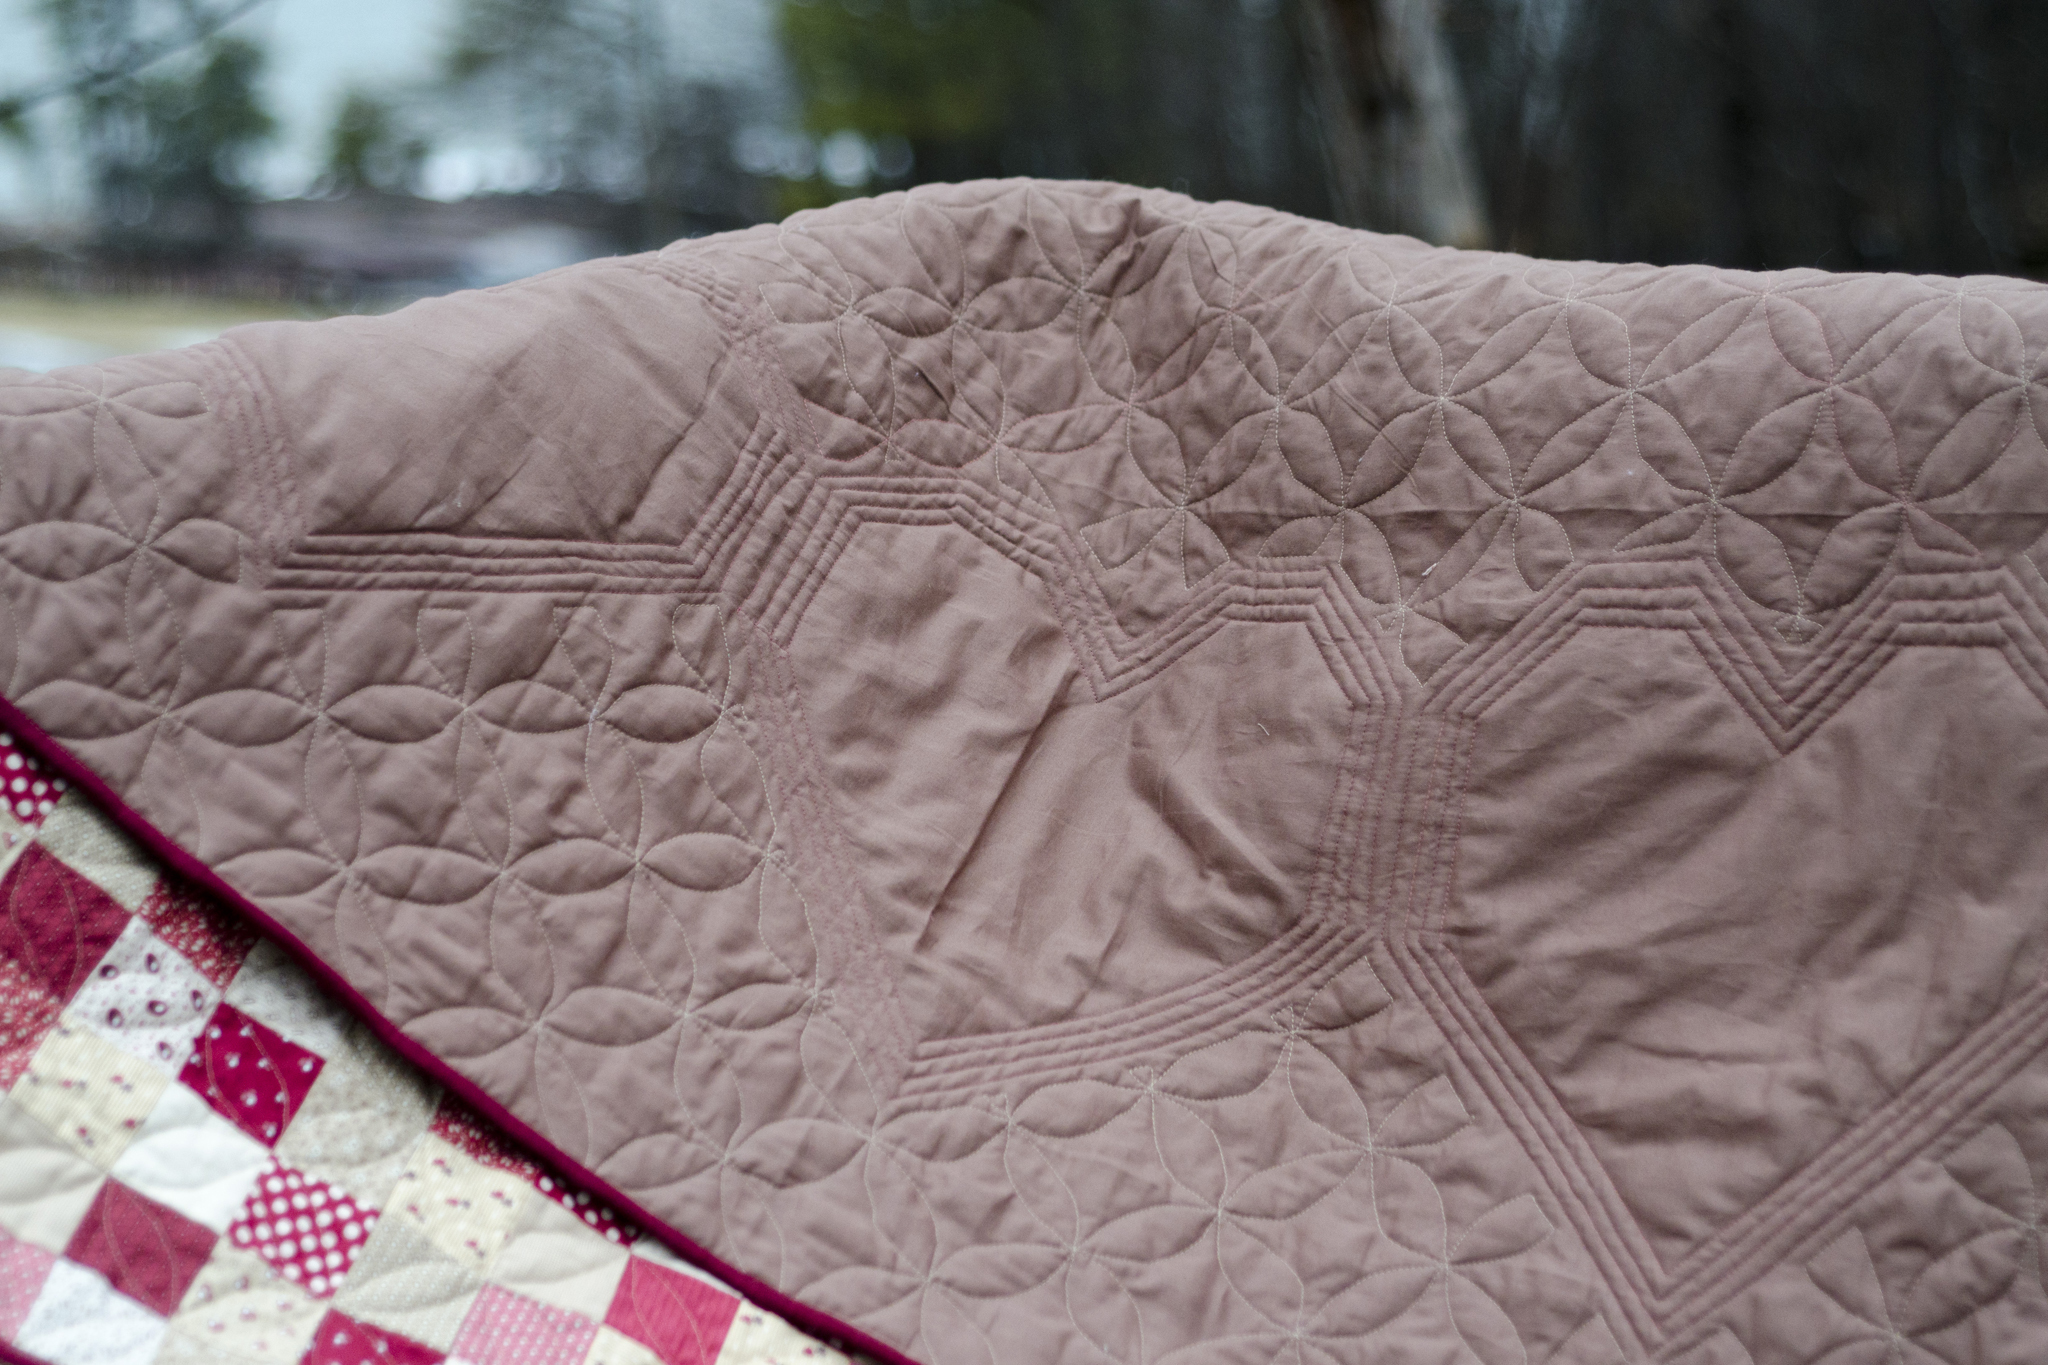
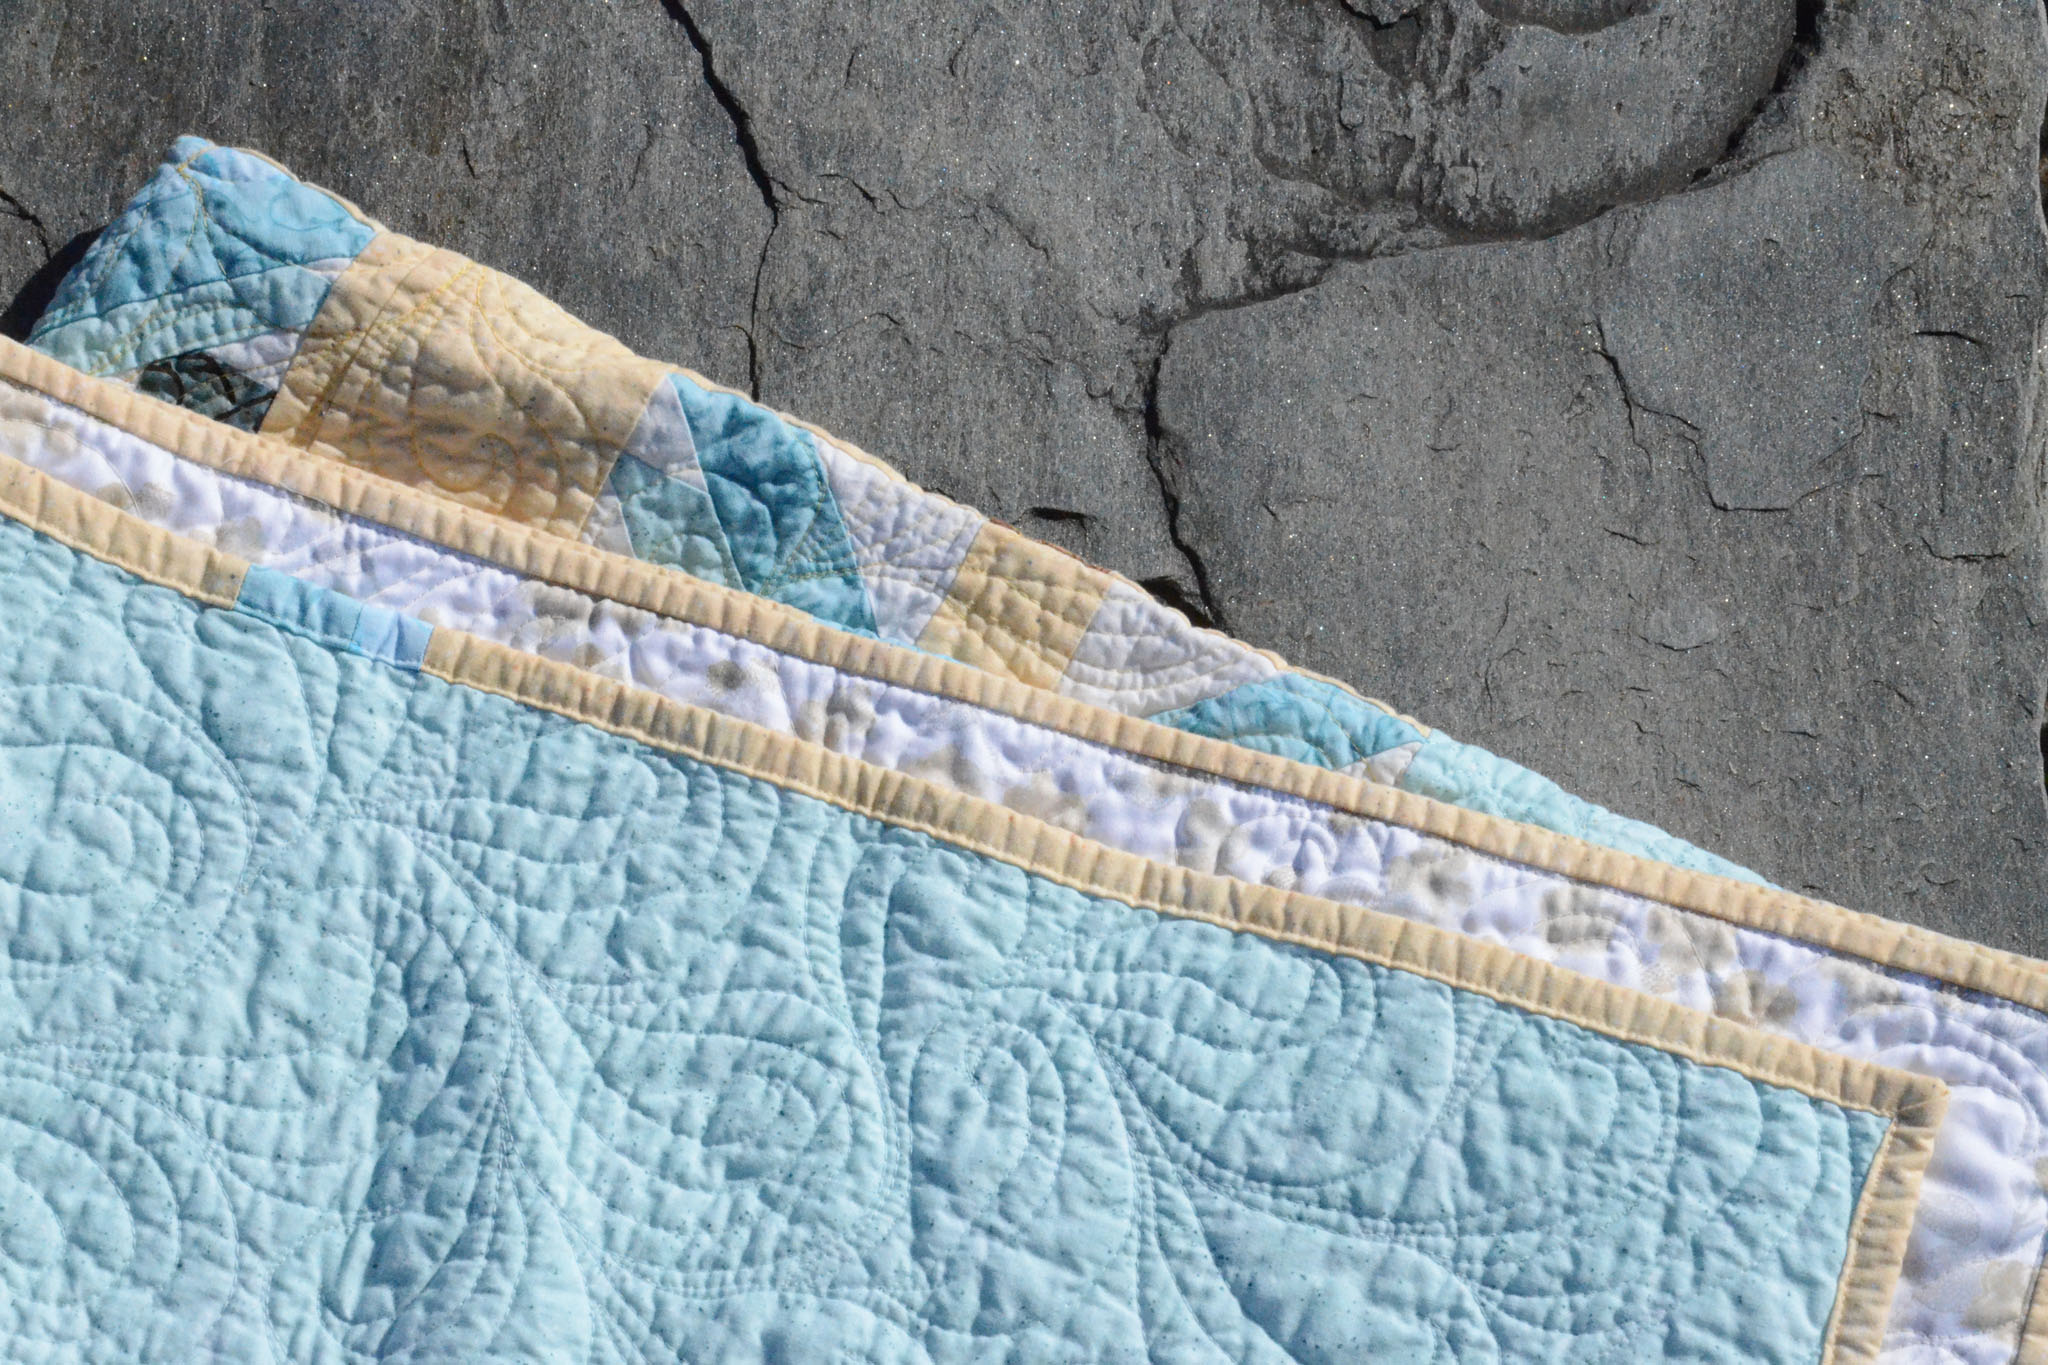
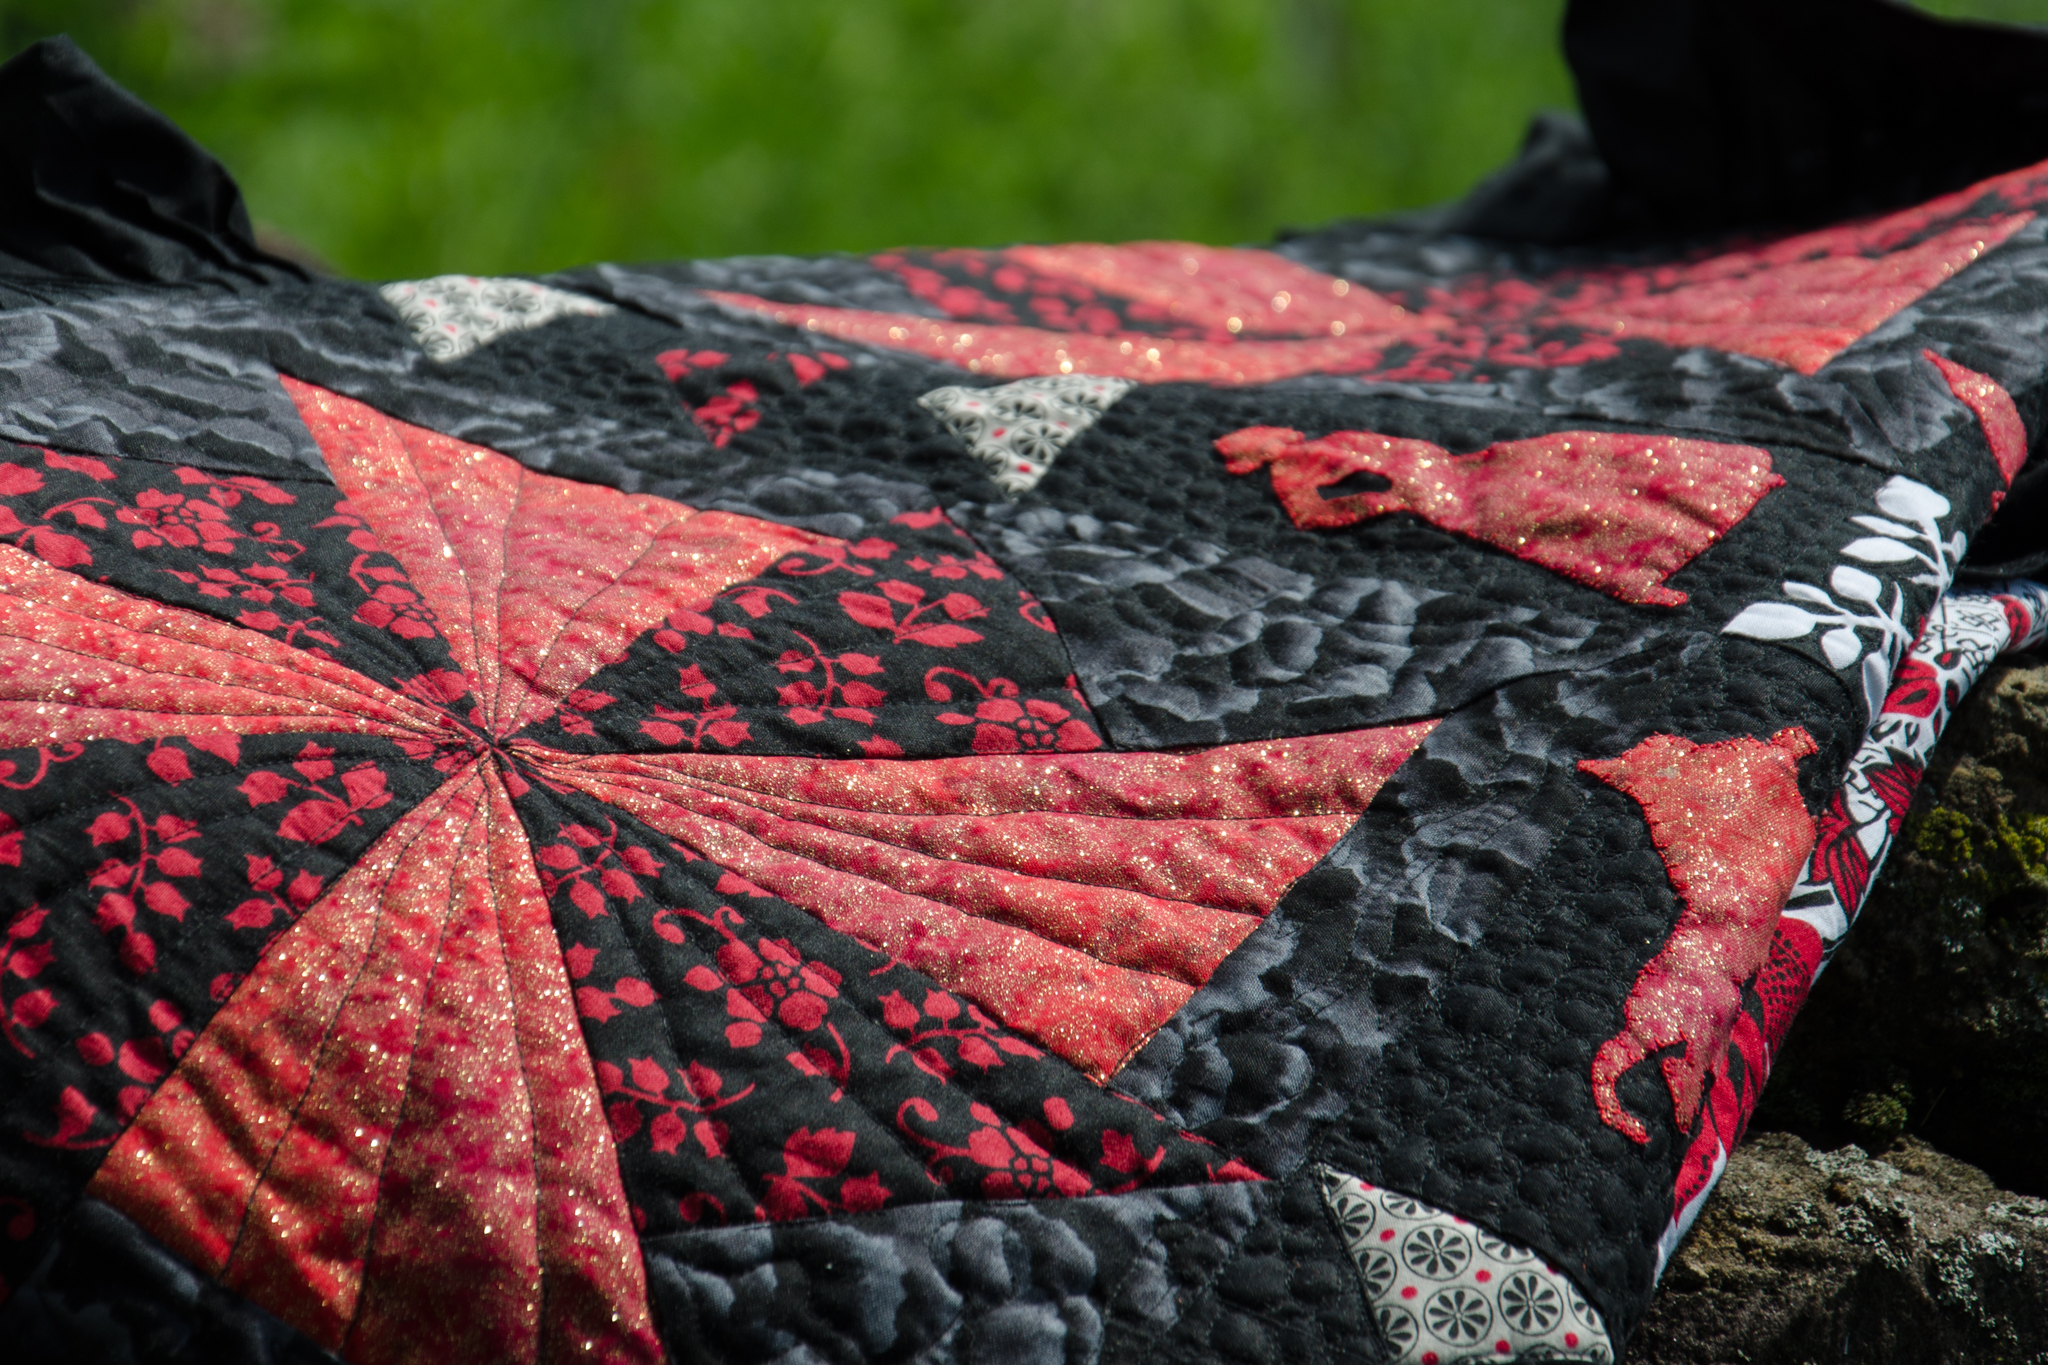
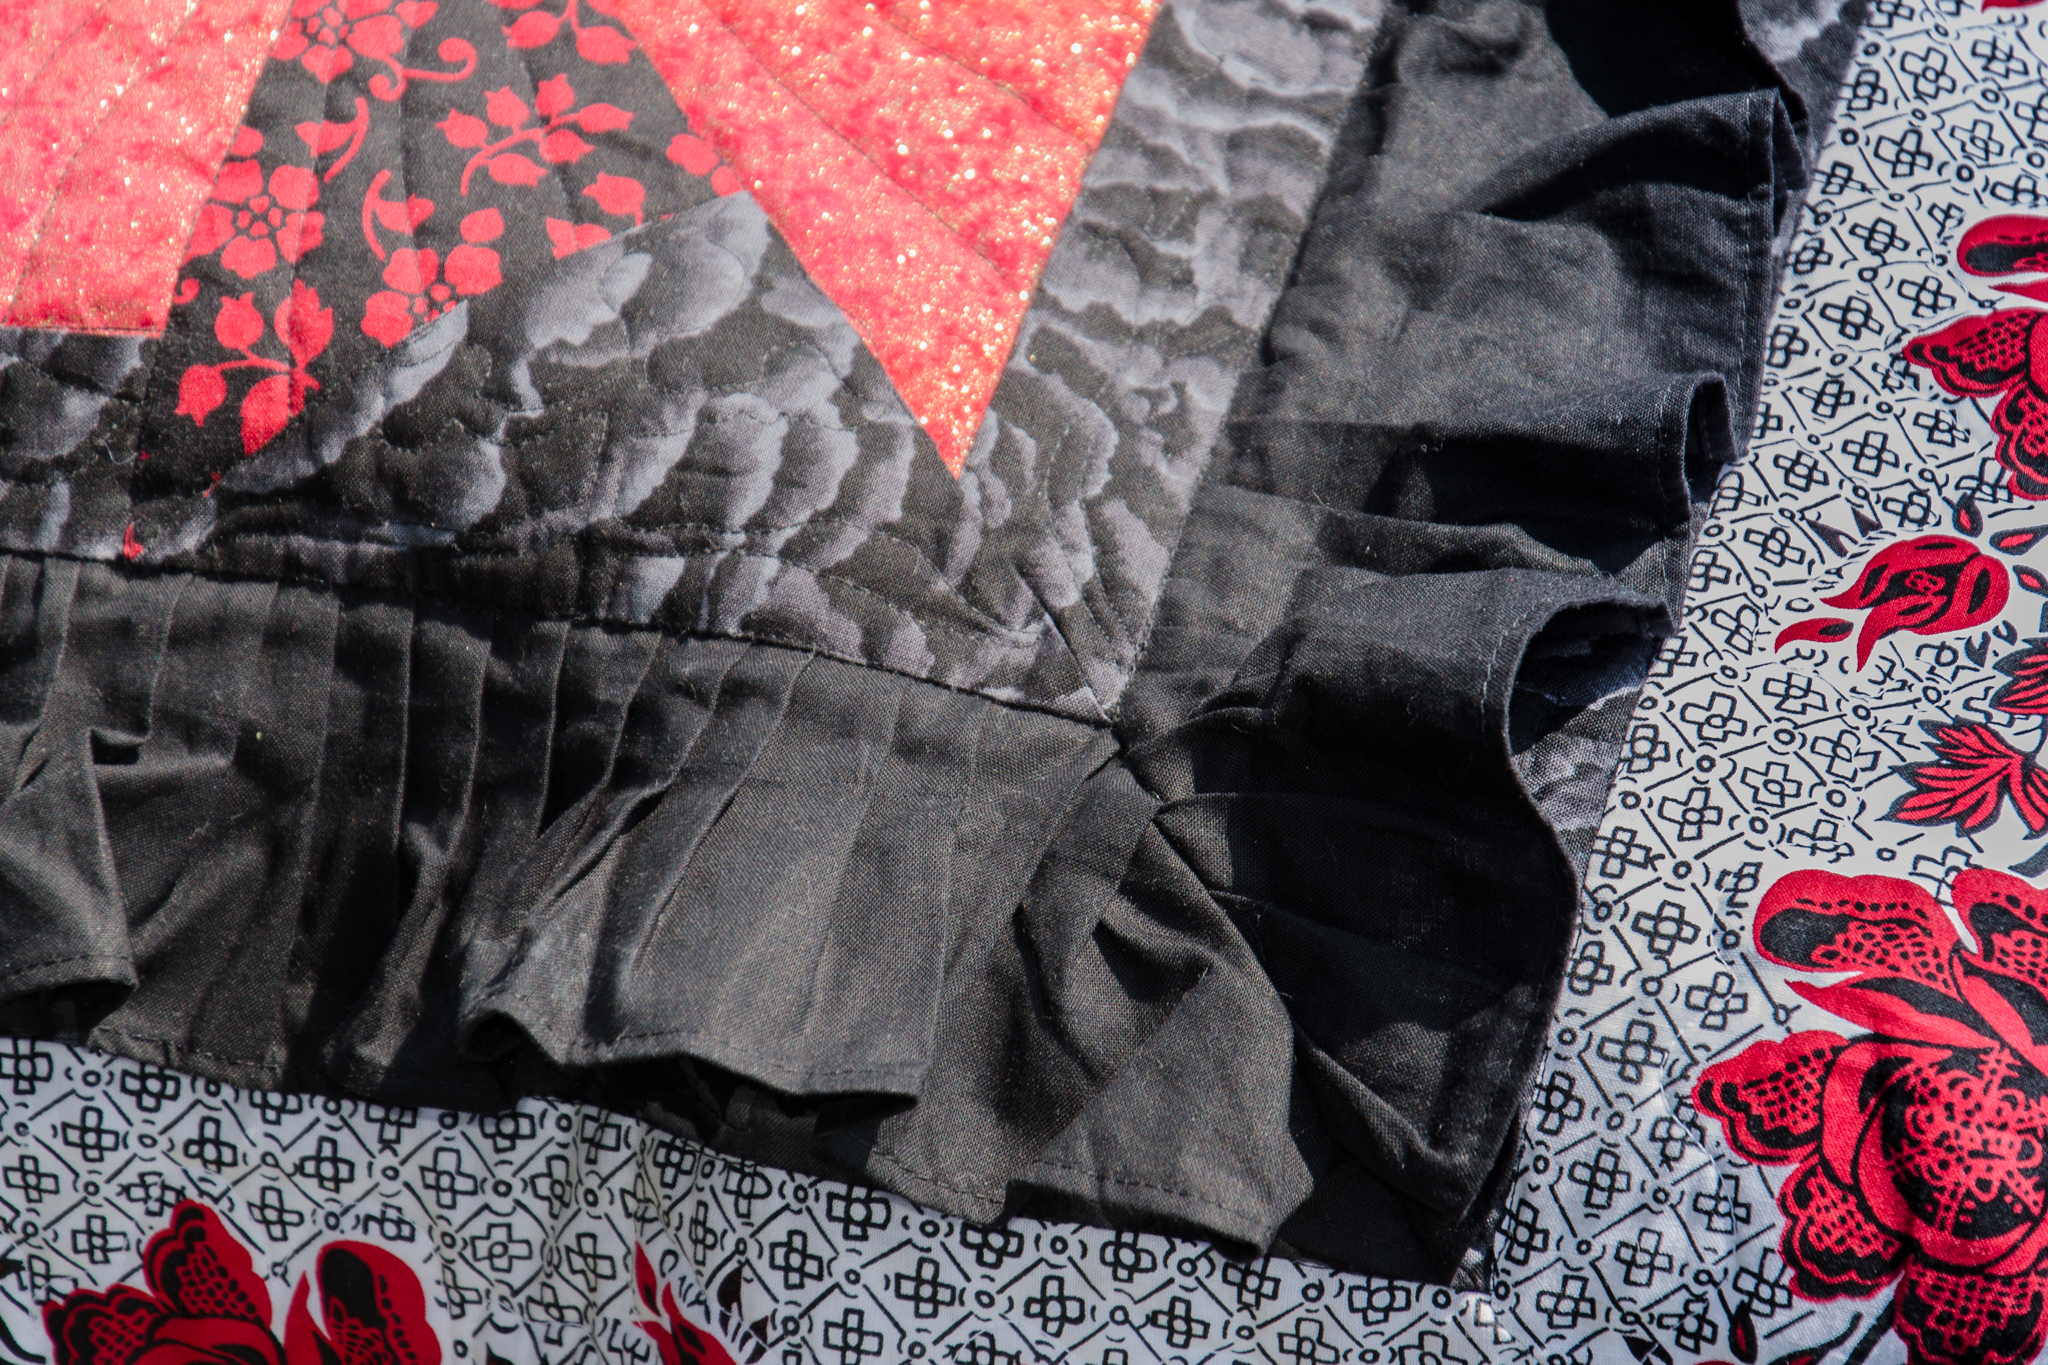
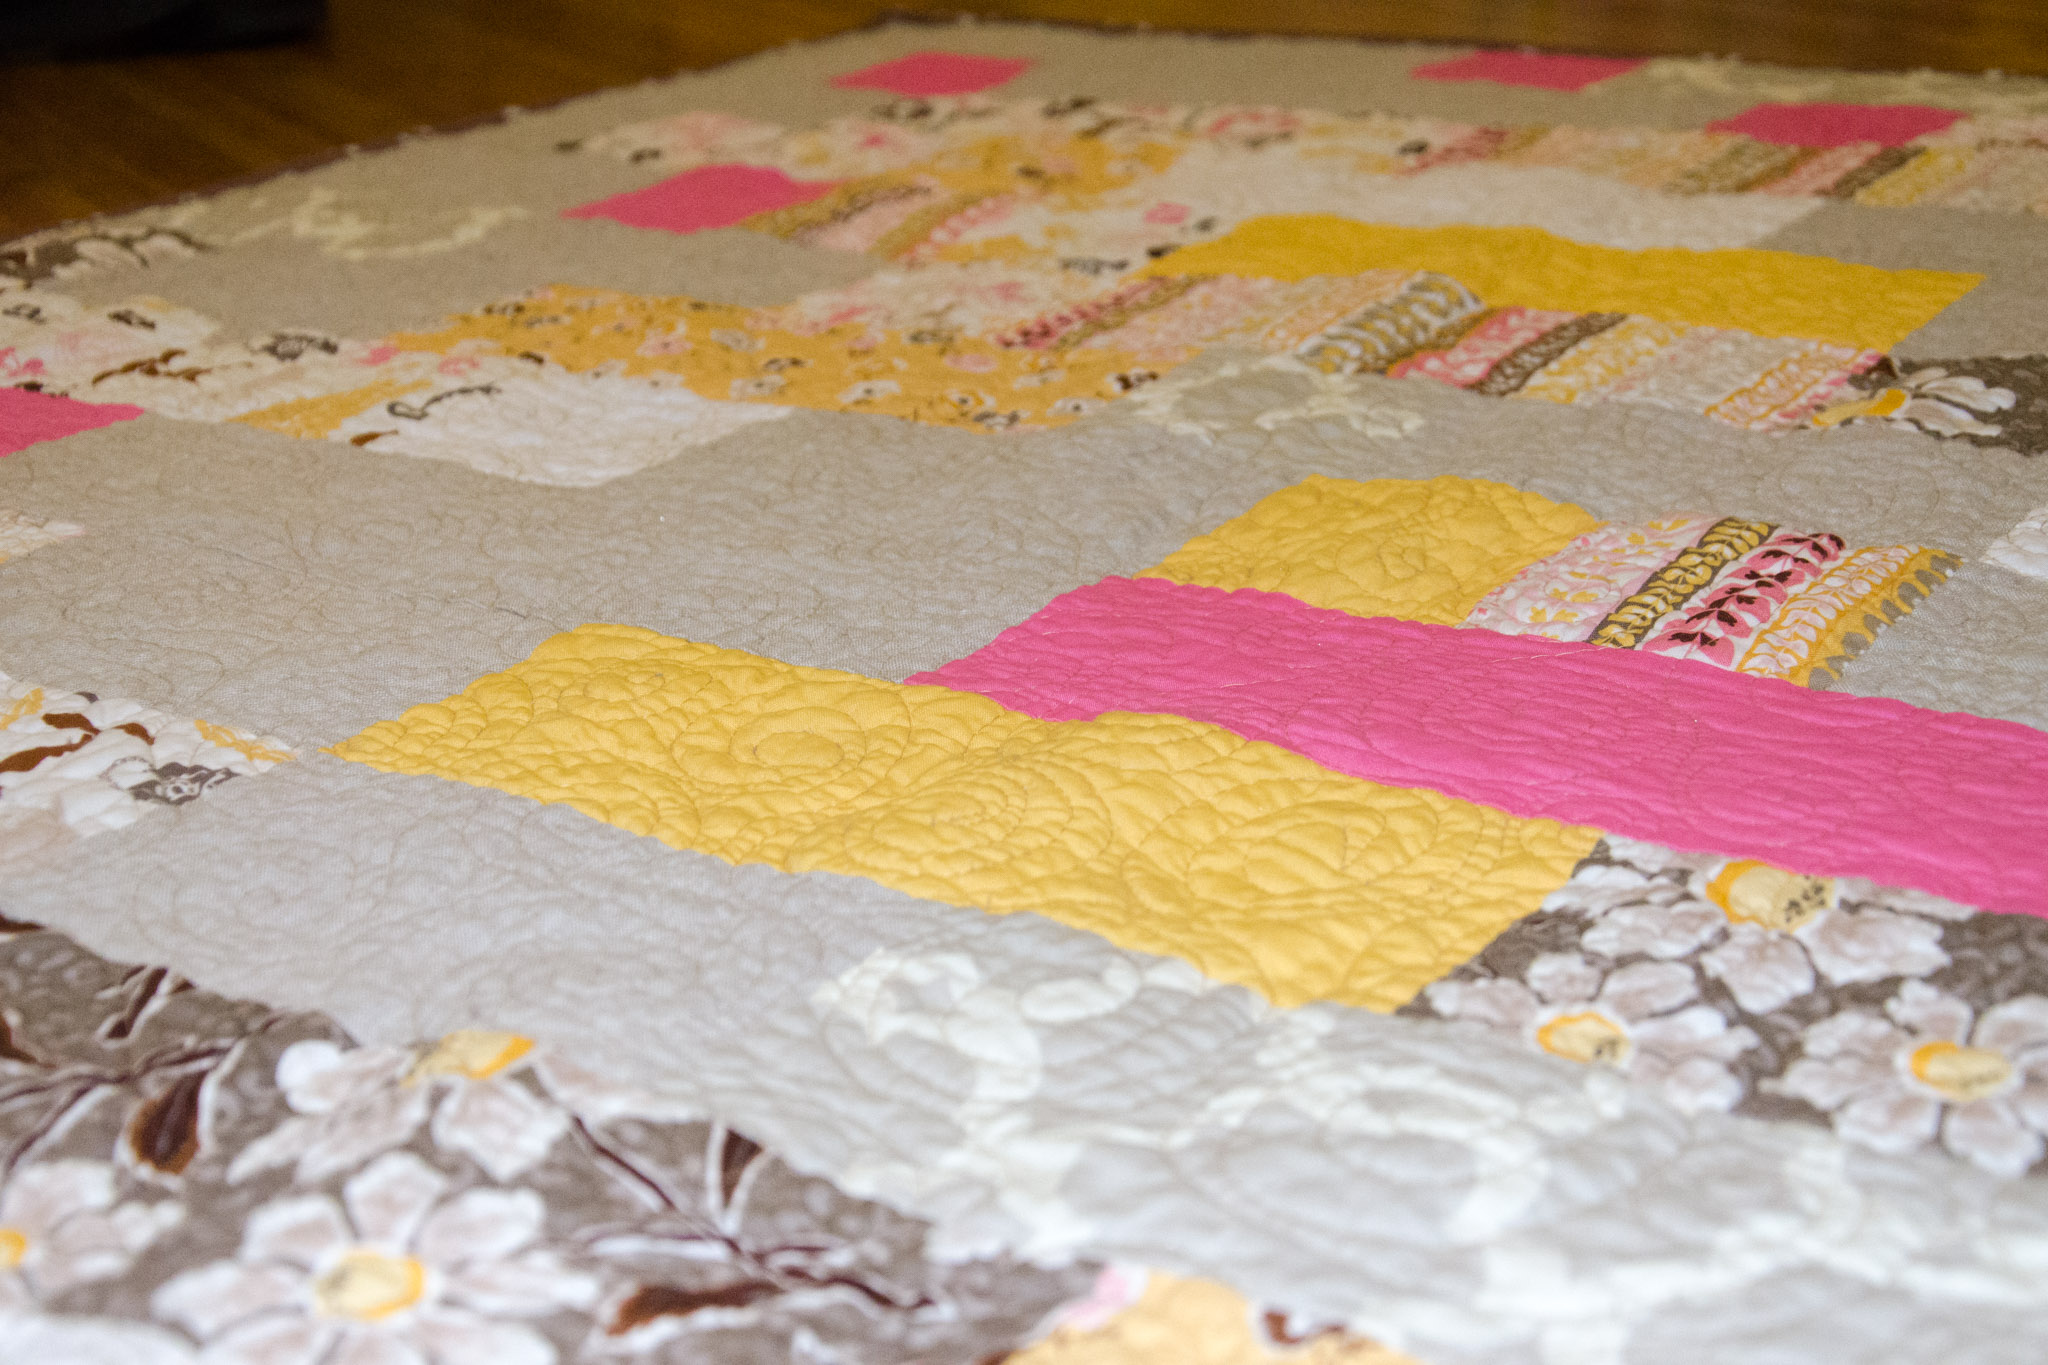
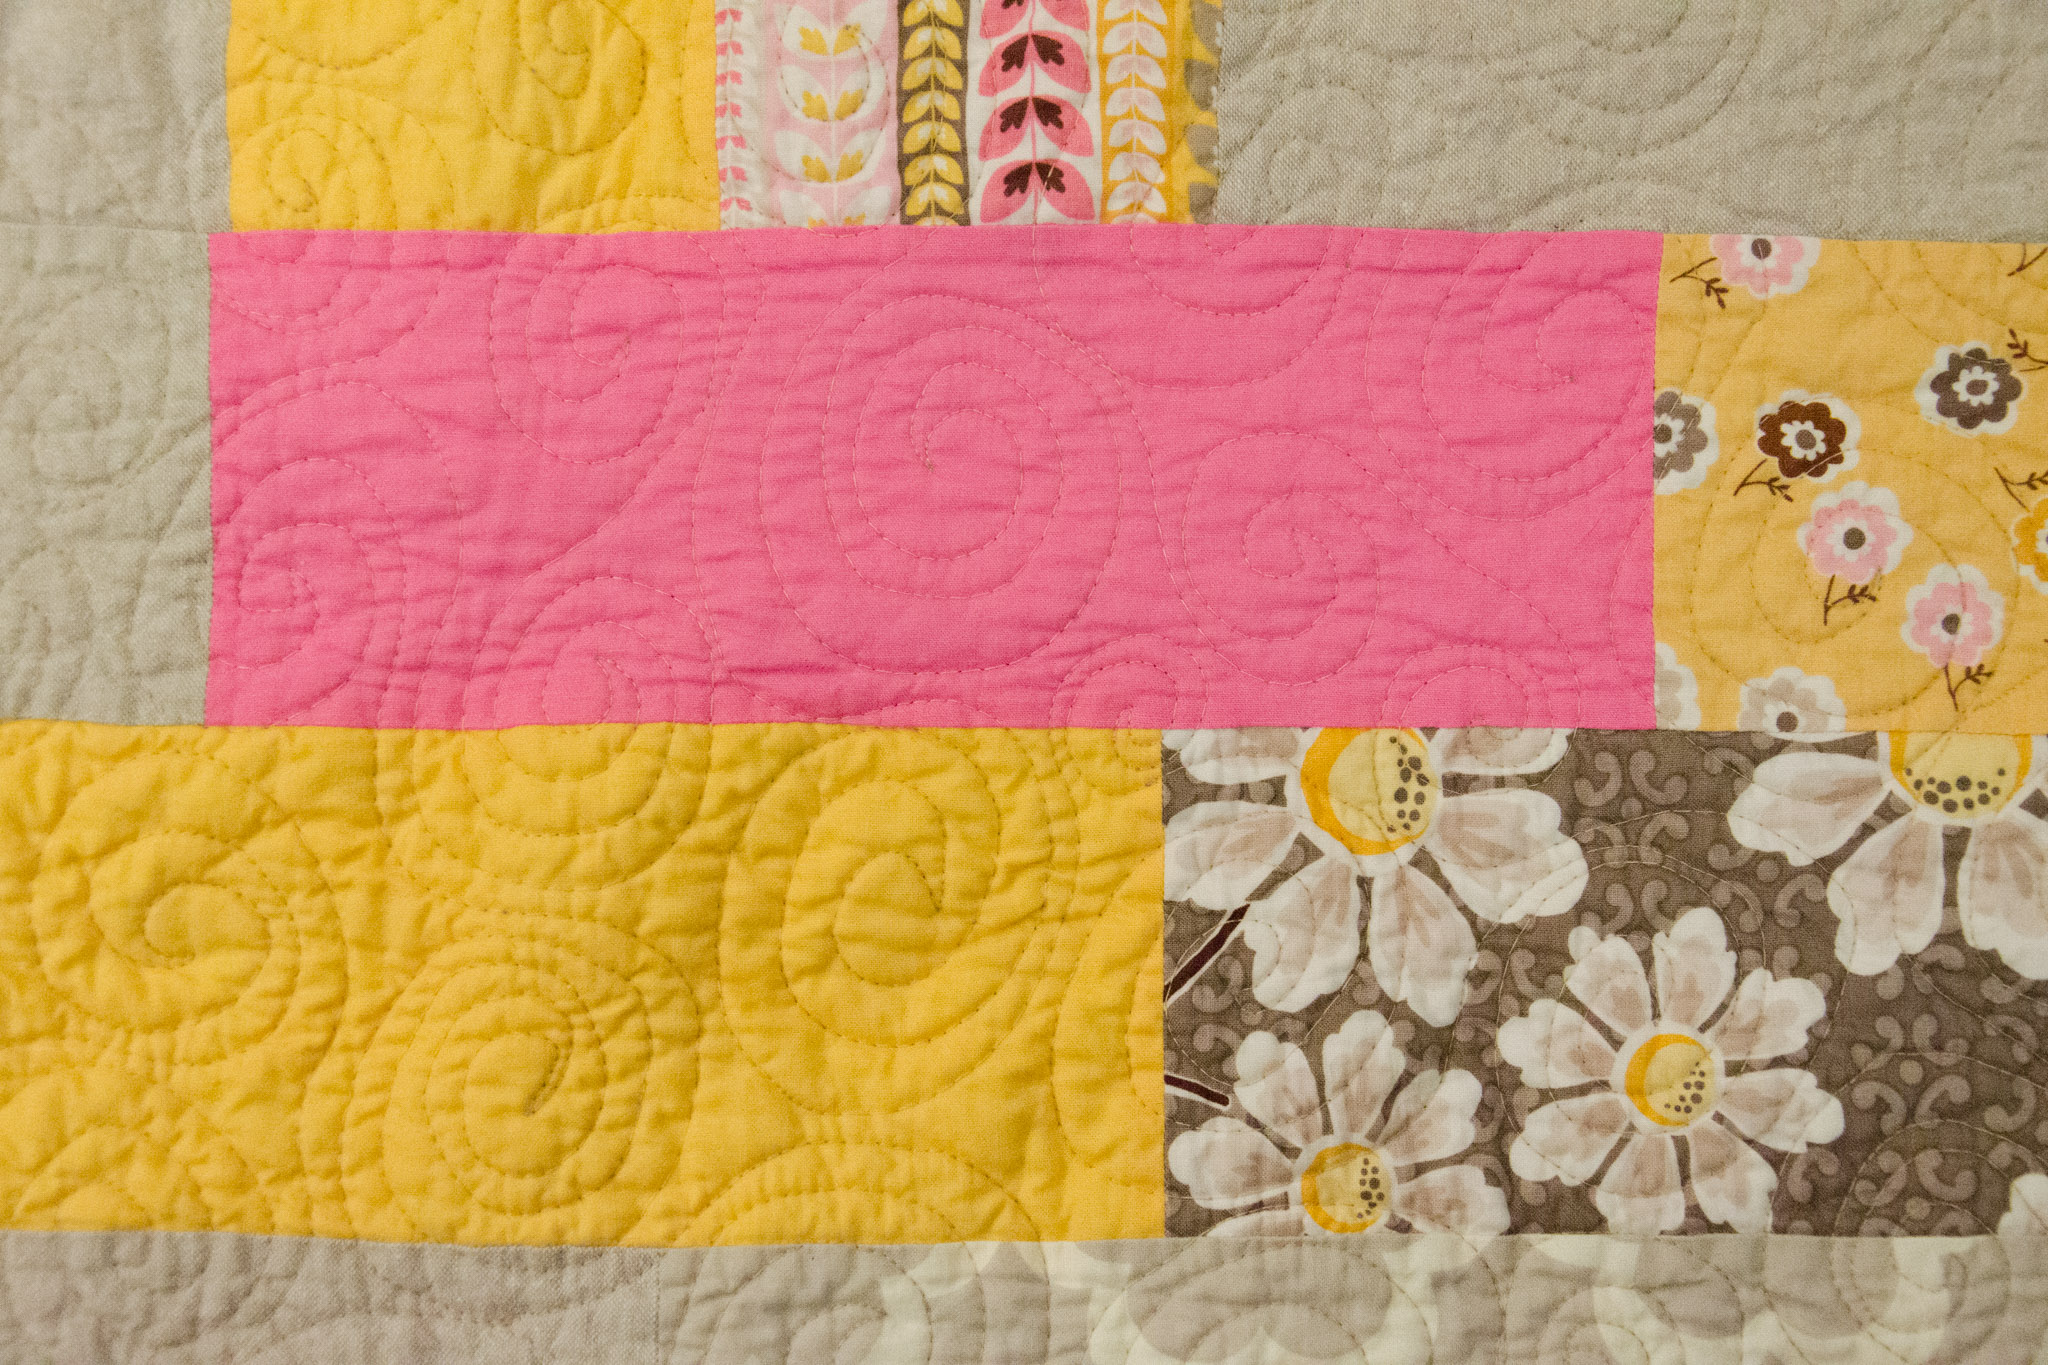
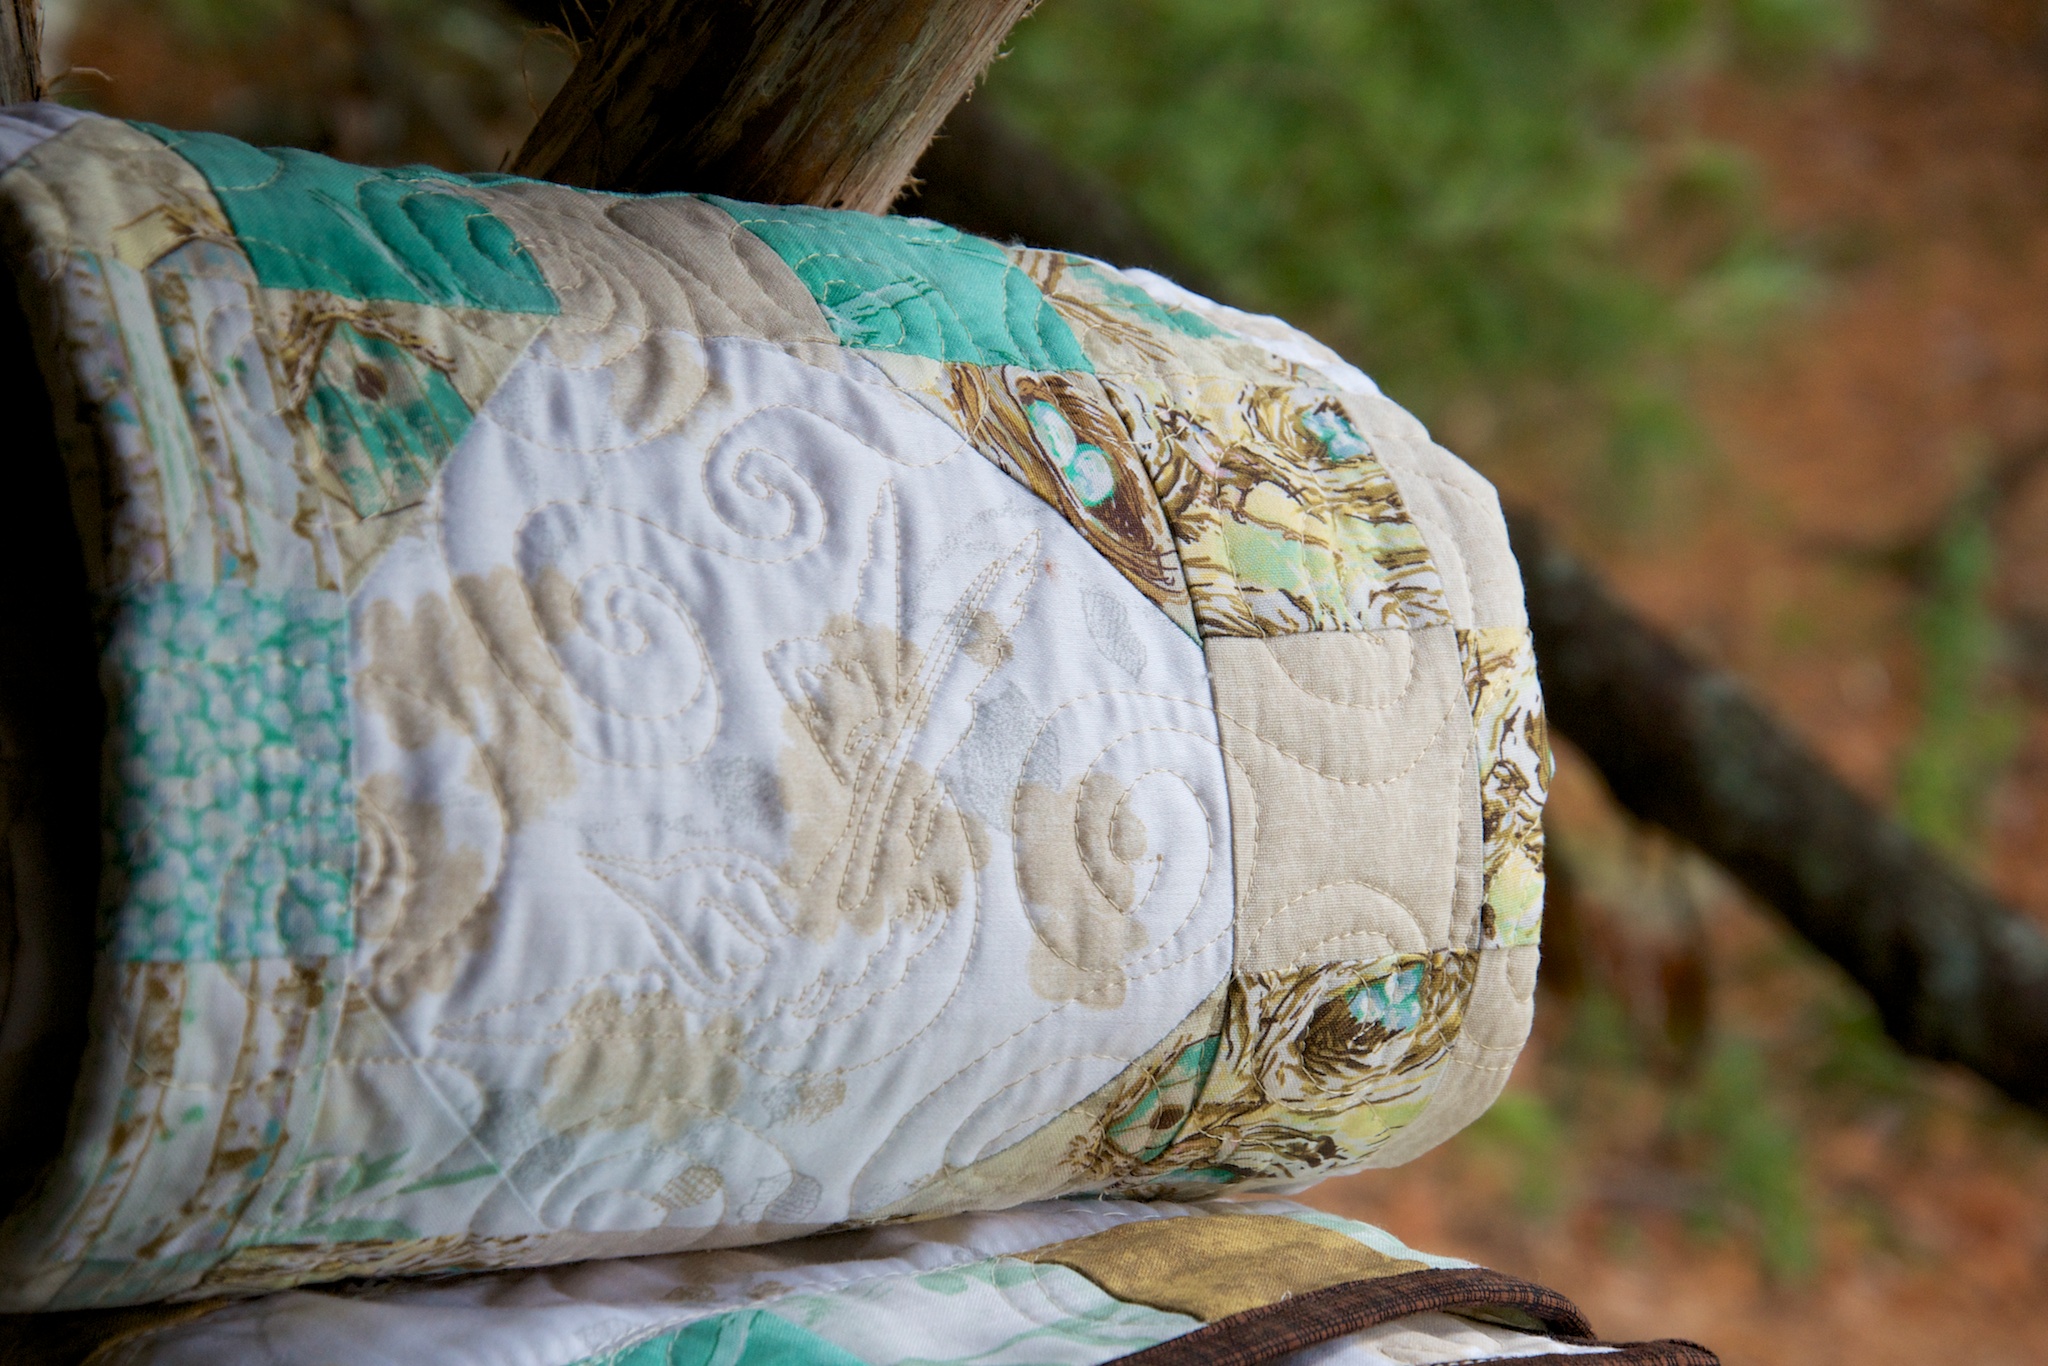
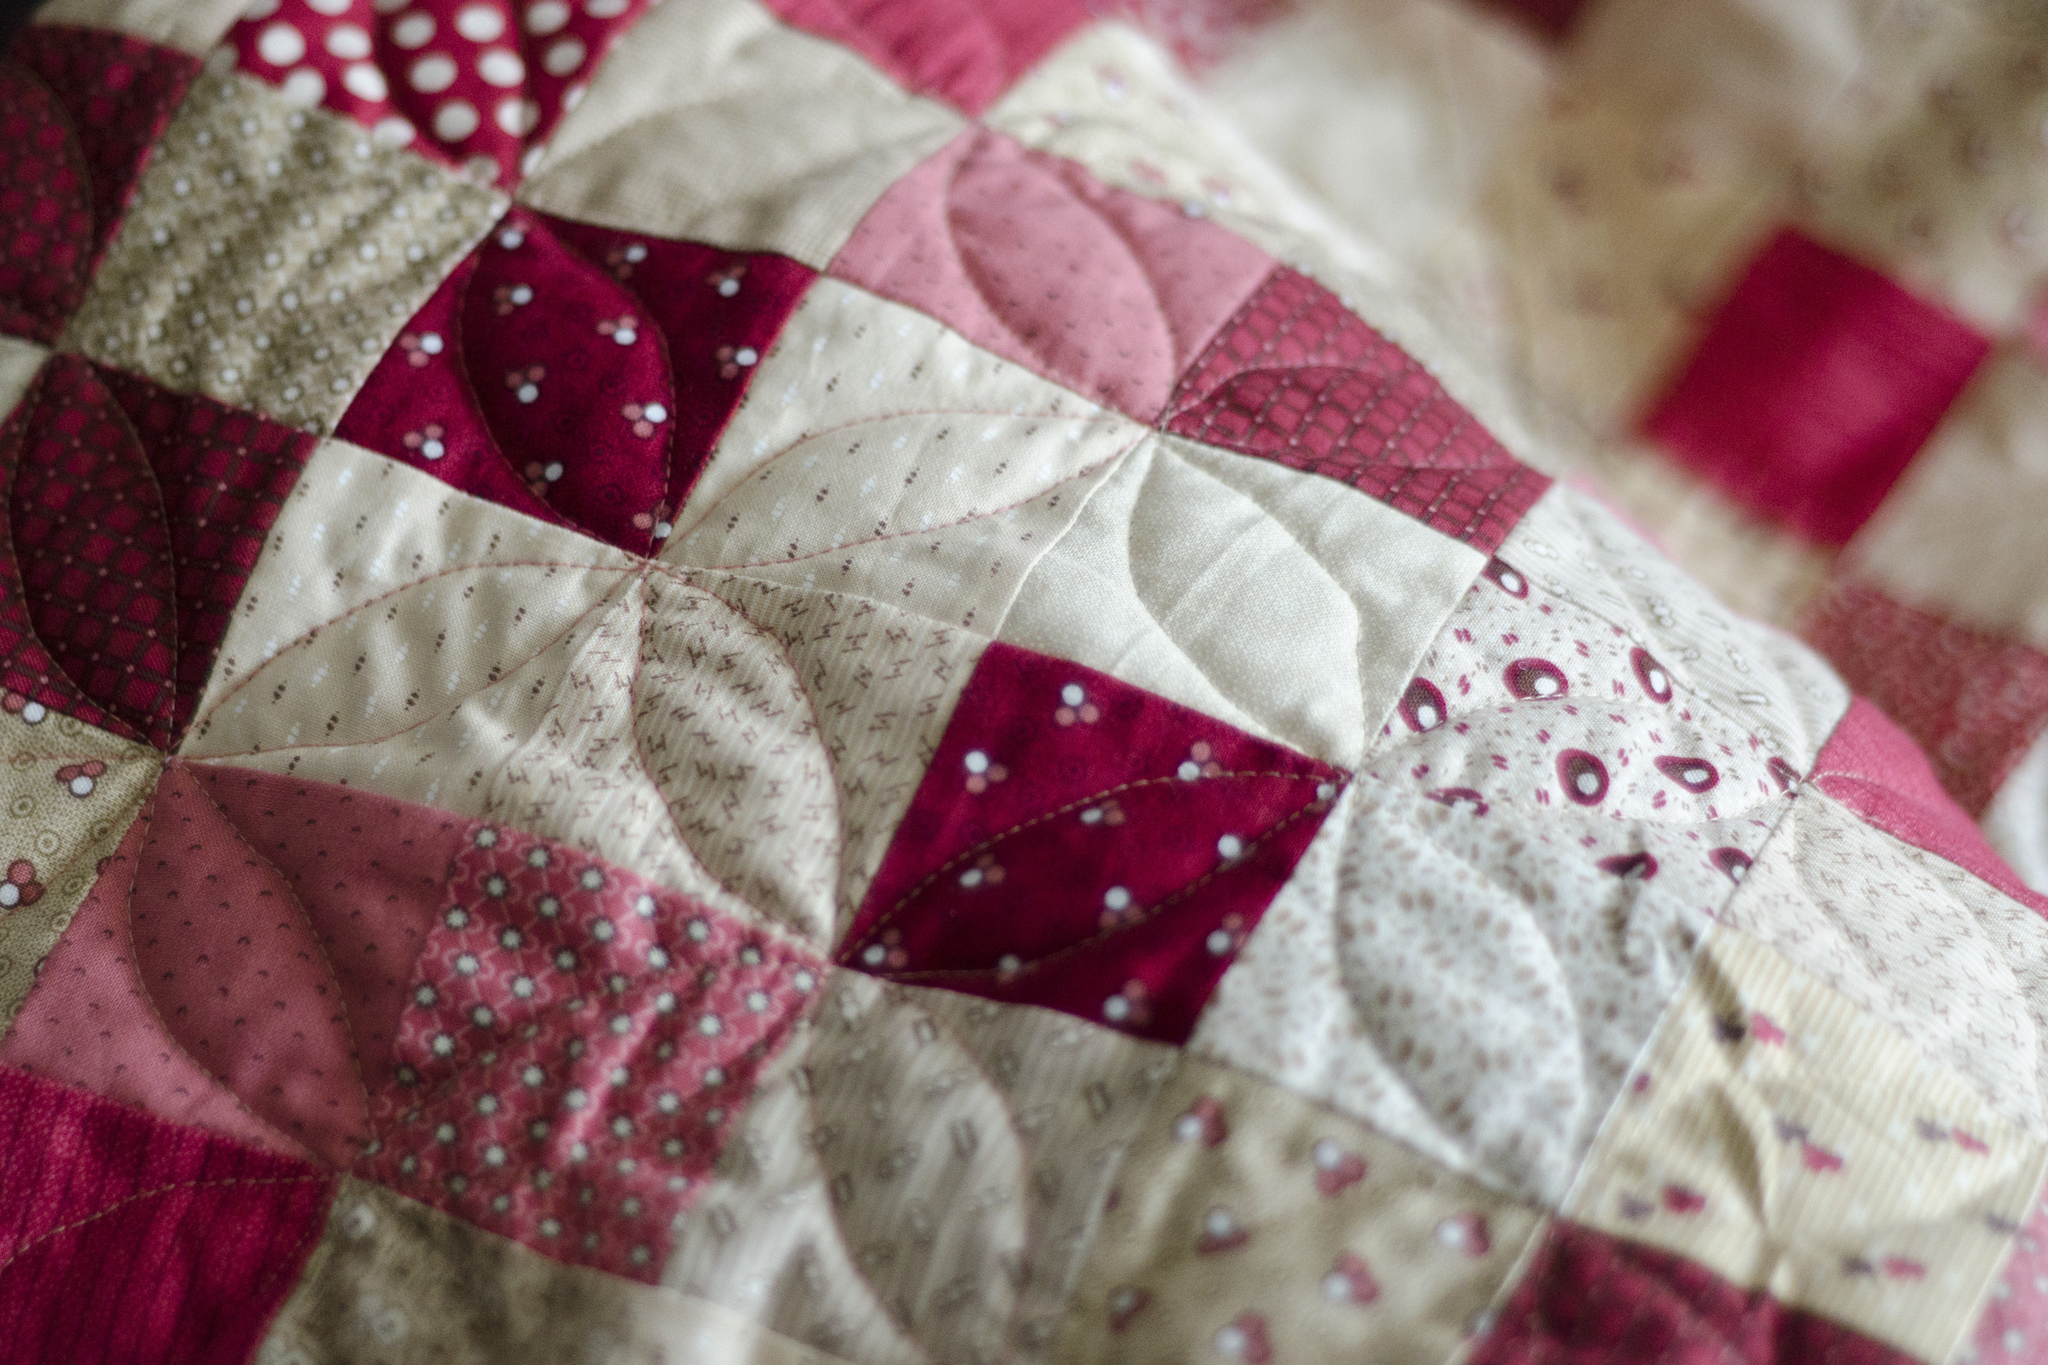
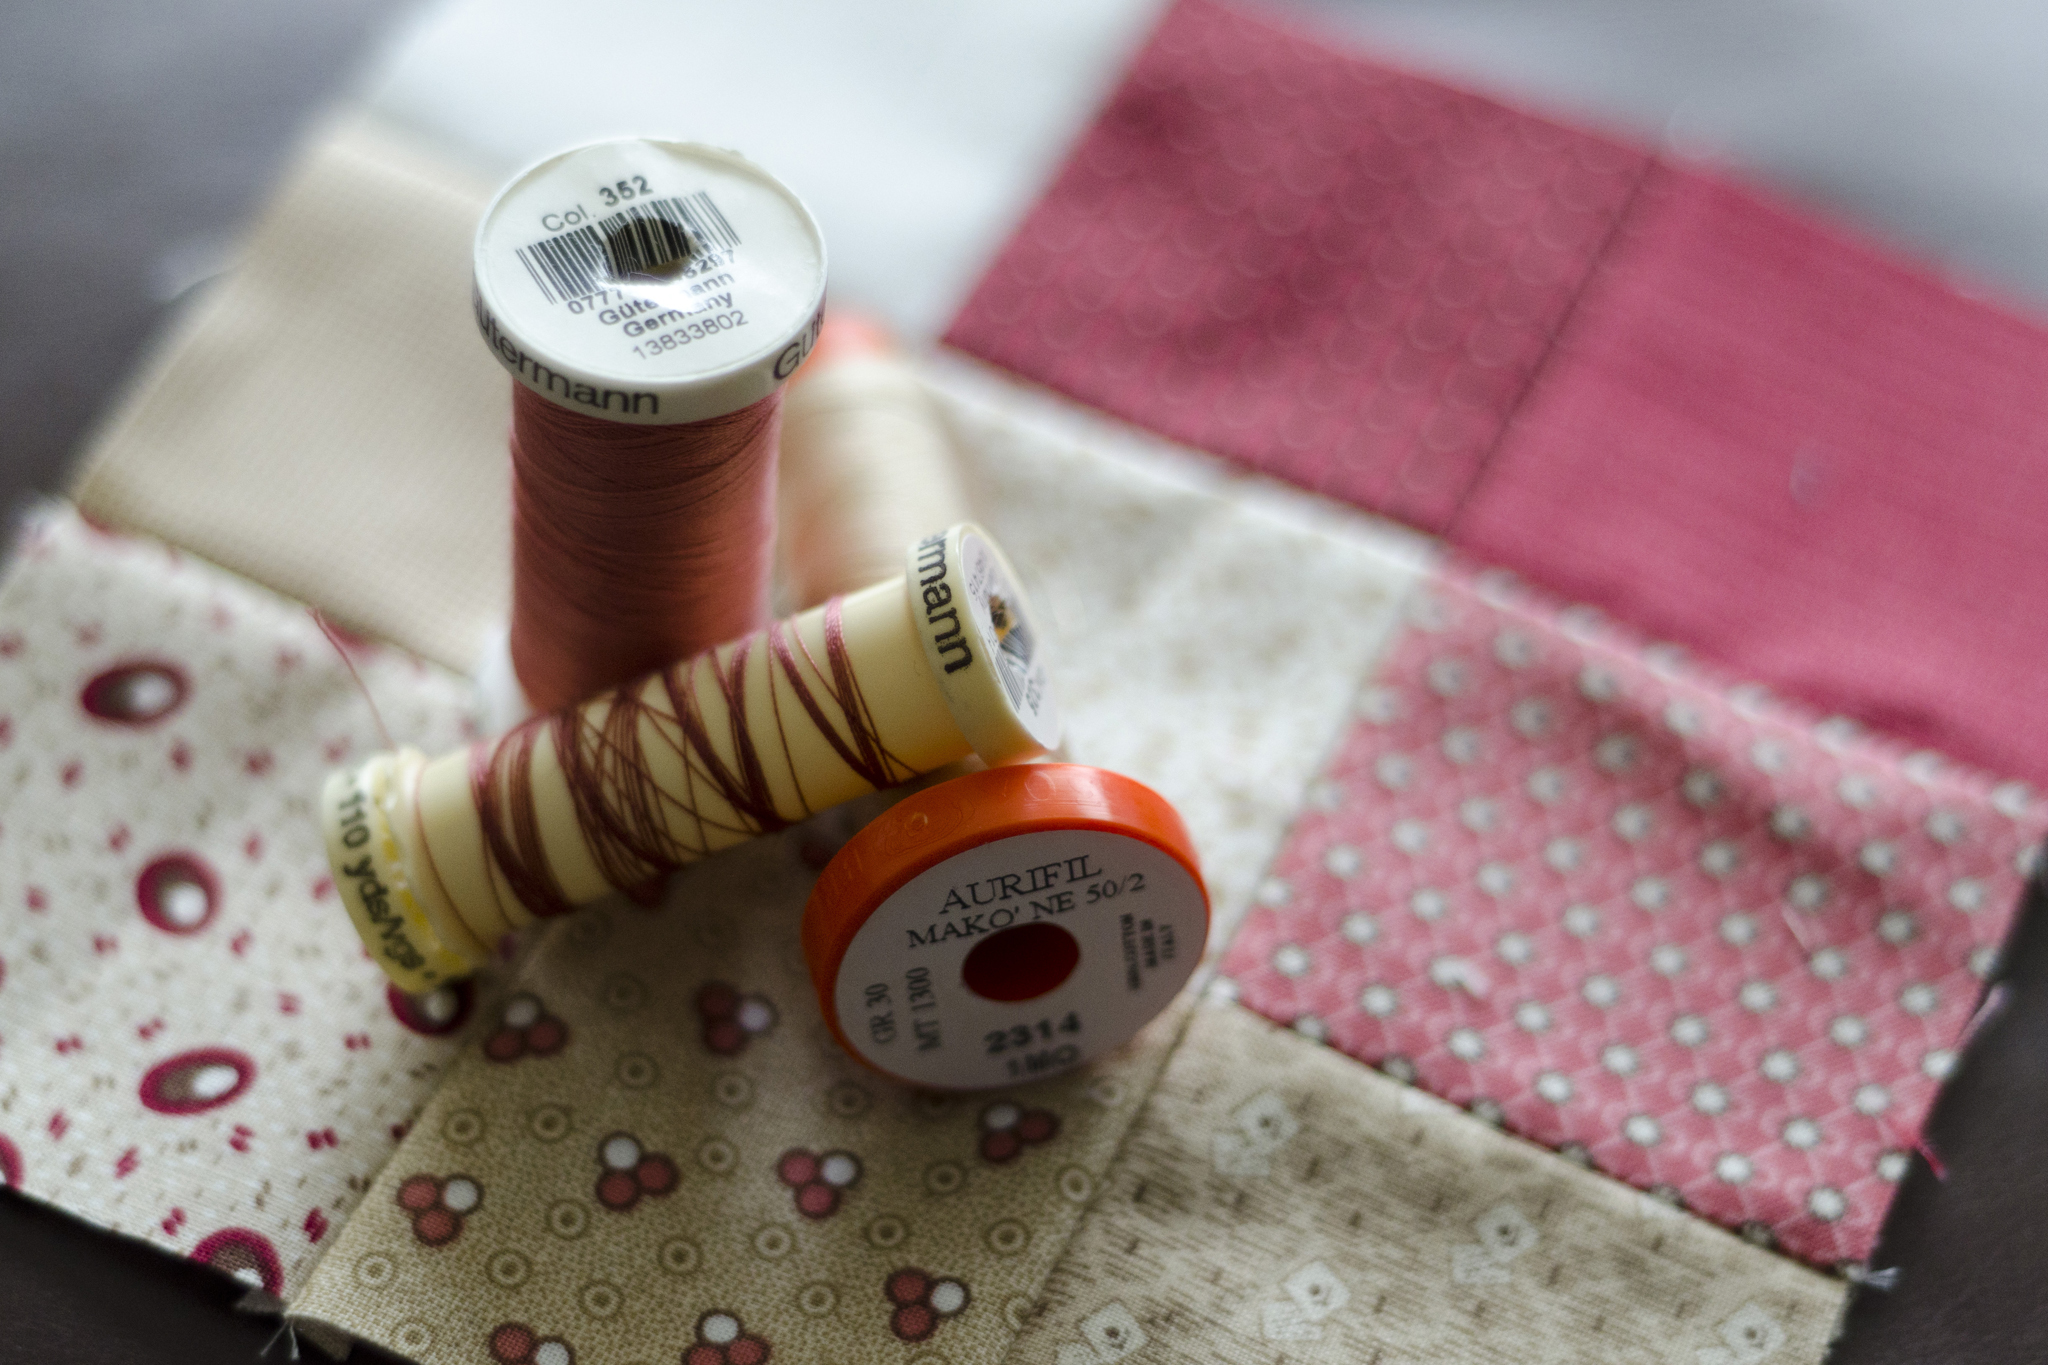
I quilted a few ghost hearts into the quilt, then did the rest in an orange peel pattern that was simple to pull off with the nine-patch construction of the quilt (although far from perfect). It seems appropriate that the orange peel quilting looks like exes and ohs. The hearts are quilted in two shades of pink, while the orange peel is mostly beige with a few pink highlights.

"Miniatures Heart" (detail), Rachael Arnold, February 2016, 54"x72".
“Miniatures Heart” (detail), Rachael Arnold, February 2016, 54″x72″.

I used wool batting for the first time since my War of 1812 Challenge quilt, and am not sure what I feel about it. It is wonderful to cuddle under during winter here in VT, but I’m not sold on the texture and drape of the finished quilt. I’m also worried about washing this one, uncertain how the Quilter’s Dream will react.

"Miniatures Heart" (detail), Rachael Arnold, February 2016, 54"x72".
“Miniatures Heart” (detail), Rachael Arnold, February 2016, 54″x72″. Photo by Carl Pfranger.

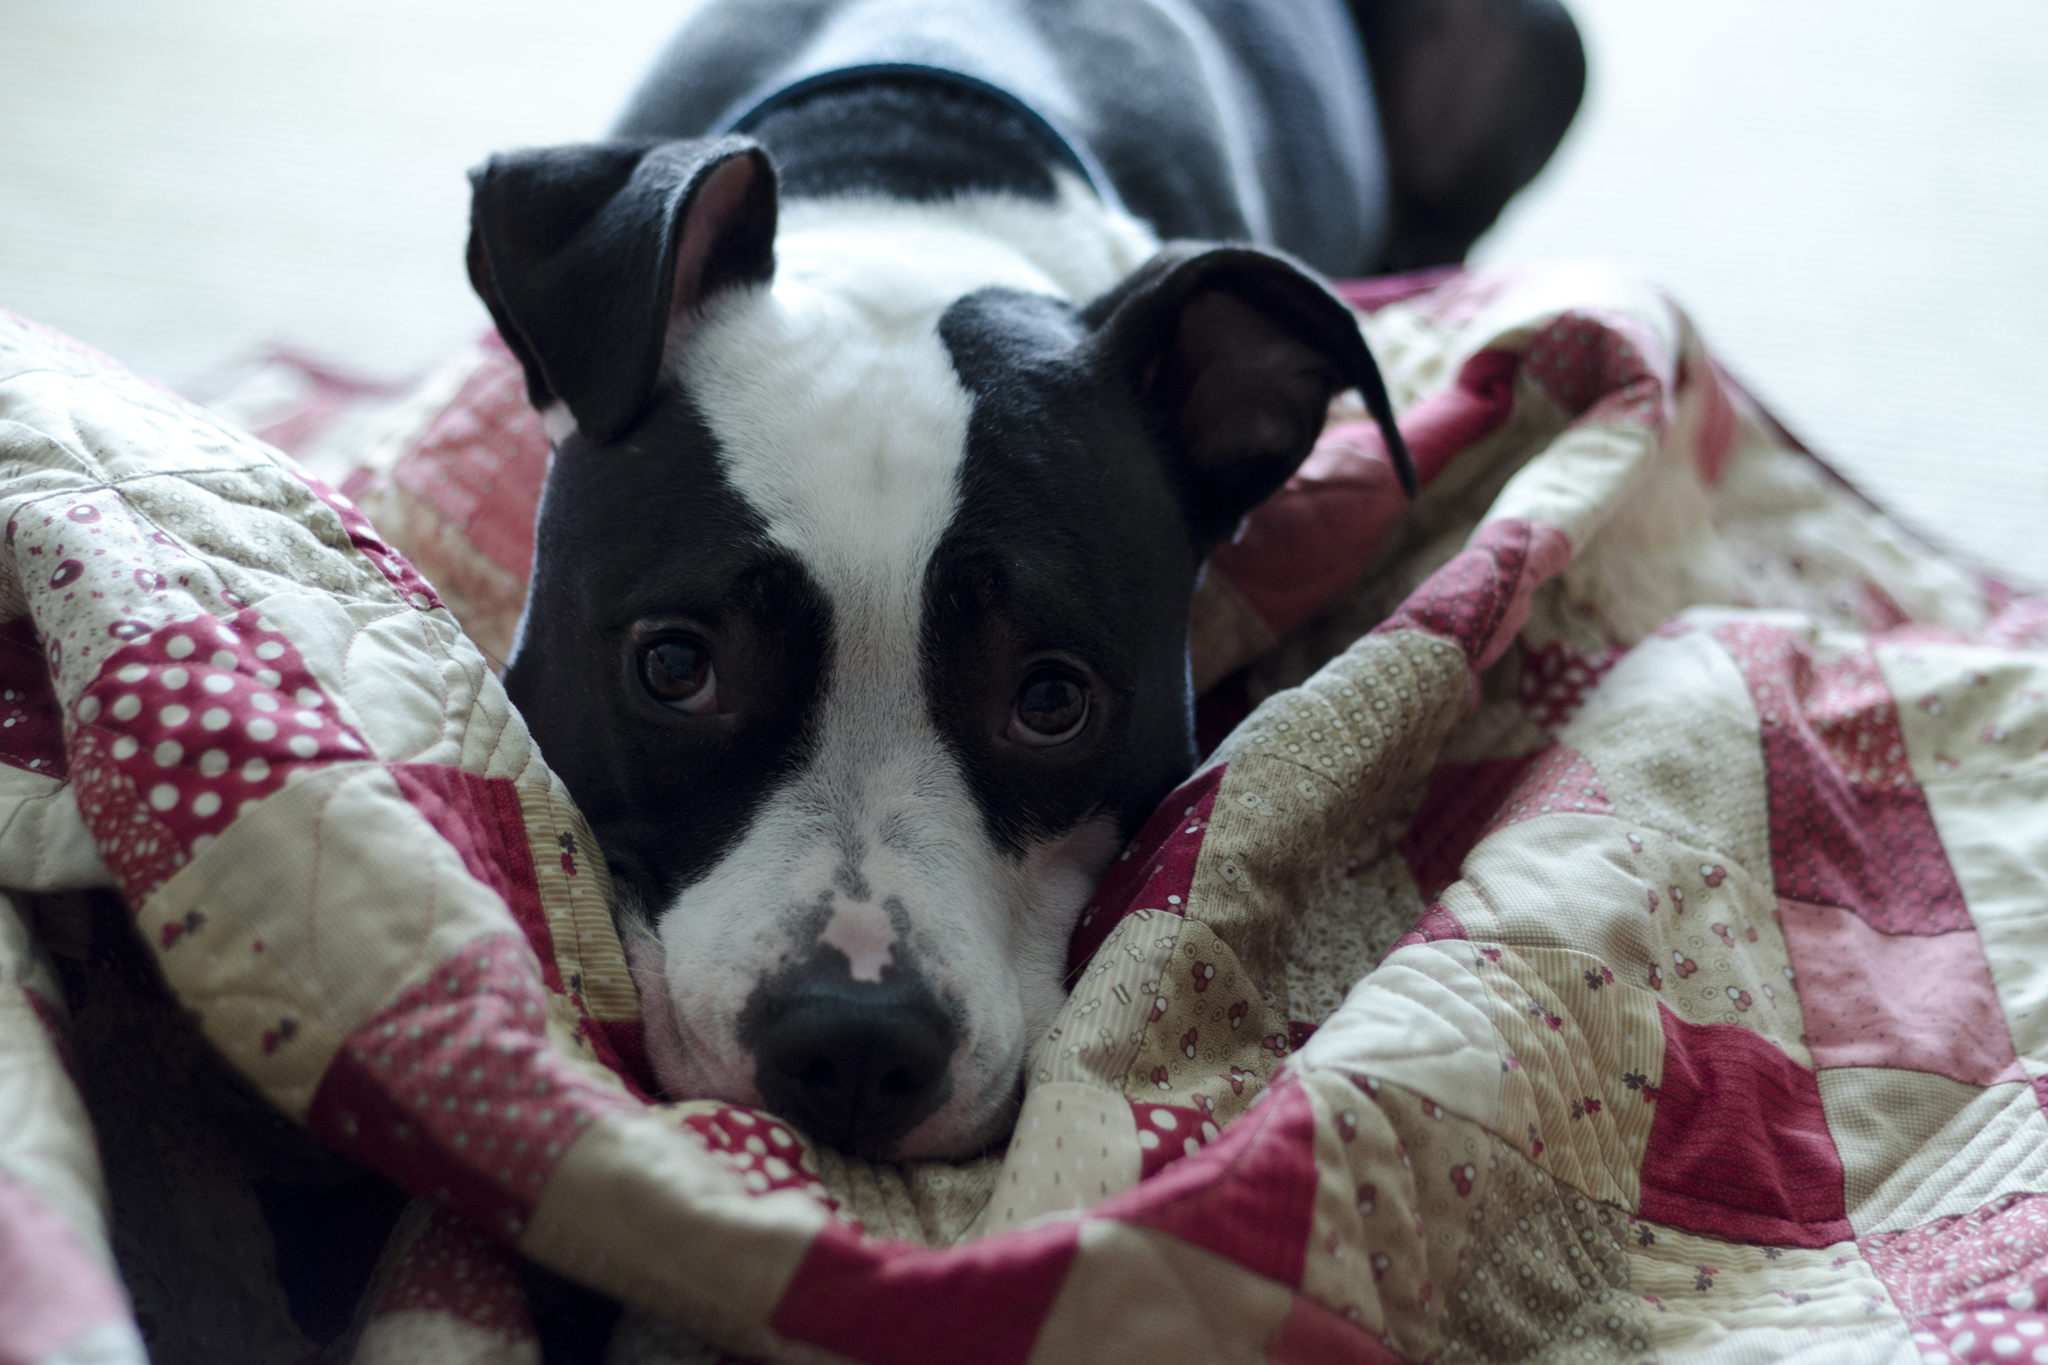
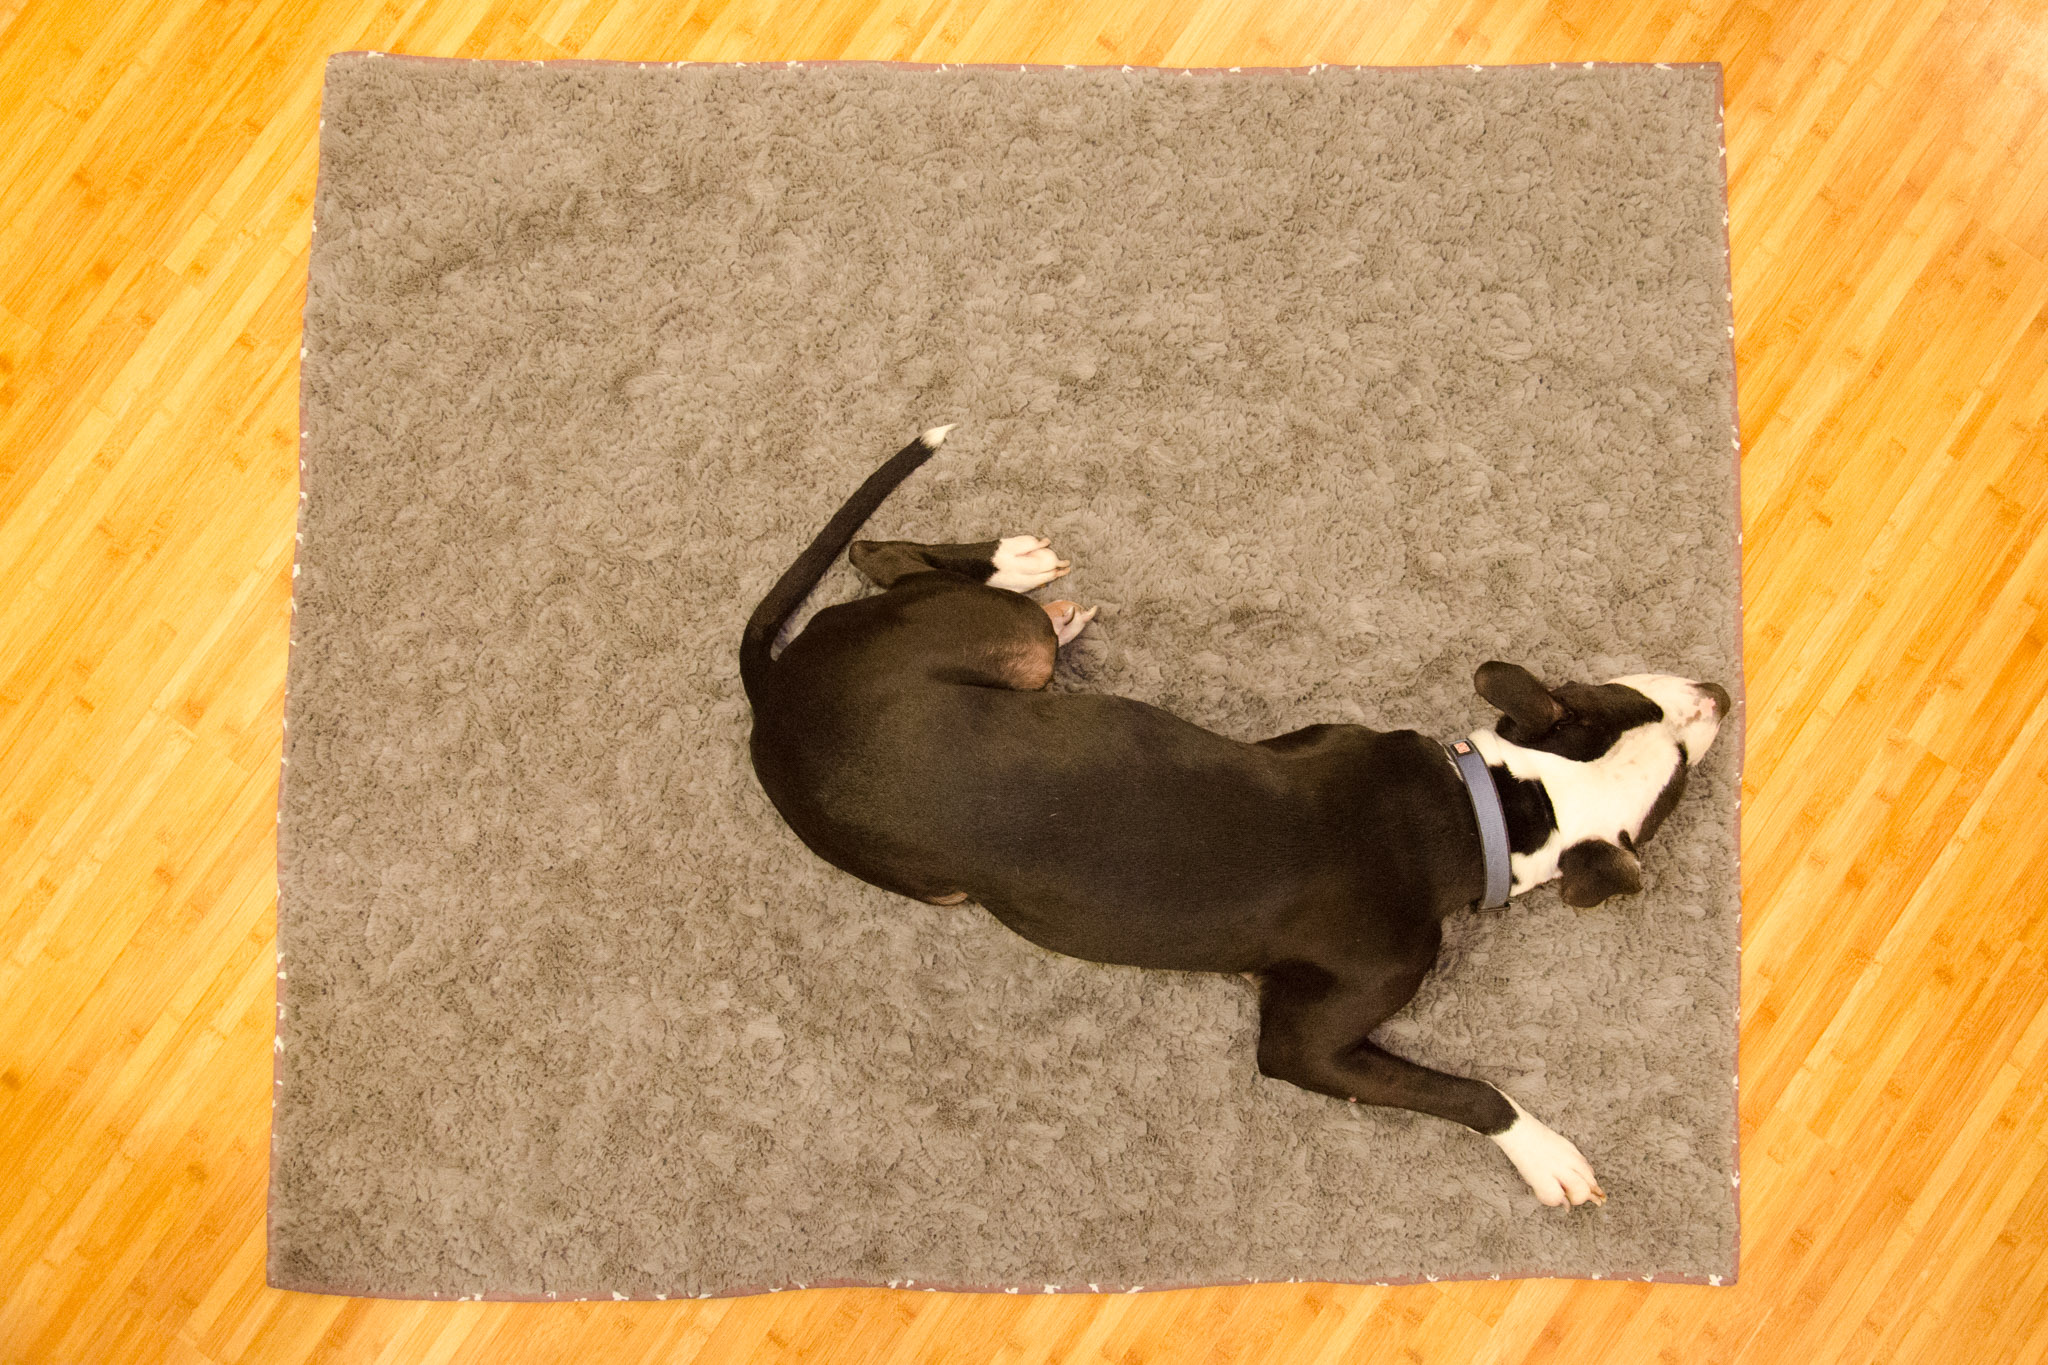
As my mother very bluntly noted on an in-progress social media post, the colors and design of this quilt are really not “me”. Yet I’d count it as one of my favorites. There’s just something about it that makes me happy, and it’s pretty apropos to the time of year. I foresee it being my quilt of choice here at home until spring comes around. That is, if Moof doesn’t keep stealing it.

"Miniatures Heart" (detail), Rachael Arnold, February 2016, 54"x72".

February 28th, 2016

Pear Tree of Life

Posted in Quilting

  • Baby quilts
  • Fabric Designer: Thomas Knauer
  • Fabric: Pear Tree
  • Finished projects
  • Q016DA

Just as 2015 kicked off with a baby quilt, so has 2016. The recipient of Disappearing Seven Wonders is now a big brother to a baby sister who needed her own quilt.

"Pear Tree of Life", Rachael Arnold, January 2016, 48"x48"
“Pear Tree of Life”, Rachael Arnold, January 2016, 48″×48″

After pulling out a bundle of Pear Tree and coordinating fabrics a few months ago, all progress stopped. I couldn’t settle on a design for the quilt. Then I came across the Into the Wild pattern and was inspired to cut into the stack. I wasn’t incredibly faithful to the pattern (although it was great visual inspiration), but I like how it turned out with the fabrics I used.

"Pear Tree of Life" (detail), Rachael Arnold, January 2016, 48"x48"
“Pear Tree of Life” (detail), Rachael Arnold, January 2016, 48″×48″

The most obvious change to the pattern was adding a square in a square (in a square) to the center, highlighting a motif from the eponymous print in the line. I also added in a few more half-square triangles where the original pattern had squares, and dropped the top and bottom rows in favor of a square quilt due to the amount of fabric I had.

"Pear Tree of Life" (detail), Rachael Arnold, January 2016, 48"x48"
“Pear Tree of Life” (detail), Rachael Arnold, January 2016, 48″×48″

It’s backed with blush-colored, star-embossed Minky, using 70/30 Cotton/Poly blend batting in between. The batting is a bit higher loft than I normally buy—I bought it a few months ago for a different project, but decided to use it for this quilt instead, knowing that the high poly content works out fine with the polyester cuddle fabric. It gives the quilt a good texture in the looping quilting.

"Pear Tree of Life" (detail), Rachael Arnold, January 2016, 48"x48"
“Pear Tree of Life” (detail), Rachael Arnold, January 2016, 48″×48″

I quilted it with pink 40wt Aurifil in alternating free-motion patterns, building out from the center. My ability to free-motion stitch in the ditch has not improved since my first attempts, from what I can tell, but my consistency with feathers has improved. It’s bound in a textured green print. I’m very happy with how the quilting stands out on the back.

"Pear Tree of Life" (detail), Rachael Arnold, January 2016, 48"x48"
“Pear Tree of Life” (detail), Rachael Arnold, January 2016, 48″×48″

After a few months of not sewing (much), it was nice to jump back in with a relatively simple quilt. I hope it keeps the baby warm through her first winter and beyond.

February 4th, 2016

The F-word

Posted in Quilting

  • Feminism
  • Finished projects
  • Q015CD
  • The F-word Quilt

I don’t give a fuck about using or hearing a bit of blue language. In fact, whether such words are truly profane, taboo, or vulgar could be an entirely different essay that I’m not nearly pious nor pedantic enough to write (there are far more interesting things to hold sacred). Four letter strings can often sum up sentiment in an unparalleled way.

But, forget about that one particular bad word for a moment. Keep the first letter, double the character count and you arrive at the dirtiest, crudest, most offensive word in modern English: feminist.

“The F-word”, Rachael Arnold, September 2015, 57″x57″.

This quilt came about because I’m tired of reading essays where the author says they’re not a feminist because feminism is icky while laying out arguments for what they actually are that are all dictionary feminism. I’m sick of reading screeds vilifying straw-men feminists written by people whose sole goal is fear-mongering. I’m weary from the constant low-level of discrimination I experience as a woman working in tech, even as I know that I’m privileged by a shocking level of near-equality compared to many of my cohort. I am absolutely exhausted by the media and people in the legislature telling me what is best for my body, income, career, mind, personality, and beliefs because I am a member of the so-called weaker sex.

It’s a rant in quilt form.

“The F-word” (detail), Rachael Arnold, September 2015, 57″x57″.

The F word. F——t. F******t. F#$!~+st. Feminist.

“The F-word” (detail), Rachael Arnold, September 2015, 57″x57″.

Details

Front: Kona Cotton Honey, Kaffe Fassett Shot Cotton Butter, Andover Textured Solid Magnum

Batting: Warm & Natural Cotton

Backing: Heather Ross Briar Rose Cricket Clover Lilac/Gold, Kaffe Fasset Shot Cotton Quartz, Kona Elegance White

Binding: Kaffe Fasset Shot Cotton Quartz

Quilting: A mix of machine embroidery quilting and straight line quilting using Guttermann cotton thread, with a small bit of hand quilting using white 28wt Aurifil.

“The F-word” (detail), Rachael Arnold, September 2015, 57″x57″.

Look for a longer post on the quilting of this project later this week.

“The F-word” (back), Rachael Arnold, September 2015, 57″x57″.

September 16th, 2015

Altered Steps

Posted in Quilting

  • Finished projects
  • Q015CC
  • The Wedding quilt

There are days I’m incredibly grateful that my first attempts at quilting didn’t scare me off forever. Case in point, my very first ever quilt project. I decided to make up my own bed-sized pattern using two different versions of the Altar Steps block that are both pretty fiddly (one had set-in seams, people. I don’t even like those now!), using fabric purchased from a box-store that shifted all over the place. It was a recipe for disaster.

"Altered Steps" by Rachael Arnold (detail)
“Altered Steps” (detail), Rachael Arnold, August 2015, 54″x68″. Photo by Carl Pfranger.

Somehow, I managed to complete 10 blocks (nine of one, one of the other), although there’s about a 1″ difference in size between them all. I clearly hadn’t read about chain piecing, judging by thread tails. I cut things incorrectly but still used them. I really have no idea what I was thinking. At some point, I came to my senses and moved on to a different project.

"Altered Steps" by Rachael Arnold (detail)
“Altered Steps” (detail), Rachael Arnold, August 2015, 54″x68″. Photo by Carl Pfranger.

In my effort to clear out old works in progress (for fear of being that quilter who has 20-year-old unfinished projects hoarded away in corners of their home—not that there’s anything wrong with that if you’re so inclined, it’s just not a good thing for me, personally—, I pulled out the blocks and decided to do something with it all. My self-imposed restraints: use up as much of the uncut yardage as possible, use all ten blocks, and don’t purchase any new supplies (no quilting thread, no batting, no backing—all stash).

"Altered Steps" by Rachael Arnold
“Altered Steps”, Rachael Arnold, August 2015, 54″x68″. Photo by Carl Pfranger.

I knew from the start that there was no way I’d actually make the originally planned quilt—not with these cheap, poorly cut, questionably coordinating fabrics. I also knew that I wanted to do something fast so that I could move on to a project I was in love with, not just in love with the idea of getting out of my sewing and head space.

"Altered Steps" by Rachael Arnold
“Altered Steps” (detail), Rachael Arnold, August 2015, 54″x68″. Photo by Carl Pfranger.

With wide sashing and overly large borders, I managed to use up most of the yardage, a small chunk of pieces that had been cut out (mostly the flowered 5″ squares and yellow strips), and nine of the blocks. The remaining yardage, block, and a few additional scraps made it onto the back and into the binding. The quilt finished at 54″ x 68″—a very respectable throw size, considering what I was working with.

"Altered Steps" by Rachael Arnold (back)
“Altered Steps” (back), Rachael Arnold, August 2015, 54″x68″. Photo by Carl Pfranger.

I backed it with the second sheet of the set I used when making the Bird’s Nest quilt, plus a strip of piecing. I used 80/20 batting, since that’s what would work from my stash (I only had to piece it once). This is the first time I’ve gone directly from quilting 100% cotton to 80/20 the next day, and I did notice a pretty clear difference in loft while quilting: the 80/20 is not nearly as flat. I think I would have preferred 100% cotton for this particular quilt, but it washed up beautifully in the end.

"Altered Steps" by Rachael Arnold (detail)
“Altered Steps” (back detail), Rachael Arnold, August 2015, 54″x68″. Photo by Carl Pfranger.

It’s quilted using a blown-up, much less well-controlled version of the “Flourish” design from the book Step-by-Step Free Motion Quilting by Christina Cameli (thanks Mom). The center is quilted using two similar light yellow cotton threads (because I didn’t have enough of one for the whole thing), while the borders (roughly) are quilted using a light blue (I had about 18″ left on the spool when I finished—talk about cutting it close). The bobbins are a mix of yellow and whatever light beige I had on hand in quantity. I used up the last of the yellow blender and a few more cut pieces as binding, finished by machine.

"Altered Steps" by Rachael Arnold (detail)
“Altered Steps” (detail), Rachael Arnold, August 2015, 54″x68″. Photo by Carl Pfranger.

Five years and 36 other quilts later, it feels great to have a finished project made from those very first blocks along with a stash that is three yards of fabric (that aren’t my style) and a sheet lighter. A part of me looks at this and asks “could I have done something more edgy, more modern, more creative, more my style,” but another part is happy to have something that went from boxed in pieces to pieced and basted in under a week. There will always be another project to be more innovative with.

Now to decide if the quilt needs a home or should stay at mine.

August 7th, 2015

Wheeling Ruffles (Sevillanas)

Posted in Quilting

  • Finished projects
  • Long-term project
  • Q015CB
  • Ruffles

For a time in 2011, I took Flamenco lessons. I’m mostly uncoordinated and soon decided to devote more time to my other fledgling hobby (quilting!), but was inspired to design this quilt. The design and fabric went hand-in-hand: I found the border print and designed the quilt around it. After building it out in Illustrator, I decided it needed ruffles—a decision that stymied immediate progress as I debated buying a ruffling foot or doing it all by hand.

Wheeling Ruffles front
“Wheeling Ruffles (Sevillanas)”, Rachael Arnold, July 2015, 47″x47″ (excluding ruffle). Photo by Carl Pfranger.

Fast forward to 2015: the fabrics were tucked away in a box, I’d since bought a ruffling foot for other projects, and my quilting aesthetic has shifted away from the quilt design and the style of the fabrics. I decided to make the quilt anyway, mostly to play with ruffles and to mark one more unfinished project off the list (and reduce my stash at the same time).

Wheeling Ruffles detail
“Wheeling Ruffles (Sevillanas)” (detail), Rachael Arnold, July 2015, 47″x47″ (excluding ruffle). Photo by Carl Pfranger.

The center medallion piecing is all straightforward pinwheels and flying geese, with a bit of machine applique added to the sashing (raw-edge via Steam-a-Seam 2 Lite, sewn with a ‘hand look’ applique stitch on my machine) . Instead of a plain inner border, however, there’s a ruffle—because what is a Flamenco-inspired anything without ruffles?

Wheeling Ruffles detail
“Wheeling Ruffles (Sevillanas)” (detail), Rachael Arnold, July 2015, 47″x47″ (excluding ruffle). Photo by Carl Pfranger.

To make the 3″ ruffled inner border, I cut 3.75″ x width-of-fabric strips, sewed two strips together with a flat-felled seam, used a rolled-hem foot to finish one side, then gathered it all with the ruffling foot using a standard stitch length (2.5 on my machine) and a tuck every 6 stitches. Once ruffled, I pressed it all to keep the pleats in place, then sewed the ruffle and a 3.5″ strip of background fabric to the medallion. Because ruffles are a bit hard to predict length for, I made sure mine were longer than I needed and used the exactly-cut background fabric (35.5″ long) to measure and gauge length as I sewed the seam. I mitered the corners of the inner border, trapping the ruffles there, mostly because it was an easy solution to handling the corners and I liked how it looked.

Wheeling Ruffles detail
“Wheeling Ruffles (Sevillanas)” (detail), Rachael Arnold, July 2015, 47″x47″ (excluding ruffle). Photo by Carl Pfranger.

The outer border uses strips of a border print, finished with mitered corners. I planned on adding another ruffle after the printed border just like the inner one with a background strip below, and then a final binding ruffle. But, when I attached the first side of this outer riffle, I found that the cheap border print fabric bunched and pulled far too much, so modified my plan to just use a ruffle on the binding. It worked out fine, and saved me having to purchase another 1.5yds of black for the second ruffle (they sure do eat up fabric!).

Wheeling Ruffles back
“Wheeling Ruffles (Sevillanas)” (back), Rachael Arnold, July 2015, 47″x47″ (excluding ruffle). Photo by Carl Pfranger.

The back is pieced together from leftover border print. I must have purchased what I did with that plan in mind, as I had the perfect amount. The quilting is a mix of Gutermann 100% Cotton thread in black and white, with Pellon Eco 70/30 as batting. I free motion quilted a mix of pebbles, stitches in ditches, vines and leaves based off the center square motif, little loops, and echoed the printed design in the outer border. It’s bound in the leftovers of the fabric I used to fussy cut the center square, and has a 6″ ruffle attached.

Wheeling Ruffles rolled
“Wheeling Ruffles (Sevillanas)” (detail), Rachael Arnold, July 2015, 47″x47″ (excluding ruffle). Photo by Carl Pfranger.

At 47″ square (+ 12″ of ruffle), this can either be a large wall-hanging or a kid quilt. I don’t know where it’ll end up, yet, but it feels great to cross another unfinished project off the list.

Known fabric list: Michael Miller Fairy Frost and Rouge et Noir Petals; Windham Toni Floral Toss; Springs Creative Saroya Lace Stripe and Saroya Abstract; Free Spirit Black Solid.

July 22nd, 2015

A Difference in Values

Posted in Quilting

  • Finished projects
  • Gifts
  • Q014BJ

We’re heading off on a week and a half-long vacation, first delivering this quilt in NY and visiting Carl’s family, then on to MO to visit my family. Forgive the photos, as we took them the night before leaving on our trip. Hope you’re having a wonderful time celebrating the holidays!


If I’m going to stick to a formulaic fabric selection, I thought I should at least mix up the shapes I’m using. However, a condensed timeline dictated simplicity, so I stuck with squares and rectangles. This stack of six fat quarters from Daisy Cottage; fat quarters of a generic pink solid, Kona Sunflower, and Fairy Frost in snow; and a yard of Essex Yarn Dyed in Flax went together quickly, but the values in the fabrics didn’t work out as well as the stack of blues and greens for the layout I used in Mustang Summing, so I mixed up the layout.

A message for baby V in Morse code
“V’s Morse Message” (sideways, top is on right of photo), Rachael Arnold, December 2014, 48″x56″. Photo by Carl Pfranger.

The result is a message to our new niece spelled out in Morse code, with the yarn dyed serving as spacers between letters and words. The whole thing is built on a 4″ finished grid, as I started with 4.5″ strips cut down into squares, 8.5″ rectangles, and 12.5″ rectangles. It finishes at 48″x56″.

A message for baby V in Morse code (detail)
“V’s Morse Message” (detail), Rachael Arnold, December 2014, 48″x56″. Photo by Carl Pfranger.

I feel bad admitting this, since the quilt became a gift (sorry, V!), but I had such a hard time focusing on this quilt. I cut the fabric into strips soon after finishing Mustang Summing, but kept procrastinating on starting. Originally, I was going to make an equilateral triangle quilt. Then we found out a new niece was being added to the family, so it became her quilt. It took until the day she was born for the idea of Morse code to inspire me. Maybe I was just holding out for the spark.

A message for baby V in Morse code (detail)
“V’s Morse Message” (detail), Rachael Arnold, December 2014, 48″x56″. Photo by Carl Pfranger.

The back is nice and soft, courtesy Minky in the Dynasty pattern, oyster color (although the quilting hides the pattern). There’s low-loft cotton in the middle, as usual. I quilted it in an all-over swirl using Aurifil thread that I picked up from the local quilt shop. I forgot how much my machine loves this thread. The binding is a print from Brambleberry Ridge by Violet Craft.

Dogs love quilts
“V’s Morse Message” (back), Rachael Arnold, December 2014, 48″x56″. Photo by Carl Pfranger. Moof decided the back needed a little something extra for the photo.

Since I didn’t expect to finish any more quilts in 2014, I didn’t have any labels to put on this one. For now, there’s a handwritten one on the front. Perhaps I’ll have to add another in the coming months once I order more.

A message for baby V in Morse code (detail)
“V’s Morse Message” (detail), Rachael Arnold, December 2014, 48″x56″. Photo by Carl Pfranger.

I hope the size of this can grow with her and keep her warm for years. Now I need to get started on quilts for her siblings!

December 25th, 2014

Mustang Summing

Posted in Quilting

  • Fabric Designer: Melody Miller
  • Fabric Designer: Rashida Coleman-Hale
  • Fabric: Essex Linen
  • Fabric: Linen
  • Finished projects
  • Q014BI

Two things burrowed their way into my subconscious during six months of not quilting this year: all the plus quilts floating around blogland / Pinterest and the new kids on the fabric block, Cotton+Steel. It shouldn’t surprise me that I brought home a fat quarter pack from the local quilt shop comprising prints from Cotton+Steel (and coordinating solids, a coordinating Cloud9 print), nor that my brain immediately thought “plus quilt”! Add in a yard of Olive Essex Yarn Dyed linen/cotton blend, et voilà: Mustang Summing.

Mustang Summing
“Mustang Summing”, Rachael Arnold, October 2014, 48″x56″. Photo by Carl Pfranger.

I sketched out the layout in Illustrator, aiming for something in the 50″ range on each side, moving things around until I was happy. The arrangement that looked right used 4.5″ unfinished squares, making the quilt 48″x56″. In hindsight, I could have used 5″ squares with the fabric I had, but I have a serious problem about miscalculating the number of squares from fat quarters.

Mustang Summing front
“Mustang Summing”, Rachael Arnold, October 2014, 48″x56″. Photo by Carl Pfranger.

In software engineering, we say that good programmers are lazy programmers—good code doesn’t have tedious, repetitive sections because we generalize things to save typing, and automate anything we can. In quilting, I often think the adage is inverse—a good quilter is masochistic and likes using as many small pieces as possible in repetitive ways. More often than not, the engineer in me wins out. I used two 4.5″ squares and a 12.5″ rectangle for each plus rather than make them entirely from squares (except for the three that I cut wrong, which are five squares). Less cutting and less seaming makes piecing more efficient. If only I could automate the cutting with technology I have at home.

Mustang Summing
“Mustang Summing” (detail), Rachael Arnold, October 2014, 48″x56″. Photo by Carl Pfranger. You can see my cutting mistake in the navy/aqua plus.

I love the warm brown/olive tone in the Essex Yarn Dyed (and how it blends into a warm gray from a distance), and let that guide my choice of quilting threads—a heavyweight russet Gutermann poly thread. I kept the quilting simple, echoing the seams, with Nature’s Touch White batting in the middle.

Mustang Summing back
“Mustang Summing” (back), Rachael Arnold, October 2014, 48″x56″. Photo by Carl Pfranger.

It took a while to solve the problem of backing and binding. The first backing yardage I purchased was too cool, the scraps from the top too few, and nothing in my stash inspired me. I finally settled on another yard dyed linen, mixed with a column of strips leftover from the top. I settled on a plain blue solid (Kona Nightfall) from the stash to bind it.

Mustang Summing label
“Mustang Summing” (back detail), Rachael Arnold, October 2014, 48″x56″. Photo by Carl Pfranger.

With this finish, I’ve completed more quilts this year than I did in 2013, despite not quilting for six months. Things go so much more quickly when I actually complete everything I start! As of now, the only unfinished project I’ve started this year is a corset that I spent a few hours on back in May. Not too shabby.

“Mustang Sally” was stuck in my head the entire time I worked on this quilt. Thus the name, if you can make the same mental leap I seemed to do.

November 9th, 2014

Carissima / A Snapshot of HC 04’–08’

Posted in Quilting

  • Finished projects
  • For the maker
  • Q014BG
  • T-shirt quilt

Thine arms are ever warm,
Thine arms are ever warm.
Memory still shall close enfold,
Bringing us joys of days of yore;
Faith shall thy constant fame uphold,
While years, Carissima, grow cold.
We love thee evermore, We love thee evermore.

— M. W. Stryker, 1901
Excerpt from “Carissima” (The alma mater of Hamilton College)

Like most residential college students, I lived in school t-shirts while pursuing my undergrad degree. Then, as I moved along in my professional career, I found myself wearing them less often (hastened by the fact that I lived a mere 15 minutes away from my alma mater). When we packed for our move to Vermont (downsizing in the process), I refused to move the bag of shirts yet again so, I spent some time one afternoon fusing on interfacing and cutting the shirts into future quilt pieces. Those took up far less room in packing boxes.

Now—eighteen months later—it took just a single evening to piece them into a quilt top. All told there are 21 shirts represented (some with multiple squares depending on their print design).

Hamilton College ’04-’08: T-shirt Quilt
“Carissima / A snapshot of HC 04’–08’”, Rachael Arnold, October 2014, 58″ x 60″. Photo by Carl Pfranger.

It’s a partially-complete capsule of my four years—music, dorms, publications, social justice, just plain social, and a summer internship that set me on the road to my career. I even designed a couple of the shirts (and countless posters, event invitations, and publication layouts). It’s oddly lacking in reference to my major (I still wear our hoodie) or the on-campus internship that ate up over 20 hours of every week (and a few summers).

Hamilton College ’04-’08: T-shirt Quilt
Carissima / A snapshot of HC 04’–08’” (detail), Rachael Arnold, October 2014, 58″ x 60″.

For backing, I spray-basted two layers of fleece in the school colors (“buff & blue”, or in this case Joann Fabrics Anti-Pill Fleece in Camel and Navy Blue Tartan), then sewed the outline of an ‘H’ shaped after the official logotype. After cutting out the top layer inside the ‘H’, I zig-zag stitched around the cut out to secure it before basting the top to the two layers of fleece. Eagle-eyed readers will notice it’s slightly narrower than square; I trimmed off an inch from both sides so that I didn’t need to piece the 58″-wide backing fleece.

Hamilton College ’04-’08: T-shirt Quilt (back)
Carissima / A snapshot of HC 04’–08’” (back), Rachael Arnold, October 2014, 58″ x 60″. Photo by Carl Pfranger.

I chose to hand tie the quilt rather than machine quilt it for no reason other than wanting to tie a quilt. Again, I went with the school colors, using embroidery floss I had at home (DMC colors 842 and 823, inherited from my grandma). It was not easy pulling two full-thickness strands of embroidery floss through the layers, but a few TV marathon sessions (a habit started in college) and a few large tapestry needles got me through.

Hamilton College ’04-’08: T-shirt Quilt
Carissima / A snapshot of HC 04’–08’” (detail), Rachael Arnold, October 2014, 58″ x 60″.

In my haste to finish it, I made a rookie mistake of using unwashed cotton binding (Moda Bella Solid Royal), which shrank in the wash. It’s usually not an issue—I don’t prewash fabrics so they all shrink together, but well-worn t-shirts are another matter. The result is a slightly rumpled edge and corners that like to turn up. It just adds more character in a memento of four years full of it. I’m looking forward to cozying up with this during my second Vermont winter. With two layers of fleece, it’s quite warm!

Hamilton College ’04-’08: T-shirt Quilt
Carissima / A snapshot of HC 04’–08’” (detail), Rachael Arnold, October 2014, 58″ x 60″. Oh Hamilton, staunch Hamilton, why so serious when I offer you a cozy quilt?

I hope you’ll forgive me for delaying this post for a couple weeks for photo purposes. It seemed fitting to wait until we drove back to Utica for a weekend, giving us a chance to take photos on “The Hill” where it all started. The weather didn’t cooperate, but it certainly brought back memories. Also, there’s no small amount of irony that the Dark Side tee anchors the quilt (as well it should, considering my dorm choices for three years), yet we took all of the photos on the light side of campus. It fits.

October 27th, 2014

The Bird’s Nest Quilt

Posted in Quilting

  • Birds Nest quilt
  • Embroidered quilting
  • Finished projects
  • Free-motion quilting
  • Q014BH

Early in my quilting adventures, I was guilty of starting many more projects than I finished. Case in point: this quilt started life in April 2011, but a block disappeared as I was piecing them into rows and I quickly moved on to newer, shinier projects. In the 43 months between then and now, the almost-completed top and its scrap fabric have migrated from box to bin to box, apartment to house to apartment. So consigned to oblivion, it wasn’t even mentioned in the unfinished projects lists in my yearly review posts of 2012 and 2013.

Bird’s Nest Quilt (front)
“Bird’s Nest Quilt”, Rachael Arnold, October 2014, 38″×50″. Photo by Carl Pfranger.

I started the top shortly after buying a Jellie roll and the book Two from One Jelly Roll Quilts by Pam and Nicky Lintott. It’s made from alternating 6″ nine patches and snowball blocks, using 2.5″ strips and a background fabric for the snowball (in this case a Target cotton sheet set clearance buy). After one of the blocks went missing, I bought a charm pack of the fabric with which to recreate the stray block, but never followed through on piecing it.

Bird’s Nest Quilt (detail)
“Bird’s Nest Quilt”, Rachael Arnold, October 2014, 38″×50″. Photo by Carl Pfranger.

The host of unfinished projects in my sewing closet has lately become mental as well as physical clutter, demanding commitment. I unboxed this one while considering co-opting the backing fabric for another quilt you’ll see soon. Instead, I finished piecing it while waiting for a different fabric to ship for the other quilt. When I opened the box, the missing block was there on top—found and again forgotten at some point over the years. A few seams, two borders (most of which were already pieced), and it was done in the span of an hour. I’m glad it was a simple quilt design; I de-stashed the book a year or two ago.

Bird’s Nest Quilt (detail)
“Bird’s Nest Quilt” (detail), Rachael Arnold, October 2014, 38″×50″. Photo by Carl Pfranger.

To fit the bird nest theme, I used a stashed embroidery quilting bird motif to quilt some of the snowball blocks and two of the corners. The rest of the blocks are quilted with an all-over swirl design, the borders feathered. The sheeting fabric was somewhat difficult to quilt as it didn’t glide over my machine like quilter’s cotton does, but my free-motion skills aren’t perfect anyhow. All the free motion made for quick work—it went from basted to quilted in a single evening.

Bird’s Nest Quilt (back)
“Bird’s Nest Quilt” (back), Rachael Arnold, October 2014, 38″×50″. Photo by Carl Pfranger.

And so my sixth quilt start became my thirty-second quilt finish. Working with the older piecing, I could tell how my skills have improved—small betterments became a substantial change that I hadn’t otherwise noticed. There’s also something to be said for ease of working with high-quality fabric instead of the cheap stuff this is made of.

Bird’s Nest Quilt (detail)
“Bird’s Nest Quilt” (detail), Rachael Arnold, October 2014, 38″×50″. Photo by Carl Pfranger.

In the end, I didn’t need that charm pack at all, although a few charms made it into the binding when I found myself short on the brown texture. Perhaps I’ll make a pillow or two to match—I still have an entire twin sheet plus scraps of the background and backing fabric. Regardless of its future, it feels great to recover the storage space and knock another unfinished project off the list.

Bird’s Nest Quilt (detail)
“Bird’s Nest Quilt” (detail), Rachael Arnold, October 2014, 38″×50″. Photo by Carl Pfranger.

In the realm of quilting, this is hardly an “old” project to finally finish. What’s the oldest project you’ve ever dug out of a box and finished up?

October 19th, 2014

Road To Community

Posted in Quilting

  • Batiks
  • Finished projects
  • Q014BF

In 2012, I participated in a monthly sampler group at one of the quilt shops in Utica. I kept up with the block piecing during the course of the sampler, but they’ve been languishing in a box ever since. I lost track of both the number of times I’ve sketched layouts for the twelve blocks and the layouts I liked, so the blocks sat unset and out of mind. Then, a need to carve out sewing time amidst wedding planning grew, culminating in a strike of inspiration for a simple layout for these blocks. So, out they came!

Road to Community (Front)
“Road to Community”, Rachael Arnold, September 2014, 82″ x 82″

The theme of the sampler was “Road Trip”, with each block name corresponding to a place in the United States. I described each of the blocks in quarterly installments as I was working through them: Road to California, Cheyenne, and Baton Rouge; Road to Oklahoma City, Philadelphia Pavement, and Alabama; Kansas Star, Chicago Pavements, and Union Square; and Connecticut, State of Georgia, and Road to the White House.

Although the layout eluded me, I knew I wanted to riff off the idea of road trips and asphalt. I gathered additional fabric for the quilt as I traveled that year, picking up the grey texture from Downtown (Windham Fabrics) along with white and yellow batiks to fit the road markings and asphalt idea. I realized later that there wasn’t nearly enough of the grey texture, so I purchased a length of Crackle (also Windham Fabrics).

Road to Community (front detail)
“Road to Community” (detail), Rachael Arnold, September 2014, 82″ x 82″. Photo by Carl Pfranger

The final layout mixes those two grays and a third mottled gray fat quarter from my stash in an arbitrary arrangement pieced to get the lengths needed from the fabric I had on hand. The chunks of different shades remind me of the patched roads in central Missouri that I spent so many hours on during summers of my childhood. While some kids played the “don’t step on the black tiles of checkerboard floors” game, I played the “don’t let my feet touch the floorboard over the clay-red road sections” game to amuse myself when the four of us were packed in the back seat of a Honda Prelude en route from Kansas City to the Lake of the Ozarks.

Road to Community (quilting detail)
“Road to Community” (detail), Rachael Arnold, September 2014, 82″ x 82″. Photo by Carl Pfranger

It took another few months before I had a chance to quilt it. The quilting is a mix of stitch in the ditch and free motion. I took inspiration from rumble strips for the road markings, tire tracks in the open spaces, some filler “cracks”, and free-motioned lines to fill in the rest of the space. The blocks are stitched in the ditch to not obscure the colors with the dark gray quilting thread (don’t look closely at my attempts to free motion stitch in the ditch with contrast thread, please!). Fairfield Quilters 80/20 batting provided a good quilting surface (and was the only thing I had to go out and purchase in 2014 to complete the quilt).

Road to Community (front detail)
“Road to Community” (detail), Rachael Arnold, September 2014, 82″ x 82″. Photo by Carl Pfranger

The backing started life as an XL twin duvet cover that I bought on clearance at Target a few years ago. I was disappointed when I unpackaged it and found that it had a gray back rather than the print on both sides. Even with the accompanying sham, there wasn’t enough printed fabric to piece the full back, so I left one of the seams in the duvet and called it good enough. Its origin seems quite fitting to the theme considering that I now have to road trip to shop there (oh how I miss thee, my clean, organized, red and white homie). Of course, the print fits too, considering the reliance on cassette tapes if one planned to have any music on those central MO trips.

Road to Community (back)
“Road to Community” (back), Rachael Arnold, September 2014, 82″ x 82″. Photo by Carl Pfranger

It’s bound in a white batik that I bought intending to use in one of the other possible top layouts. I tried a new method of machine binding (sew to back, flip to front, secure), and am insanely happy with how it turned out. It’s almost perfect.

Road to Community (label detail)
“Road to Community” (back detail), Rachael Arnold, September 2014, 82″ x 82″

The final piece was a custom label I designed as we worked on the blocks and printed on one of my Spoonflower label orders last year. Throughout the course of the sampler, I found the community of quilters in Utica that I was so sad to leave. I hope I can find one here in Burlington soon. Just don’t tell them that the duvet cover backing is polyester (another thing I didn’t realize when I purchased it). That should stay our little secret.

road-trip-photographer
I think I should start a new photography series titled “Photographs of the Photographer”

September 23rd, 2014

 Previous Posts
Newer Posts  

© 2008–2025 Raevenfea