This is a static export of a blog I put on ice many years ago, that still has personally relevant content. No promises can be made around linkrot, styles, or working functionality.
It starts on April 11, so I have two weeks to finish up the vest, make progress on the applique project and piece the damask quilt top. Oh, and do some cutting/quilting/piecing pre-work for a class I’m taking on April 12.
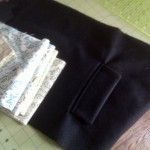
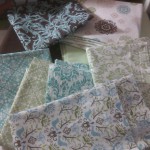
I can do it, right? I was feeling very motivated this weekend. See, here is one of the welt pockets I made, and about 3⁄8ths of the pieces for the damask quilt.
For the quilt-along fabrics, I ordered a charm pack of Just Wing It by MoMo for Moda. That‘s all I have so far, because I want to see the fabric before I decide on what should accompany it. Hopefully the yardage of the line will be available in time for me to make the bag. I also ordered some Kona Magenta because I think it might match, but if it doesn’t, I’ll use it along with the Tailor Made Teal Scissors and Multi Stitching Stripes fabric I picked up for that class I’m taking (we’re making a rotary mat and rulers bag and need 1 yd each of 3 fabrics).
Speaking of Kona and my sanity, I really wanted to do this Modern Solids Quilt Along hosted by Patchwork Squared, but I’m not, because I need my sanity to deal with house training Moof, dealing with this non-Spring weather, trying to do Flamenco lessons and getting into shape for the start of the cycling season. And because there may soon be a Utica/Mohawk Valley MQG, so I need time for that. See? I’m not that busy. Right? Right???
Have you done/are you doing a quilt-along? Do you have any tips for keeping up to speed and being a good participant? Are you doing this one?
Our puppy isn’t exactly housebroken yet. The first night we had him, he messed all over the pillow in his kennel. We needed something that could protect the pillow and be easily washable. The solution: flannel, hospital sheeting (rubber sheeting), and velcro. And a whole lot of estimating and zero measuring with anything resembling a measuring tape.
Caveat lector: this isn’t intended as a tutorial, rather as a show of my process on an off-the-cuff project. But, if you want to make your own and want clarification on anything, let me know in the comments or contact me.
Normally I’d put more thought into something like this, but basically, I looked up pillow case sizes online (on my phone, on the way to the fabric store), decided I needed about a square yard of sheeting, give or take and went to buy it. (more…)
The last few weeks have been unproductive. I’ve been unmotivated, mopey and bingeing on books and tv. Relaxing, sure, but detrimental to sewing or any other sort of blog-able activity (or blogging itself, for that matter). I’m trying to get out of that funk, because I have a lot of stuff waiting on me to get to work:
-10000000000. Vest
Top priority, slow progress needs to pick up a bunch so I can get back to quilting. Welt pockets may be the death of me.
0. Applique Project
I’m in a bi-weekly (more or less) class that is covering applique. At first I was going to do a project of my own creation involving a tree, flowers, and a swing. Here’s a sketch showing off my amazing drawing skills. (more…)
I’ve been terribly unproductive for the past month. In fact, I have half a post written about my unproductiveness and all the WIPs I have at the moment, but I’ve been too unproductive to take the photos for it.
And now, I have this guy living with me:
He’s nameless (at least, so far, 24 hours after we adopted him), 4 or 5 mos. old and not housebroken. So, it looks like my productivity will be shifted for a while yet, but have no fear, I’ll be sewing again soon (I hope).
Even when you strip piece, it takes forever to cut out the bits needed for a 54″×72″ nine-patch. (In other words, not a whole lot of actual sewing has happened this week.)
But cutting out and constructing this quilt prompted a thought to ask you about: are you extremely judicious about cutting with as little waste as possible or do you vote for speed and efficiency, figuring you can use the scraps for something else, no matter how small?
When I cut out the half-square triangles for the nine-patch, I made sure to cut them to exact measurements rather than doing them so that one half was waste (for that project, at last) like I’ve seen some tutorials show. I’d like to say that I did this because I needed to make sure my FQ pack would stretch as far as possible, but that’s only part of the issue. I really am just crazy about trying to fit everything into as little fabric as possible. It works great for sartorial and historical sewing, but am I just making things hard on myself in the quilting world?
So, wise ones, what approach do you take? Some grey-area “depends on the project” approach? What makes you decide to cut down from a larger block, or cut exact measurements? (more…)
I spent some time working on two different projects this weekend: a quilt and a vest.
On Friday, I received my order of a 18 fat quarter pack of Miniatures by Julie Hendrickson for Windham Fabrics (ordered from Fat Quarter Shop). I wasn’t planning on starting on the quilt from it for a while—I already have some of the pieces for another cut out, but once I received the fabric, I just couldn’t help but listen to the creative voices in my head yelling about what to do with it, going all oooh, ahh, how romantically-colored.
The plan is just a pretty basic strip-pieced nine-patch with a twist or two thrown in. Stay tuned for more on that. For now, I spent time cutting out the 2 ½” strips needed for the strip piecing. Some day I’ll have a dining room and a dining room table—or better yet a dedicated sewing room—that makes cutting out strips easier on my back. Ouch.
Why a simple nine patch?
I want something deliriously simple after the bargello.
The fabrics make me think “old-fashioned and traditional,” and you don’t get much more traditional than a nine-patch/postage-stamp-esque quilt.
I want really quick blocks so that this can get finished in between my applique class project, the vest, and another quilt I’m already working on.
Speaking of the bargello quilt, it is officially in the mail enroute to my cousin, yay. Link now working. That’s what I get for quick posting.
The Vest
Outside the realm of quilting, a friend wanted a copy of a wool vest he owns that has seen many better days. So, I’m working on that. To do so, I had to make a copy of the existing vest without taking it apart.
Here’s how I did it: I draped my coffee table with a towel (for cushioning/pinning loft), then craft paper taped over that. Then I just pushed pins through the seam lines and important parts of the vest which gives me a line to trace. I didn’t take photos all the way through the process, but here is one of the front sides partially done:
Then, I used the resulting pattern to make a muslin pattern. That’s where it stands. I’ll start constructing the real vest this week.
Here’s a quick summary of things I learned in the process.
Staggered rows means uneven rows. If your pattern calls for staggered rows, then the rows starting with full blocks will be a quarter-inch longer on the top than the ones with half blocks. Knowing this from the start can reduce bowing and shifting later on.
¼” wide rows are obnoxious. If you’re inexperienced or looking for hassle free, pick a pattern that doesn’t have eight ¼” rows. I.e., not this one.
Be careful second-guessing yourself. I spent hours drawing the layout up on the computer. I calculated exactly how I should cut my mid-block insertions for purple pieces. Then, I decided to change one of them in the quilt. After doing so, I realized I should have left it as originally planned. Of course, your experience may be the opposite.
Poly micro-suede is not nearly as easy to sew as cotton. It’s a lot tougher, so make sure you have a sharp needle. I didn’t quilt in the purple areas because it’s just that much more difficult to sew through than the cotton.
Trim stray threads as you go. Otherwise, you’ll spend a lot of time pulling them through seams and snipping them out of hard to get areas.
Be aware of row alignment as you work across the quilt. My top was pretty out of square at the end. I maneuvered it back into some semblance of shape by steam ironing bits to stretch them as needed. However, it could have been avoided if I had paid attention to how the rows were aligning. With a staggered pattern like this, make sure that every other row is aligning properly with each other. Meaning, row 1, 3, 5, 7… should all have seams along a straight line. Mine did not line up across the quilt, which caused some of the out-of-squareness.
Number of seams ripped because I sewed the wrong pieces together: 6
Number of rows cut twice, because I thought I lost one: 1
Number of purple pieces cut .5″ too short: 40
Leftover fabric: I haven’t totaled it up, but I have at least a ¼” yard of most of the fabrics, and more of others. Granted, I purchased extra of many because I like them so much.
About the quilting itself
I’m kind of un-adventurous when it comes to quilting so far. I decided to stick to simple stuff: echoing the purple curve. I used invisible thread on the top, and a teal (called peacock, I believe) poly on the bottom.
My machine does not like Gütermann invisible thread. Something about the way it comes off the spool causes it to tangle around the horizontal spindle and eventually screws up tension. Halfway through, I managed to get it to work on the vertical spindle, but I didn’t want to tear out the first half, so it is less than stellar overall.
After I figured out how to get mine to work, I came across this Quilter’s Review invisible thread comparisons article and comparison table. I wish I’d seen it before. I don’t even remember why I purchased the Gütermann thread to begin with (it’s been sitting in my thread box for a while). I’m usually a fan of the brand, but I think I’ll try something different next time—especially since the author of that article claims it’s the thickest of the six (I really hate the stiff texture!).
I used a 50% Bamboo Rayon / 50% Organic Cotton blend batting, that is pretty similar in consistency to Warm and Natural cotton batting. Really, my choice of batting in this case came down to the fact that they sell a 60″ x 60″ packaged version, which was absolutely perfect for this quilt. Since I used a poly fill that I’d purchased for some previous crafting/couch reupholstering in the baby quilt, I wanted to work with something low-loft like Warm and Natural, and the bamboo/cotton blend seemed decent.
It was very easy to work with, but I suggest pulling it out of the package and laying it out flat for a couple days or ironing it or something, because it holds the packaging folds. My teacher suggested possibly throwing it in the dryer on low or air with a very slightly damp towel just to release the wrinkles, but just laying it out flat overnight had helped enough that it wasn’t too much of an issue.
As I expected, doing a 55″ square quilt on my machine was a little unweildy, but aside from the frustrations with the nylon thread and a few mistakes I made in how I’d planned to quilt it, it turned out okay, I think.
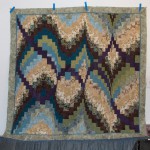
Here are some photos of the front and back.
Front details The back of the quilt. In the detail, you can see that I have some wrinkles sewn in. I didn’t baste it quite well enough.
I’m looking forward to my next class: we’re doing appliqué and free motion quilting, so expect something a little more exciting in the future!
Now that the front of the bargello quilt is complete with borders, it is time to think about the back. Quilt backs can be simple—small ones can even be just a width of fabric—or complex. The most common form of backing is simply taking yardage and using it as-is (if wide enough) or sewing widths together until it is wide enough. I wanted to do something more exciting than that.
Who says piecing is only for the front of quilts?
Well, if someone did, I’ll have to politely disagree with them. You can do fun things with the back too, if you’re so inclined. It’s a great chance to use up extra blocks from the front, or fabric leftovers. Of course, it’s a creative process so I can’t really do a tutorial on how you should piece a back, but here’s what I did.
Color-run inspiration
After finishing the front of my quilt, I still had some of one color run left; by the time I got to the central strips, the two color runs had converged into the same exact order, so I chose to exhaust one completely by cutting the remaining strips from it, leaving a good 8″ left on the second.
I also had a whole pile of little 3.5″ wide slices that I’d removed from all the rows for purple-block insertion, and a spare 1 1/2″ strip that I cut because I thought I’d lost the first one I cut (I’d actually sewn it to another strip in the wrong section).
I decided to use the extra color run, strips and pieces on the back, filling in the remainder with the teal batik.
Labeling
Labeling is one of those things that is easily overlooked because it’s not vital to the quilt-making process. But, because I am giving this quilt as a late wedding gift to my cousin (the wedding quilt is in the long-term UFP pile), I thought a label recognizing their marriage is important.
The way I decided to incorporate a label actually became part of my back piecing. Deciding to stay far away from embroidery, I chose to give printable fabric a try. I picked up June Taylor Colorfast Printable Fabric from JoAnn Fabrics (with a 40% off coupon, of course). I hope to review it soon, but for now, suffice it to say that it seems to be somewhat color fast and printed just fine in my Canon PIXMA iP4300 (which is going on 4 years old now). I purchased white printable fabric, although you can also get cream. I figured white would allow a wider range of options in the future, since I’d have a lot left over. So, I printed a cream background to my label (which has faded a bit, hence the “somewhat” color fast). Having a border-less printer is really helpful here, as you either have to waste the printable fabric so that you can cut it down or have a printer that can do less than a 1/4″ margin on all sides of the label so that the white edges are hidden in seam allowances. My border-less printing settings weren’t behaving, but the print margins were < 1/4″, so all was well.
I set up a 3.5″x6″ (the width of the strip it was going into by a pretty arbitrary height) document in Illustrator and had fun designing a cool label, complete with a verse, my name, city, the date (Winter 2010/2011) and the name of the quilt. Drumroll please… “Bye-bye Blues… Welcome Verdant Spring.”
The blurry bit under their names is on the photo for privacy. It doesn’t really look like that. It’s their last name and wedding date.
Putting it together
Once I’d created a label, I put it in a strip created from all the extra color run pieces. The strip is mostly in order of the color runs, but begins to skip when I ran out of some colors. I enclosed that strip with two strips cut from the color run leftovers (well, one was that spare one I’d cut accidentally).
I miscalculated the amount of fabric needed for the back, so I was short on the teal batik. I made up the difference using pieces of the other fabrics. Mainly G3 and B4, along with a lot of the black/brown paisley that was the original inspiration fabric and all the other little pieces left over from the front. I tried to use as little of the purple as possible on the back, because the poly is a bit harder to sew through than quilting cotton. One piece made it in as part of that stray slice I’d cut for the front.
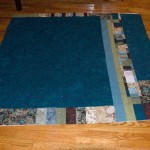
The full back, laid out on the living room floor. After sandwiching, I am not quite sure that the strip of piecing on the top of the quilt will actually be on the back. I may have miscalculated overhang by a few extra inches, but no big deal. I can always use it for something else!
The result is a back that is a little more tailored and interesting than a plain back (not that plain backs are boring—they can be amazing to look at the actual quilting of the quilt, but it’s really better to ignore that on one of mine as my quilting skills are very amateur).
Now it’s all sandwiched and waiting for me to quilt it!
What tips do you have for piecing backs? Is it something you do for most quilts, or do you prefer basic backs?
Now that the main section of the quilt is complete, it’s time to square it and add borders.
This is the center of the quilt before borders. You can see how uneven the bottom is.
Squaring
My quilt top was badly out of square. It’s kind of demoralizing it’s so badly out of square. Make sure you’re paying attention to how rows are lining up across the quilt, not just within row groups. Had I done that, I think it would have helped a lot. Instead, I was steam ironing the heck out of one section of the quilt trying to square it up a little by stretching it to match other sections. I don’t know if that’s the most advisable way to do it, but it worked relatively well. At least, it made the edges mostly square, but you can see where the row seams do not line up across the quilt.
The top and bottom rows are also not straight, because I had to cut an uneven amount to square up the sides. But, it happens sometimes, and you just have to roll with it.
Top edges. See how the two sides have much different amounts being removed?
The sides were mostly square, but the top and bottom weren’t. To square them up to add the borders, I taped the quilt to the floor, and measured center, then measured the top and bottom and lined up the borders so they were square, meaning that there were different amounts of seam allowance on the quilt top. After sewing the borders on (using the 1/4″ border allowance to guide me), I cut off the excess.
Measuring.The top and bottom borders pinned on in a mostly square configuration.
Borders
My teacher made one of the quilts from Twist and Turn Bargello Quilts by Eileen Wright. The prescribed border includes a 1/4″ strip much like the one Edie used on the pattern that I’m using.
The catch is, Wright has you cut a 1″ strip, fold it in half, and simply sew one end into the seam, leaving the other loose (similar to a prairie point border). After sewing eight 1/4″ rows in my quilt, I decided that this was the best thing since sliced bread, and used this method rather than piecing together the strips normally.
Wright also has you cut your borders on bias, which my teacher said made a huge difference in attaching them (much easier) and also hid any joins better than normal seams. Unfortunately, I didn’t have enough fabric to do borders on the bias, but it is something to consider in the future, for sure. Also, because of my out-of-squareness, I am relying on my non-stretchy borders to help square it up. Bias borders would just bend out of square with the quilt top.
Instead of doing borders with half blue, half green like Edie used (well, blue/brown), I chose to use a blue inner border and green outer border, with brown binding. Edie’s pattern called for a 1/4″ inner border, 3/4″ outer border and 3/4″ binding, which I also modified. Mine are 1/4″ inner, 2 1/4″ outer (technically 2 1/2″, but 1/4″ is covered by the inner border), and 3/4″ binding. I added a wider outer border to infuse a little more color to the quilt. Once I finished the top, I felt that the browns and creams were overwhelming the blues and greens.
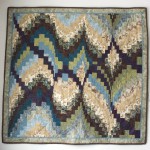
Here’s the completed top, including borders. The hanging shot is probably the most color-correct.
What tips do you have for squaring up quilts? What about adding borders?
When I was a kid rifling through my grandmother’s sewing supplies, I always got a kick out of the little berry thing that hangs off of the traditional tomato pin cushion. I never understood what it was for, I just thought it was cute and silly. Ok, no past-tense about it. I still think it’s a little cute and silly. But now I know what it is for.
The berry is filled with emery, which is an abrasive powder. Emery is commonly affixed to boards to create files, among other uses. In this case, its purpose is to keep needles clean and sharp.
Over time and with use, needles and pins will dull, tarnish, and burr (to different degrees depending on the quality of the metal), making it more difficult to push them through fabric. By running needles through the emery berry a couple of times before use, you help keep them in better shape, so they work much better as they age.
So there you have it. The berry does have a purpose. The most common use is for hand-sewing needles, but it can help pins and even machine needles.
Although the image above is of mine, which is the cheap Dritz one I picked up at Joann Fabric, these days you can get a wide variety.
There are also many free pincushion patterns on the Web, so you can make your own. Use the emery berry off of an old tomato one that needs replacement, and you’ll still have the useful berry around.
Is there another sewing whatsit that you want to know more about? Let me know in the comments. Also, if you know of any super cute pincushions or pincushion patterns, pass them along! After writing this post, I feel like I need something much cooler than my yellow tomato.