Raevenfea

Maker of various fabric things

This is a static export of a blog I put on ice many years ago, that still has personally relevant content. No promises can be made around linkrot, styles, or working functionality.

Posts tagged: Quick project

Quick Diamond Napkin Rings

Posted in Crafting

  • Quick project
  • Tutorials

As part of a gift, I need coordinating napkins and napkin rings, so I whipped some up on my day off yesterday. And, dear readers, I’ll show you how to make the same napkin rings. They are very easy; it took me all of an hour to make four, not including the time it took to go buy more ribbon when I ran out. Lesson learned: measure out the full spool before cutting, don’t just eyeball it. Luckily JoAnn carried the same ribbon (my original spool is of unknown origin… I’ve had it for ages).

Before you get started, you can download my template (and instructions) as a PDF.

In the downloadable instructions, I’ve provided a template and measurements using both ¼” seam allowances and 1⁄8″ seam allowances so that you can use whichever you’re more comfortable with. I made mine with 1⁄8″ ones—or technically however far the right-side hash mark on my utility foot is from the center needle position. The following instructions use that method.

August 9th, 2011

Mother’s Day Quilt

Posted in Quilting

  • Finished projects
  • Quick project

I lost a block for the Bird’s Nest Quilt at the beginning of May. I think maybe the dog ate it, but I didn’t want to comb the yard for evidence. It was a show-stopper; I didn’t have fabric to make a replacement. So, to console myself, I went fabric shopping at JoAnns. After all, Mother’s Day was a week away, and the missing block was for my gift to Mom. Luckily, I had the excuse of visiting this past weekend—3 weeks later—to give myself extra time to finish.

I knew of a fabric line at JoAnn’s that I really liked and thought my mom would too, and ended up with this selection:

to which I added Moda Clover (Bella Solids) from my stash and a light blue faux-batik print I have yards of in the stash to use on the back (75% off because of a streaky/splotchy print issue that went away in the washer. Yay).

Since I was down to the wire, I needed a simple quilt idea, and nothing was coming to mind, but I found this pattern on allpeoplequilt.com that has 19″ blocks—super simple and interesting to boot.

June 2nd, 2011

Backup Drive Sleeve

Posted in Crafting

  • Bag
  • Caveat lector
  • Quick project
  • Tutorials

From a technologist’s standpoint, the number two tech item a college student needs is an external backup drive (number one is a computer). My oldest younger sister is finishing her first year at Missouri Science & Tech, and her birthday is coming up, so I’m giving her a backup drive. They are fragile, so I decided to whip up a quick carrying-case/shock absorber to go with it.

Caveat lector: I’m not claiming that batting can actually, truly help if the drive gets dropped/knocked around/etc, but it’s surely better than nothing, and I didn’t want to search for neoprene.

May 4th, 2011

Small Treat Totes for Christmas Wrapping

Posted in Crafting

  • Bag
  • Pattern review
  • Quick project

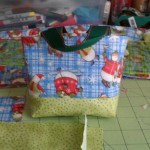
My sewing machine has been limping along, so my projects are all on hold while it gets serviced. I did manage to whip up one last thing before the machine went to the shop: a few gift bags for Christmas using allpeoplequilt.com’s Small Treat Totes pattern. With a finished size of 4″x4″x2″, they’re about perfect (if not almost too large) to house the jewelry I’m giving to my four older nieces, and the little finger puppets for the youngest.

The pattern differences

Image courtesy allpeoplequilt.com

I didn’t stick to the pattern 100%. The main change I made is the fabric layout. The original pattern calls for two fat quarters: a light pattern and a dark pattern. The result is four bags, two with the light pattern featured on the outside top and two with the dark featured.

None of the Christmas-themed fabric I picked up (50% sale at Joann) had small enough patterns to pair with each other, so I chose to use my holiday fabric on the upper outside and interior of the bags, and using a green dot fabric from my stash for the contrast on the bottom of the bags. I paid a very small amount of attention to fussy-cutting some of the exterior panels, but for the most part just cut the required rectangles from strips.

Construction notes

As usual, allpeoplequilt.com provided easy-to-follow directions for the project. They have you construct two panels: the lining, ribbon handle, and outer panel (of the focus piece and contrast). Then, you sew the two panels together, turning it inside out and pressing for the finished bag.

Treat Tote Panel

This is one of the panels. In the original pattern, the large piece on the left would be the same fabric as the smallest piece on the right.

In order to have a flat bottom, you fold the corners so that the two corner seams are touching, then press and sew a straight line across, creating a triangle of excess fabric (which you trim off).

Treat Tote Corners

View of the corners after pressing and stitching, but before trimming.

One thing that is not clear in the instructions is that you need to do this corner treatment to all four corners. I realized this during construction of the first bag, but decided to not flatten the lining corners for sake of time. It results in a baggy lining with excess fabric on the interior instead of a flat one. It doesn’t affect how the bags look, however.

Treat Tote Finished

A finished bag.

Verdict

This is a great quick project that is adaptable for just about any gift or treat-giving occasion.

This is a project where fabric size is important: you will need fat quarters to cut out all the pieces without wasting a ton of fabric. A normal quarter yard cut is not tall enough to fit two of the panels on top of each other. I was working with half-yard pieces that I’d picked up for various other project ideas.

This can also be a great project for scraps—who says you need to cut all the panels out of the same fabric? The pieces needed are: 2 5.5″ x 6.5″; 2 3.5″ x 6.5″; 2 2.5″ x 6.5″. If you can scrounge up those pieces, anything goes, right?

The handles could also be created from the fabrics you use. I grabbed a spool of 75%-off Christmas ribbon. The pattern recommends heavy grossgrain ribbon (which is what I bought), but depending on what you plan on putting in the bags, I don’t see why lighter ribbon wouldn’t work.

A group of treat totes

An unawesome photo of five treat totes for five awesome nieces.

December 20th, 2010

 
Newer Posts  

© 2008–2025 Raevenfea