
Scrappy Bookmark Tutorial & Giveaway Winner Announcement
Posted in Crafting
Thank you to everyone who entered my first giveaway. I’ve enjoyed seeing some new names and new blogs to take a look at. So, without further ado, the winner according to random.org is…

Comment #8 — Alyce B!

Congratulations, Alyce, check your email!
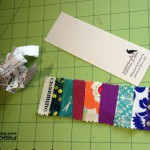
For every one else, here’s a simple scrappy bookmark to make using paper piecing.
Materials needed

- Fabric Scraps
- Scrap paper
- Nice paper
- Thread — neutral (and maybe contrasting)
- Glue or spray baste
- Ribbon or chunks of stray thread
- Point turner/presser
- Pinking shears or fray stop (not vital if a frayed edge look interests you)
Paper piece your fabric
First, cut a piece of scrap computer paper, an old phone book page, or any other scrap paper into the size you want your bookmark to be. A pretty standard size seems to be 2″ × 6″.
Then, chose two scraps to start your piecing with, and lay them on top of the paper with right-sides together, like this (you don’t have to use selvages, but I thought it looked cool):

Sew 1⁄8″–¼” from the edge (especially with small scraps, 1⁄8″ should be ok). Use a smaller stitch length (I use the 1.8 setting on my machine), so that the paper can be easily removed later.
Then, even up the seam allowance and fold up the top piece and press with your point turner/presser.

Repeat until you’ve completely covered your paper template.

Trim your scraps to the size of the paper. If you are pinking the edges, do that, otherwise, cut with normal scissors or your rotary cutter. Be careful not to cut the paper with your sewing shears or rotary cutter—paper will dull the blade. I have a spare set of cheaper craft scissors for things like this.

Now, gently remove the paper from your fabric, then press your fabric (starch would be good).

Construct your bookmark
If you want to print, draw, or write a message or something on your nice paper (which will be the back of the bookmark), do so now.
Cut your nice paper to the same size as the fabric (or slightly smaller for pinked/frayed edges). Use glue or spray baste the fabric and the paper wrong-sides together. Make sure to slip your ribbon or tassel in the center of the top.
Using either contrasting or matching thread, depending on what look you want, stitch 1⁄8″–¼” in from the edge of the paper to secure the fabric to your paper, in case the glue or spray ever degrades. Make sure to use a slightly longer stitch length here, so that it doesn’t easily tear away like the scrap paper did.

And that’s it! A cute little bookmark to use or give away. (Hey, it makes a great little notecard for a giveaway winner, especially for a book giveaway 🙂 )
Thanks again to everyone who entered. Today is my second bloggiversery—hopefully the second of many more!
Comments are closed.