Raevenfea

Maker of various fabric things

This is a static export of a blog I put on ice many years ago, that still has personally relevant content. No promises can be made around linkrot, styles, or working functionality.

Process: Quilting the F-word

Posted in Quilting

  • Feminism
  • Machine quilting
  • Process
  • Q015CD
  • The F-word Quilt

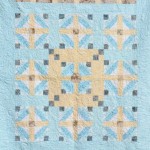
I had a very hard time figuring out how to quilt my F-word quilt. The final quilt looks a lot like my original sketches, but I made and then scrapped many other plans in between. A persistent idea with the quilt was obfuscation—hiding or obscuring the fact that someone is a feminist, whether because they have their own hangups with the word or because they don’t want to deal with societal baggage of calling themselves a feminist.

“The F-word”, Rachael Arnold, September 2015, 57″x57″.

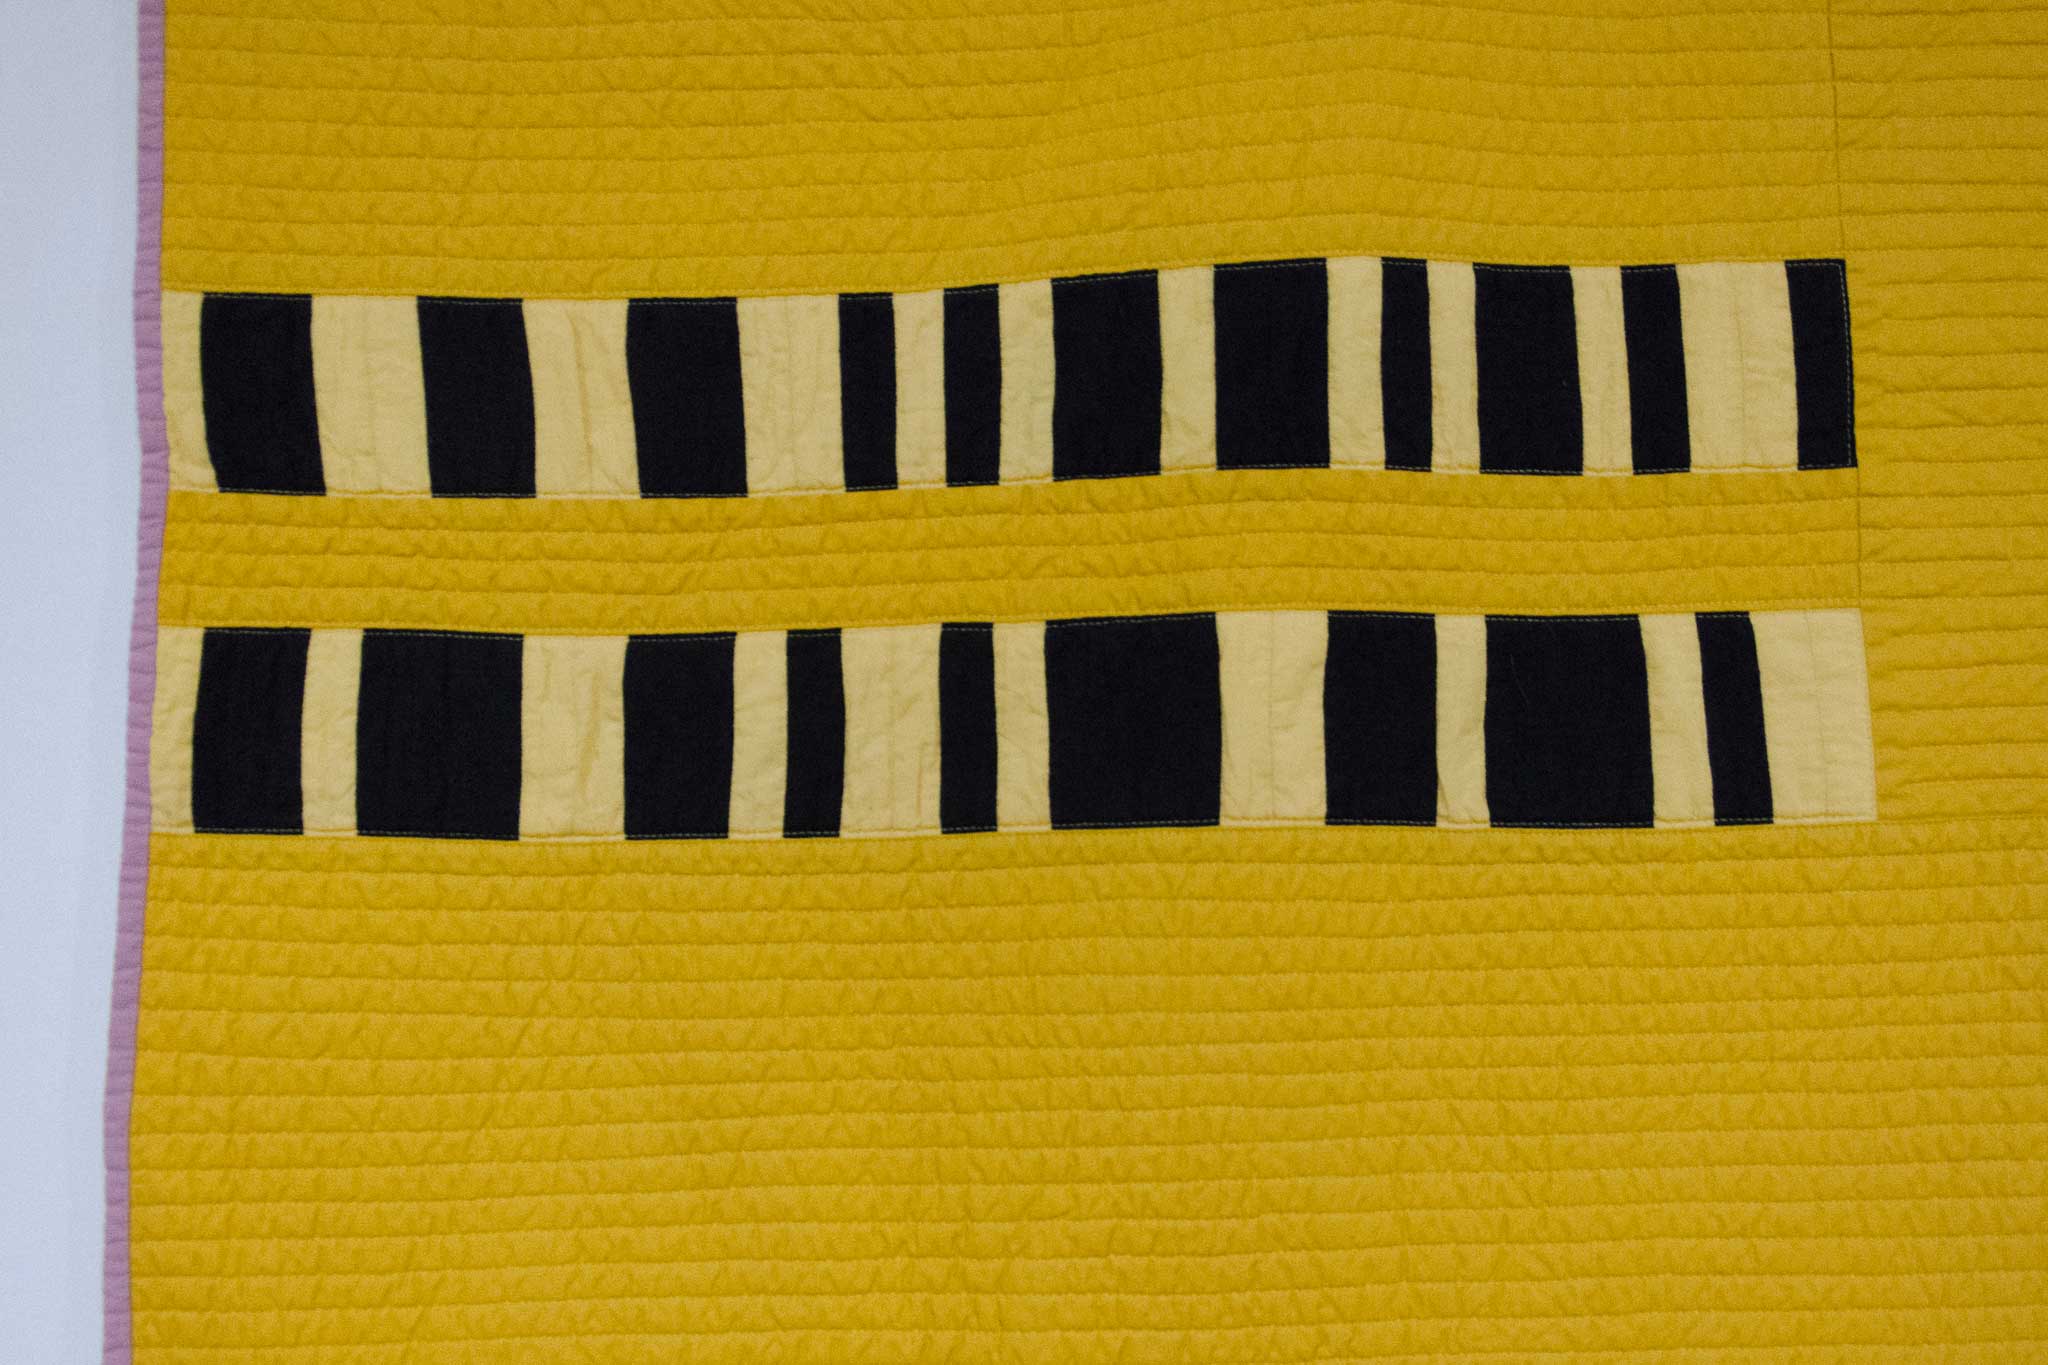
In that vein, iterations of the quilt plan involved quilting in “feminist” in binary, riffing on the equal sign pieced section (there, yellow is 0, black is 1), but couldn’t work the quilting in a way that seemed right. I also liked the aesthetic and suggestive meaning of quilting “feminist” spelled out in braille, but struggled with feeling like that was cultural appropriation. Both methods would clearly spell out the word, yet be illegible to most viewers.

f-word-quilting-braile
“The F-word” (sketch), Rachael Arnold, September 2015, 57″x57″.

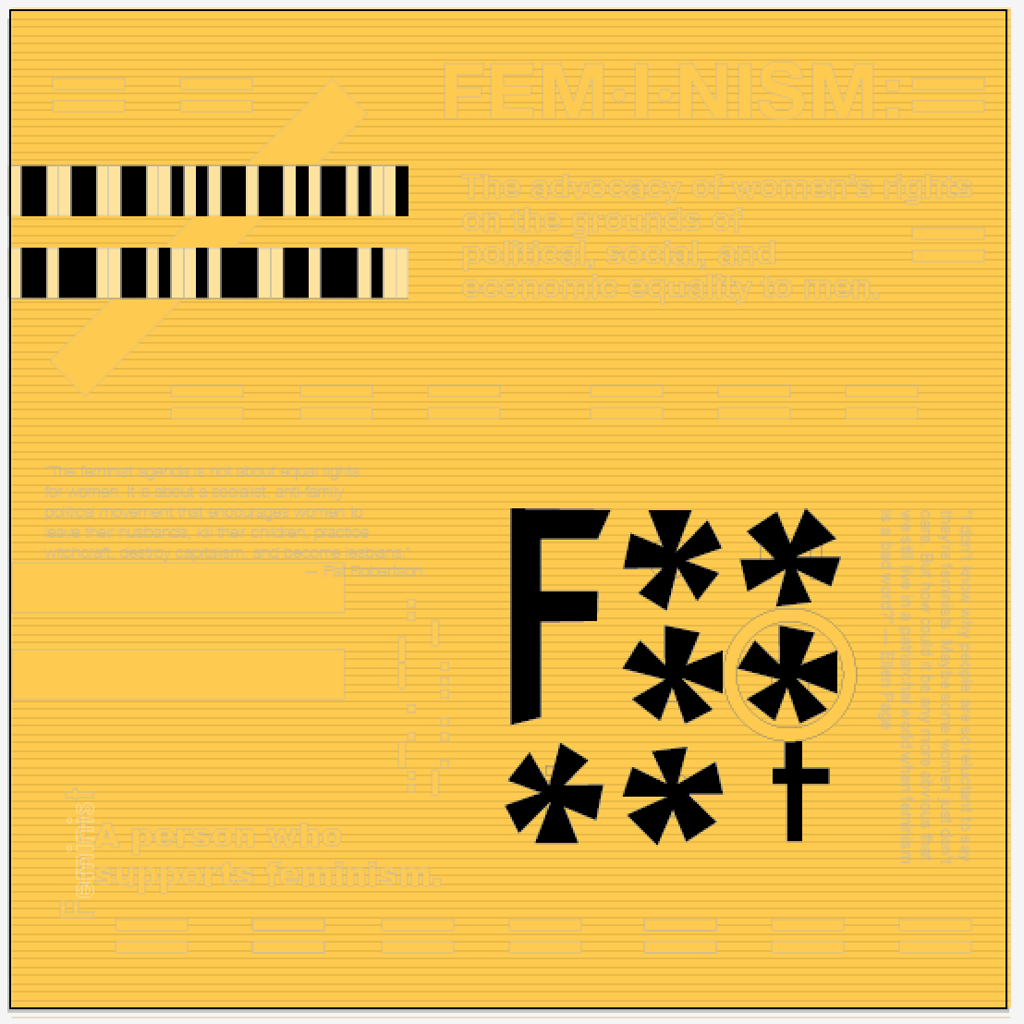
A later plan involved quilting in quotes and definitions. This involved a lot of font-based machine embroidery that was ultimately too technically intricate for my tastes. I was able to create embroidery fonts of text outlines using free software that came with my machine, but the font kerning was horrendous, so I would have had to lay out each individual letter on my machine. I also never fell in love with a layout.

f-word-quilting-quotes
“The F-word” (sketch), Rachael Arnold, September 2015, 57″x57″.

I liked the interplay between anti-feminist quotes from celebritized dogmatists and pro-feminist quotes from celebrities, and sometimes wish I’d been able to work it in.

“The feminist agenda is not about equal rights for women. It is about a socialist, anti-family political movement that encourages women to leave their husbands, kill their children, practice witchcraft, destroy capitalism, and become lesbians.”

Pat Robertson

“I don’t know why people are so reluctant to say they’re feminists. How could it be any more obvious that we still live in a patriarchal world when feminism is a bad word?”

Ellen Page

“The feminist movement is not about success for women. It is about treating women as victims and about telling women that you can’t succeed because society is unfair to you.”

Phyllis Schlafly

“People feel removed from sexism. ‘I’m not a sexist, but I’m not a feminist.’ They think there’s this fuzzy middle ground. There’s no fuzzy middle ground. You either believe that women are people or you don’t. It’s that simple.”

Joss Whedon

I scaled back, thinking perhaps I’d use just the definition of feminist and feminism, but it was still too technically finicky in a way that wasn’t speaking to me. Perhaps the story would be different if I had a $3k embroidery software suite.

fem¡i¡nism

The advocacy of women’s rights on the grounds of political, social, and economic equality to men.

fem¡i¡nist

A person who supports feminism.

f-word-quilting-1
“The F-word” (detail), Rachael Arnold, September 2015, 57″x57″.

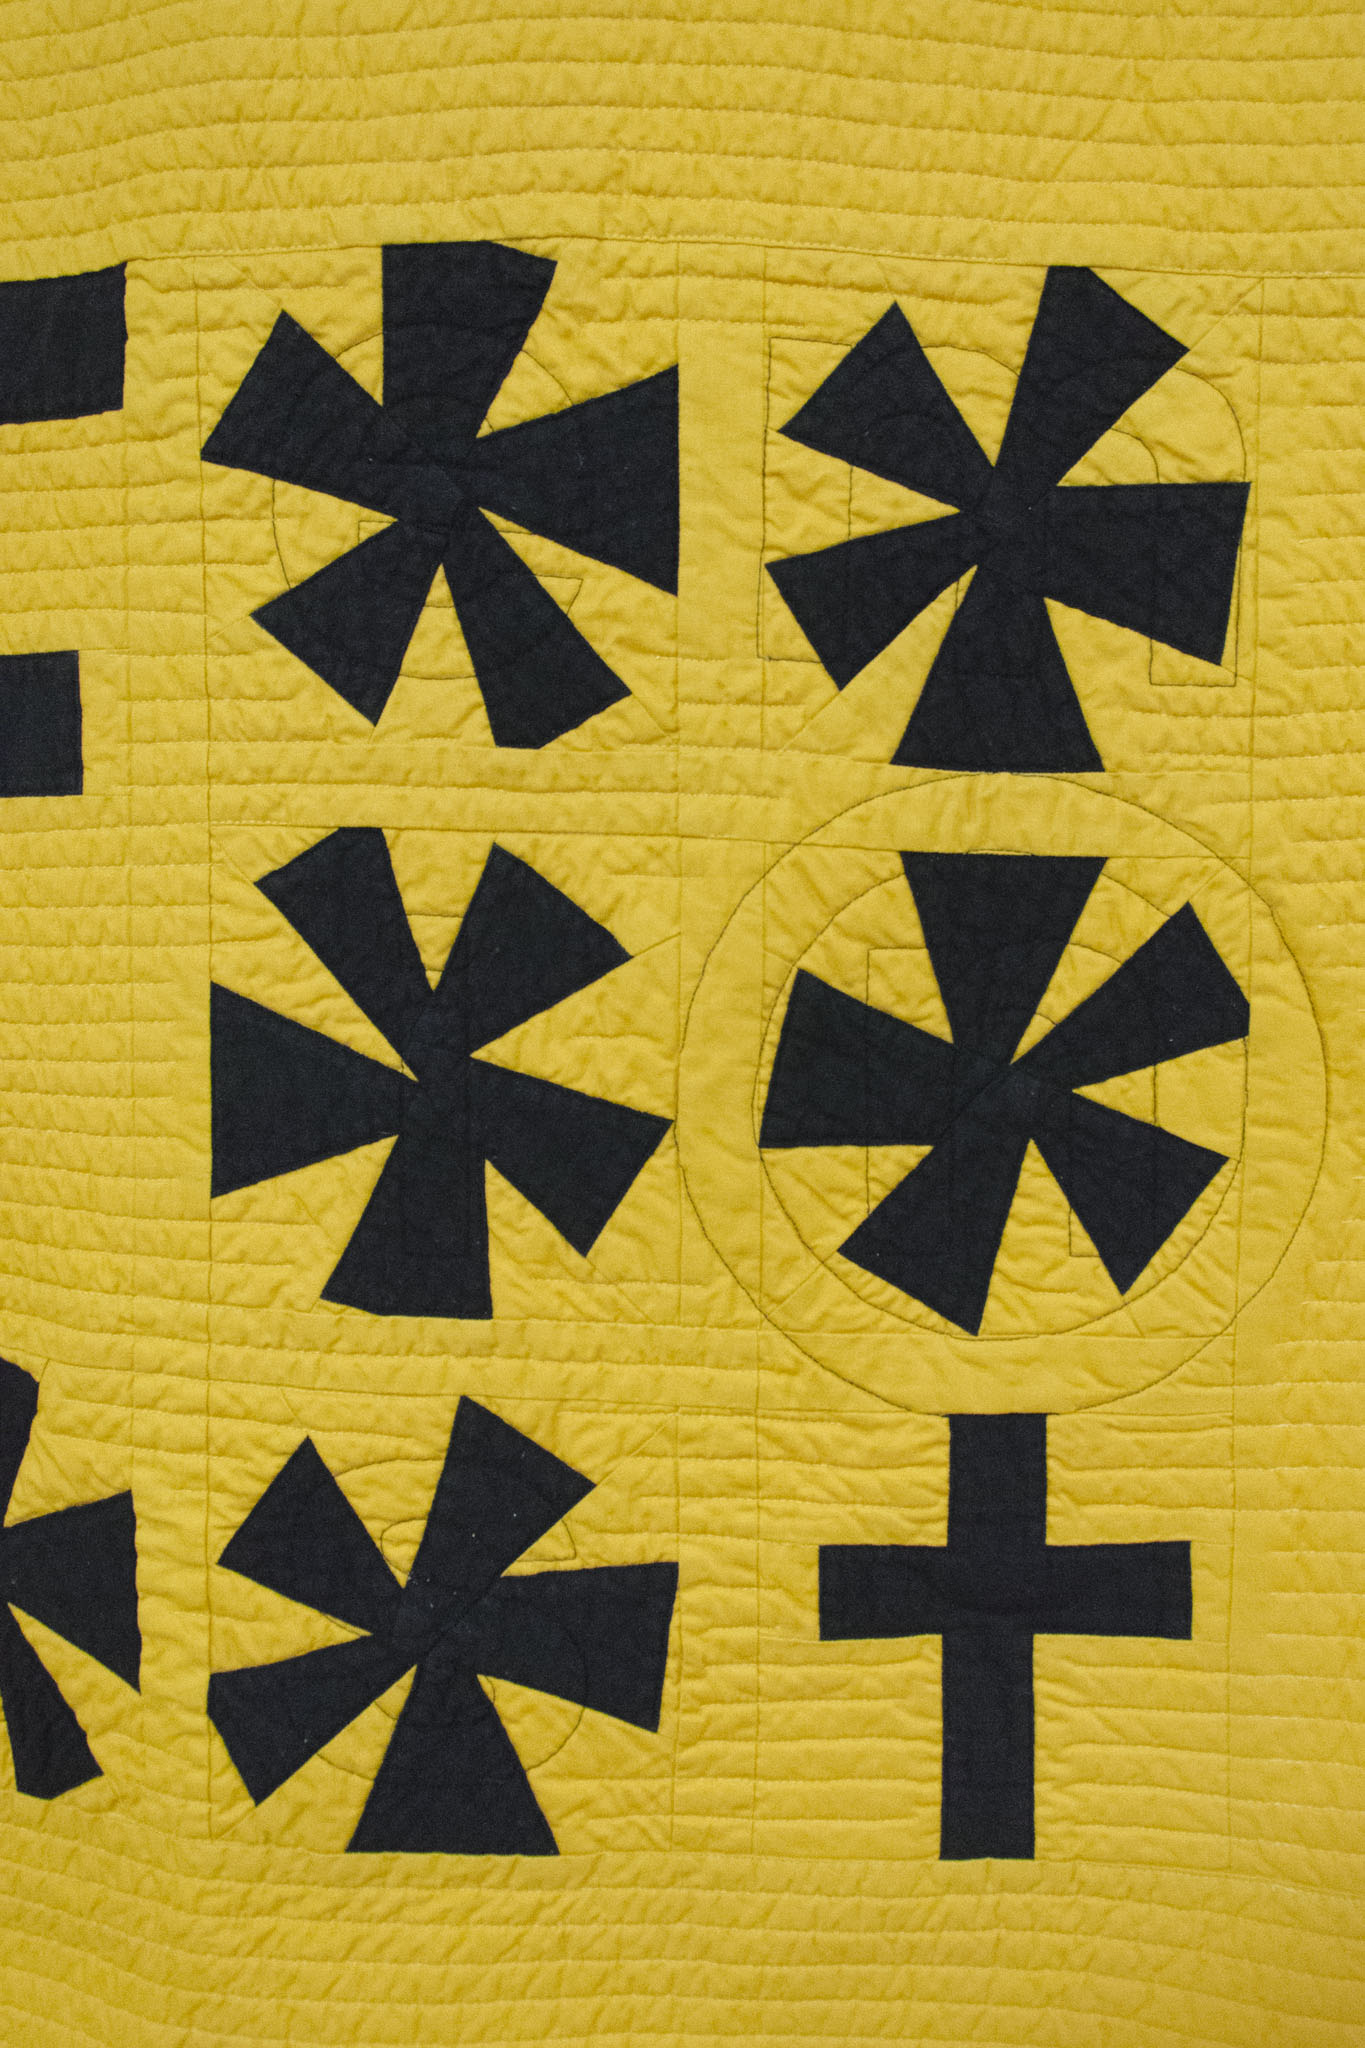
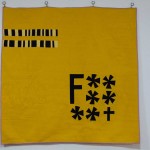
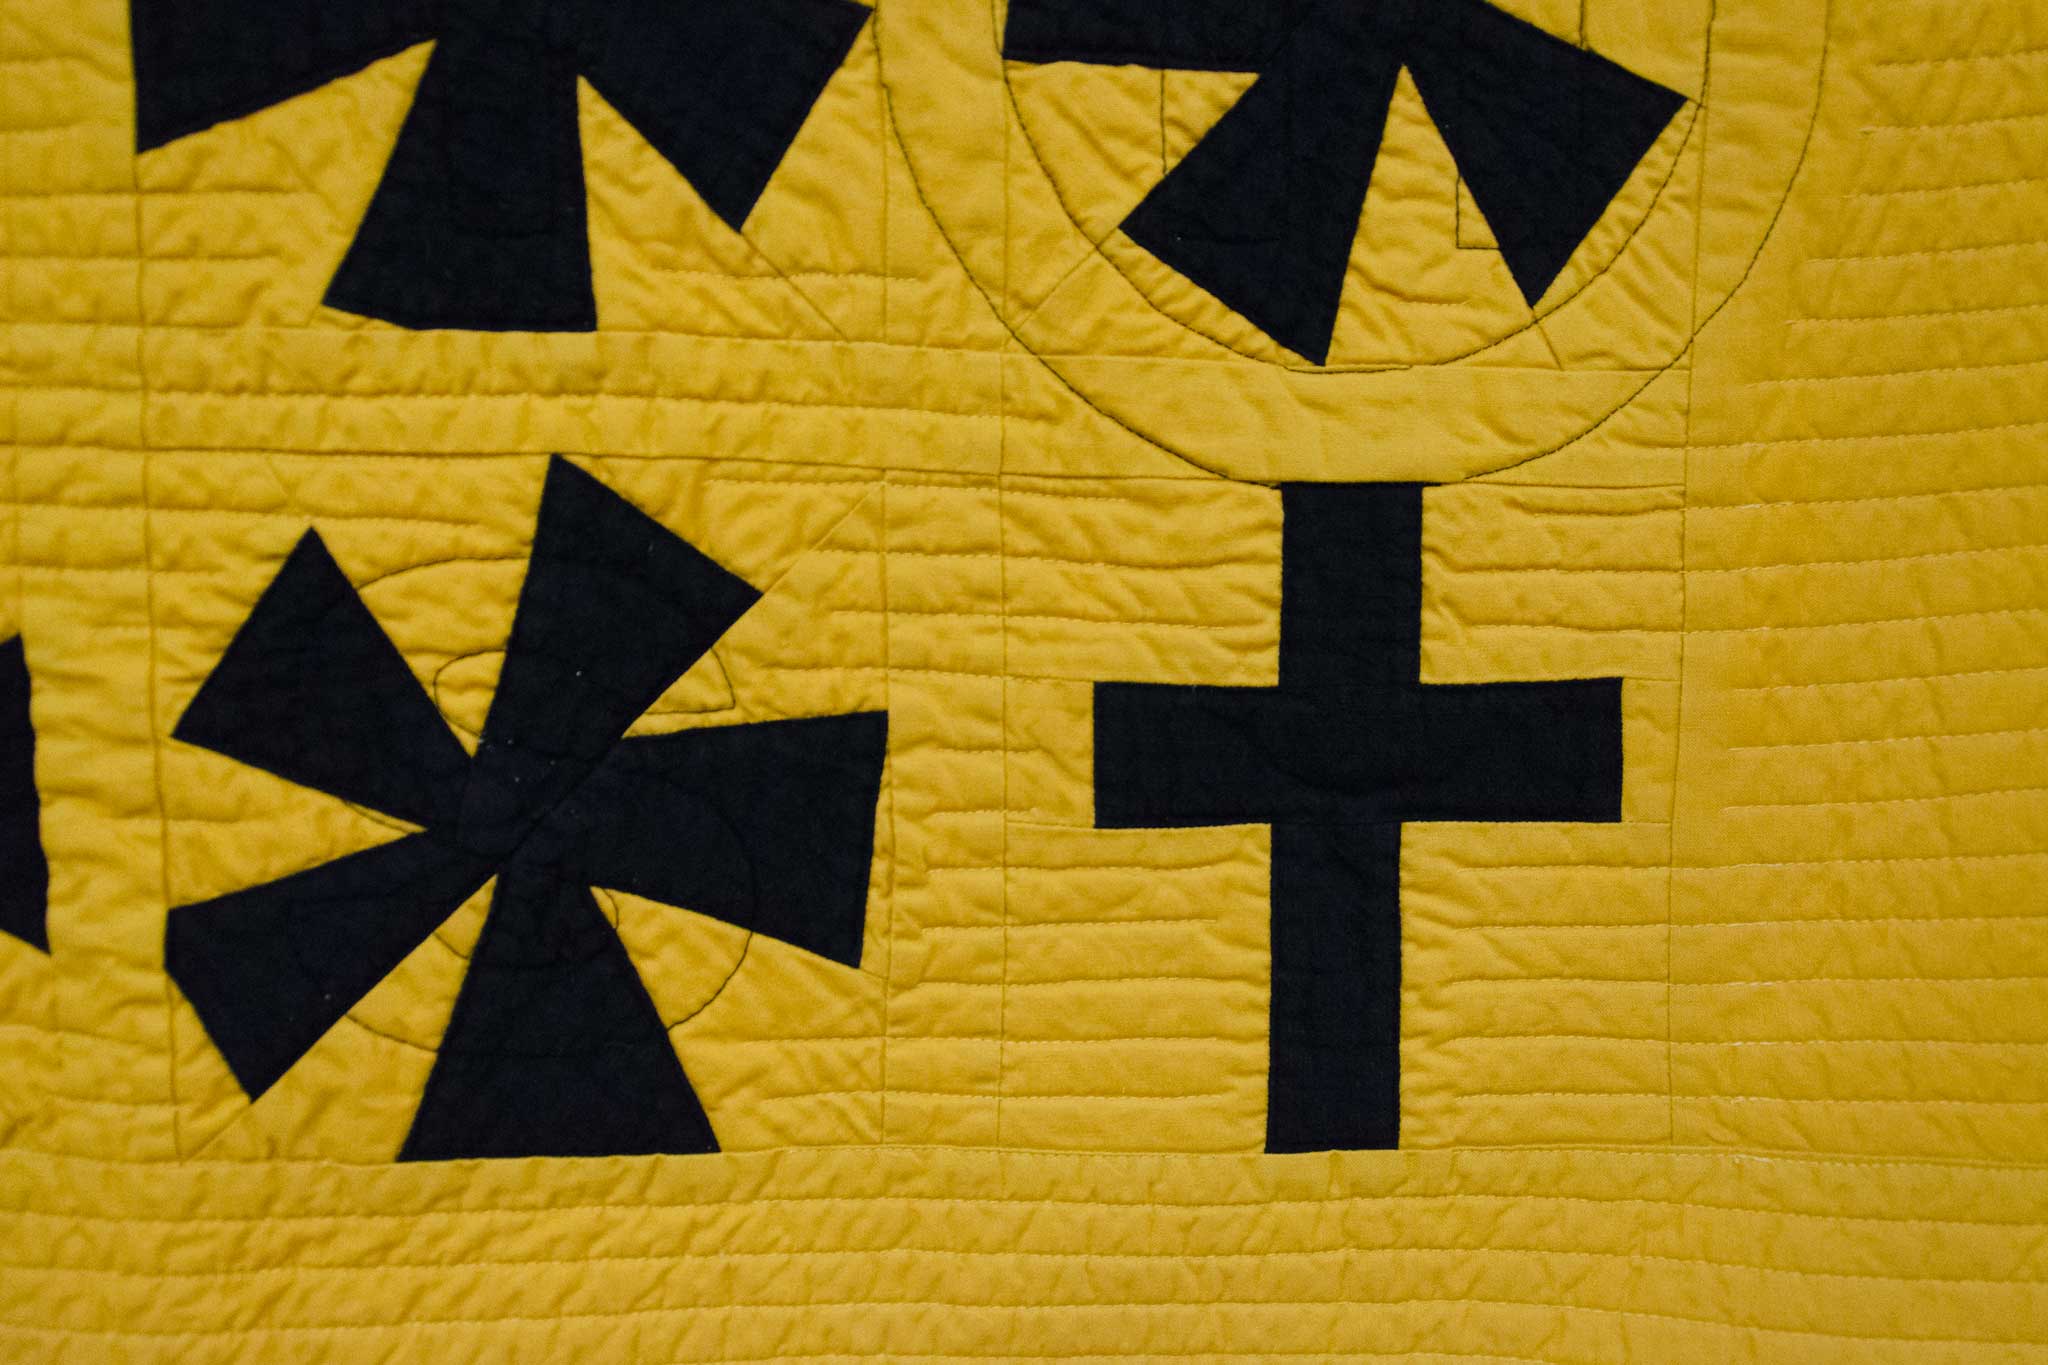
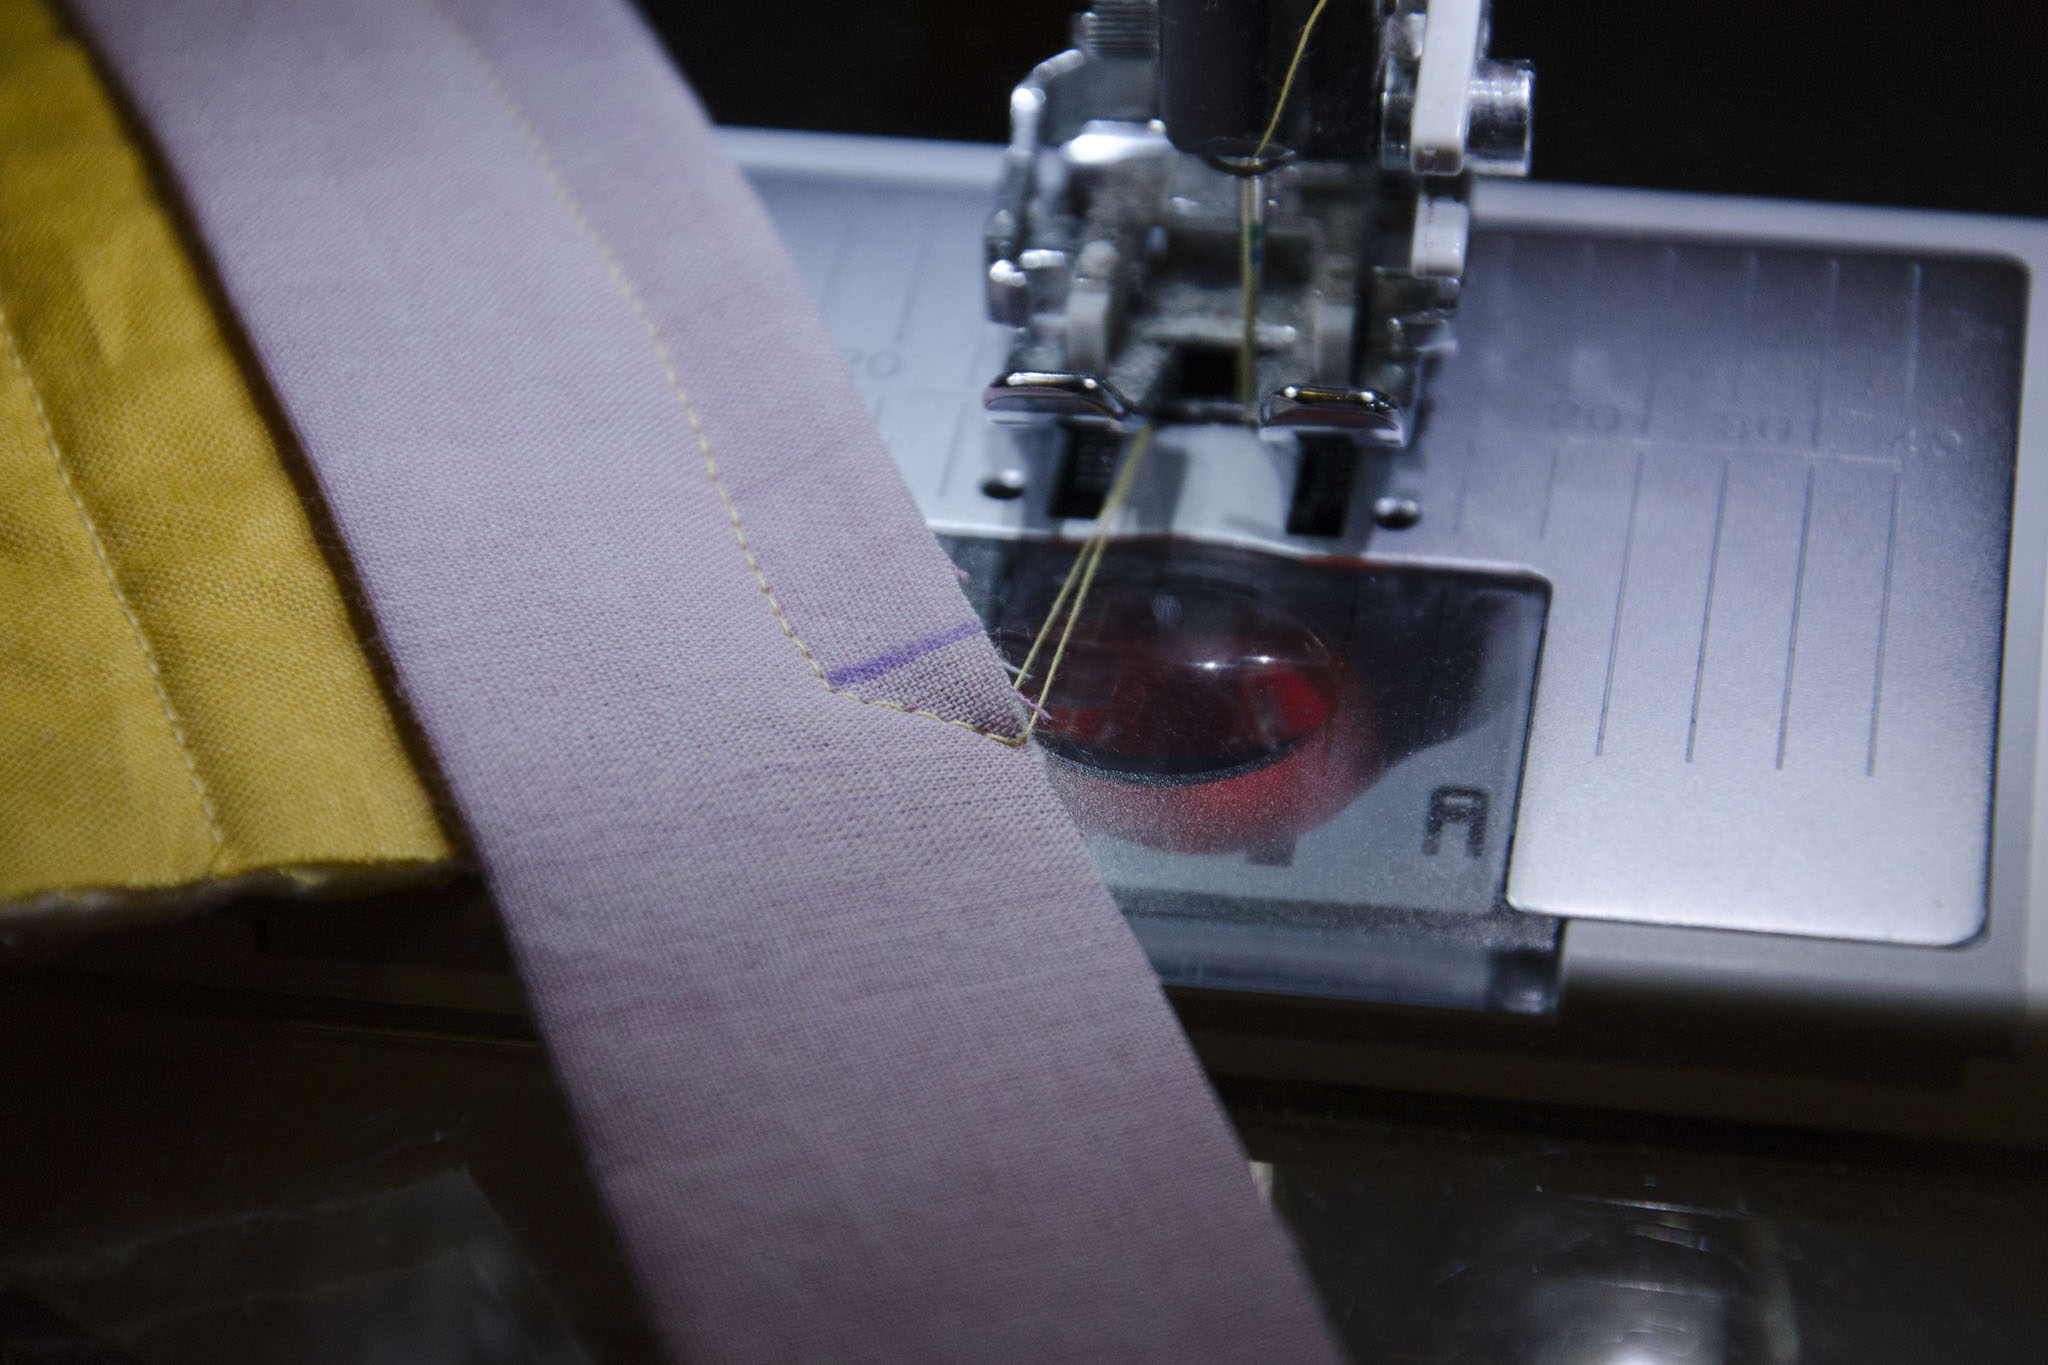
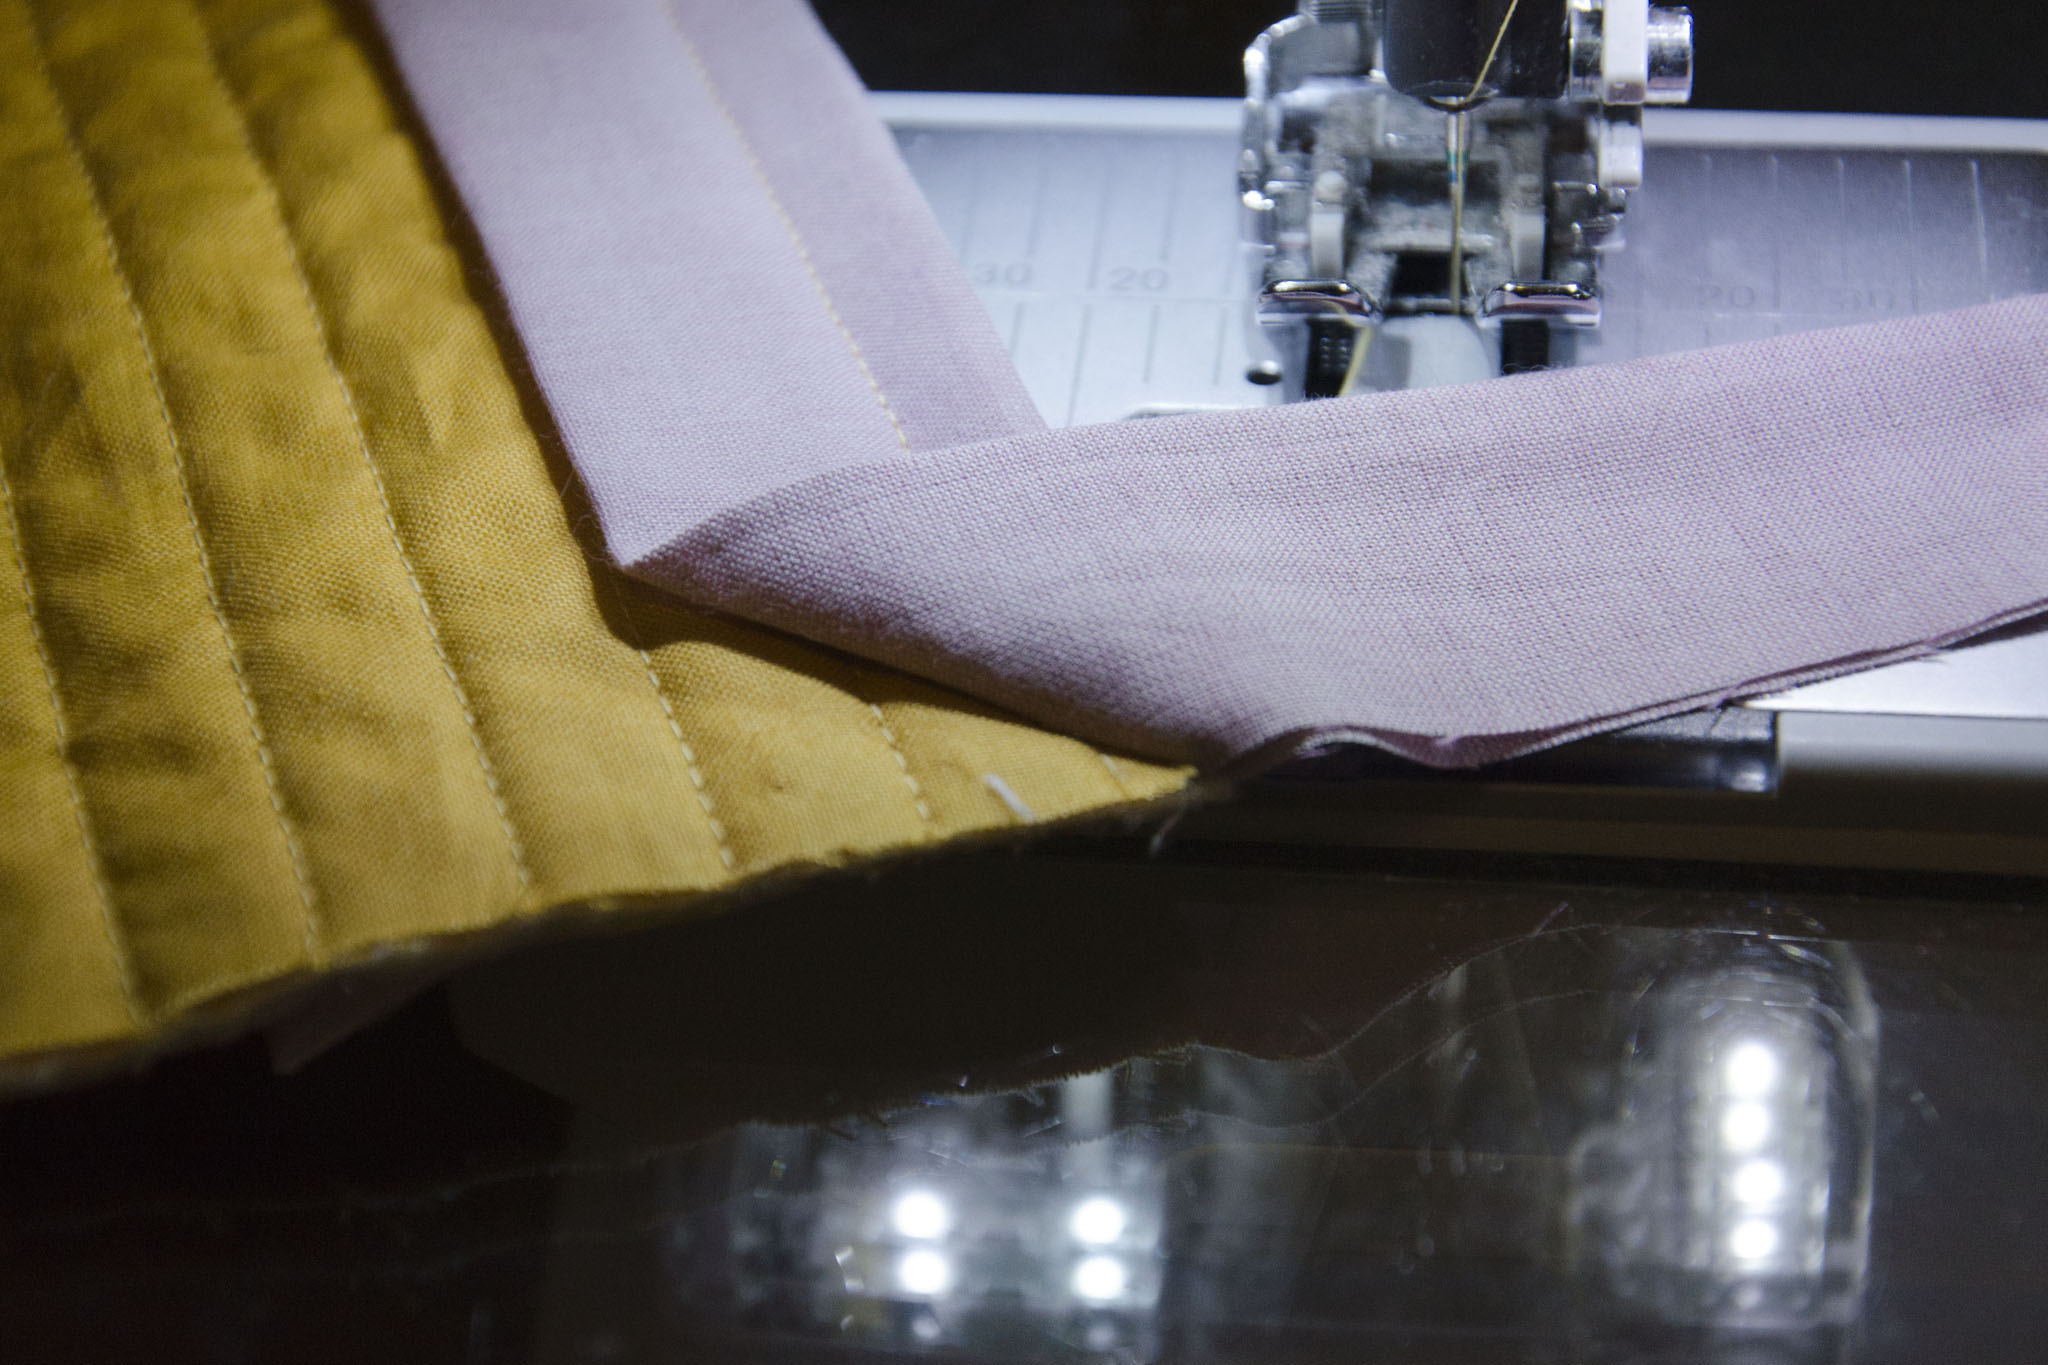
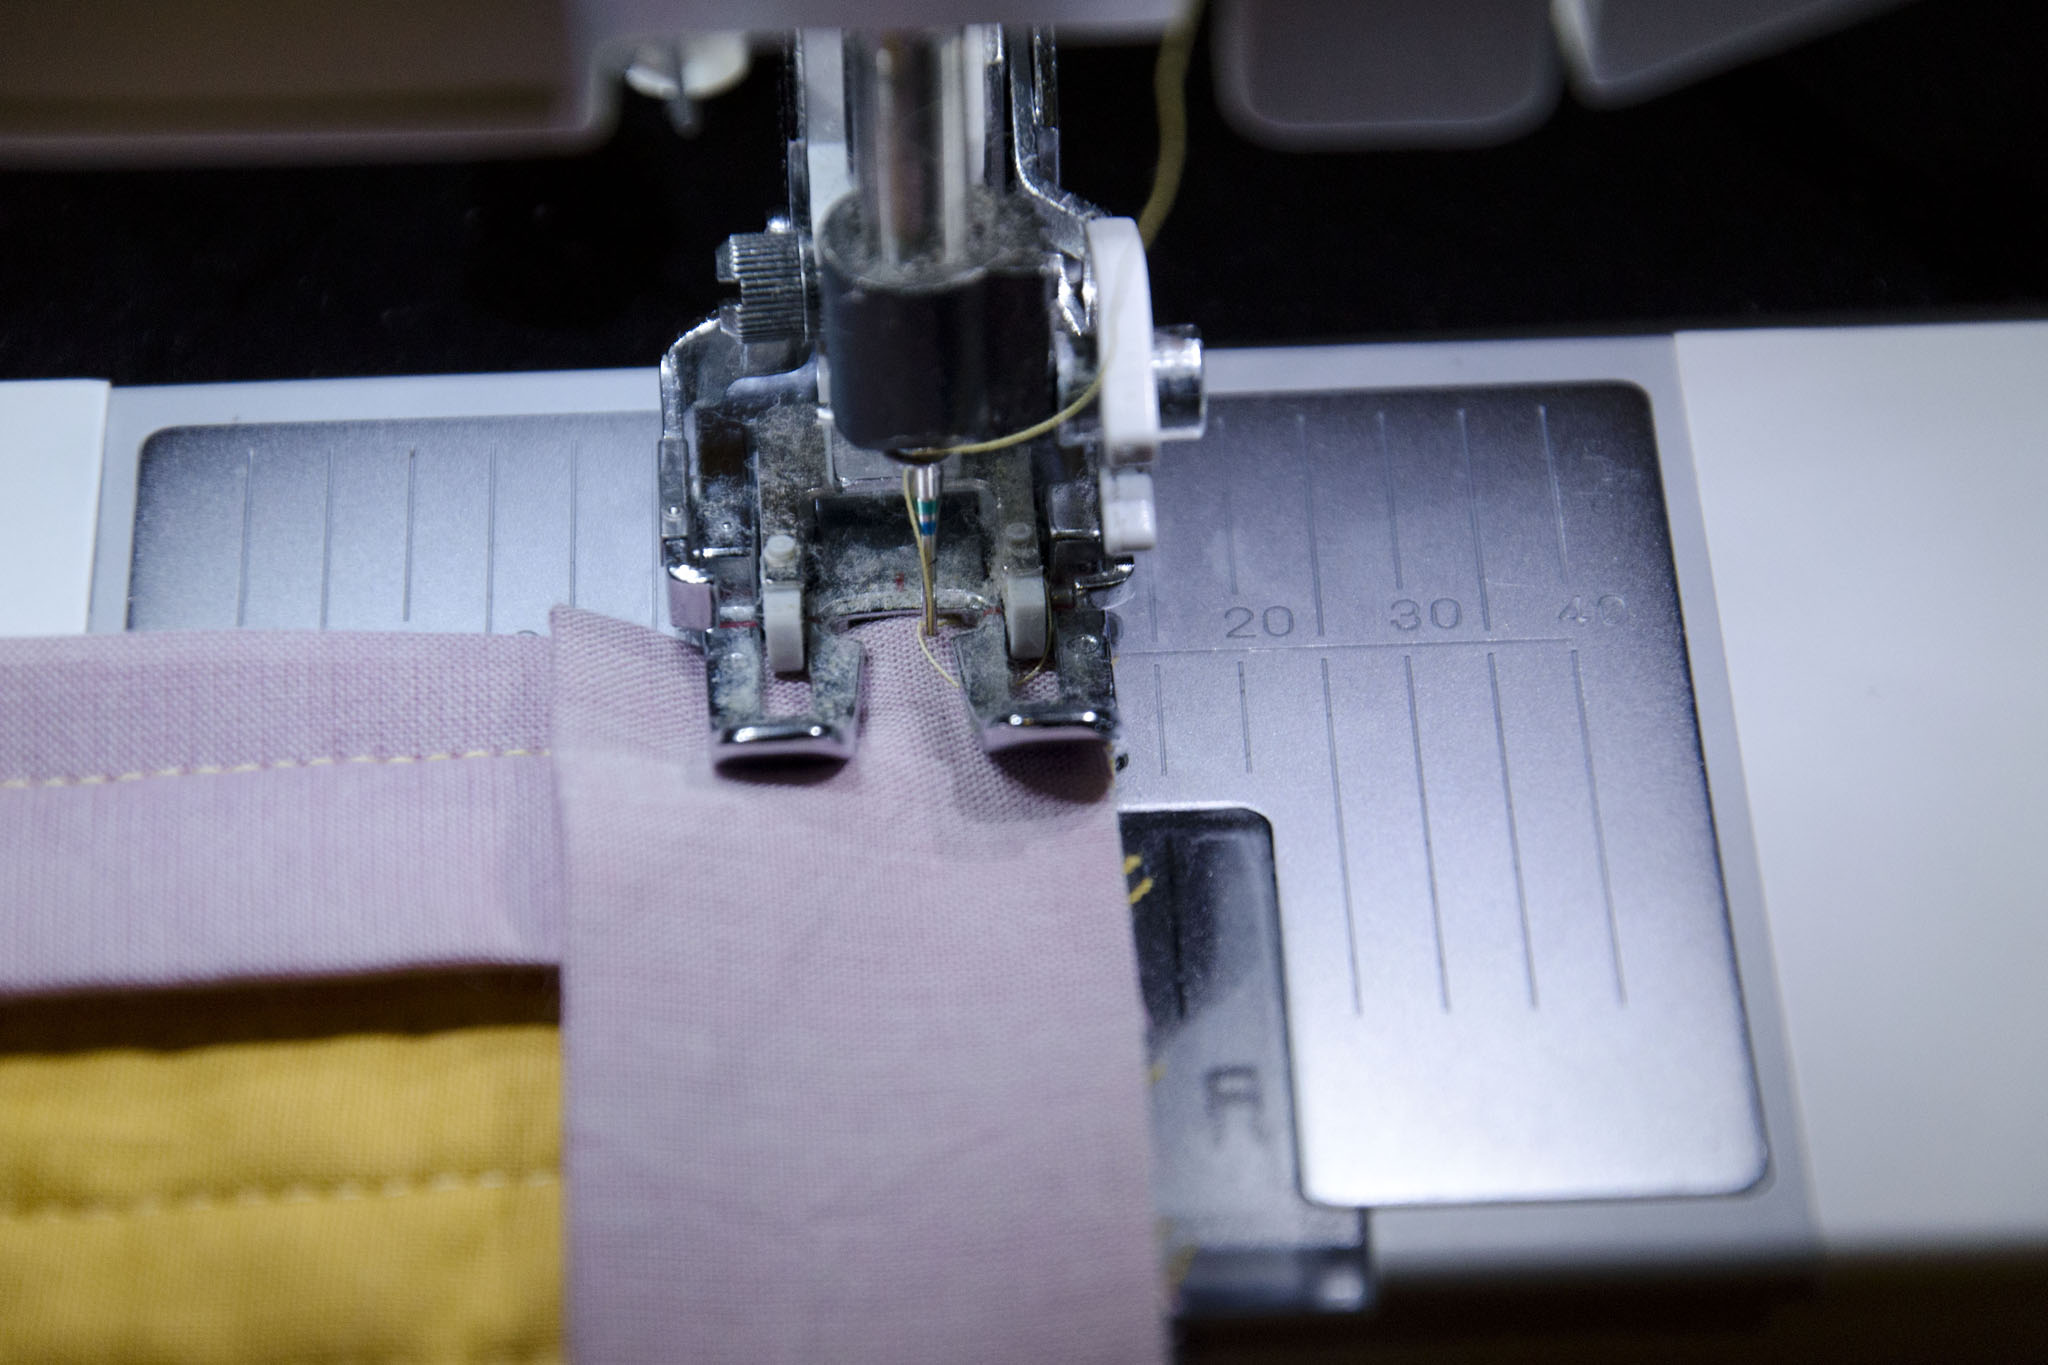
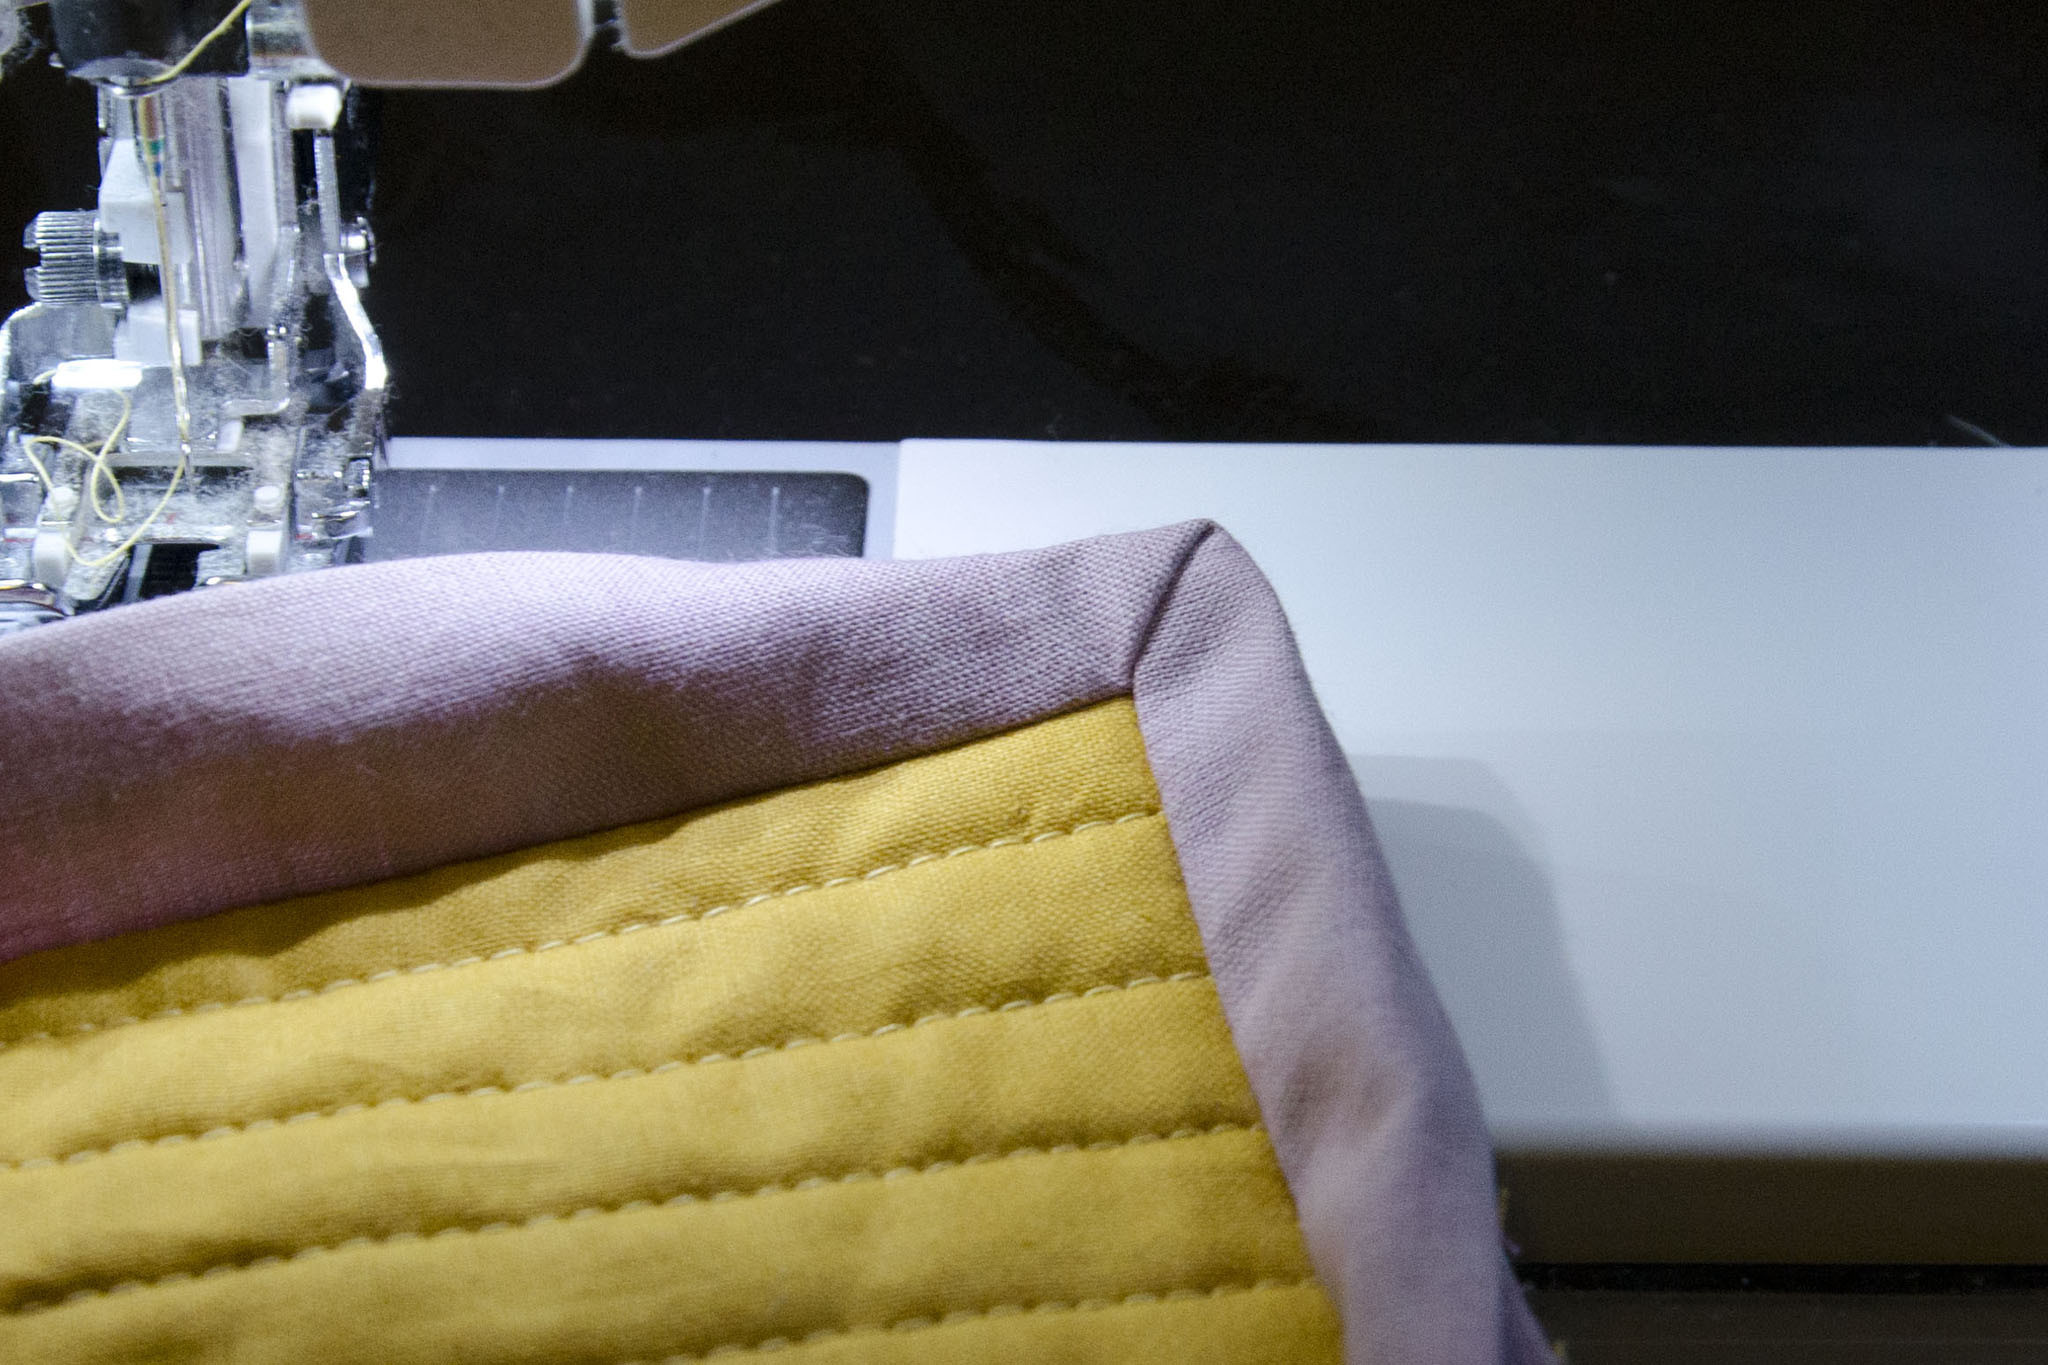
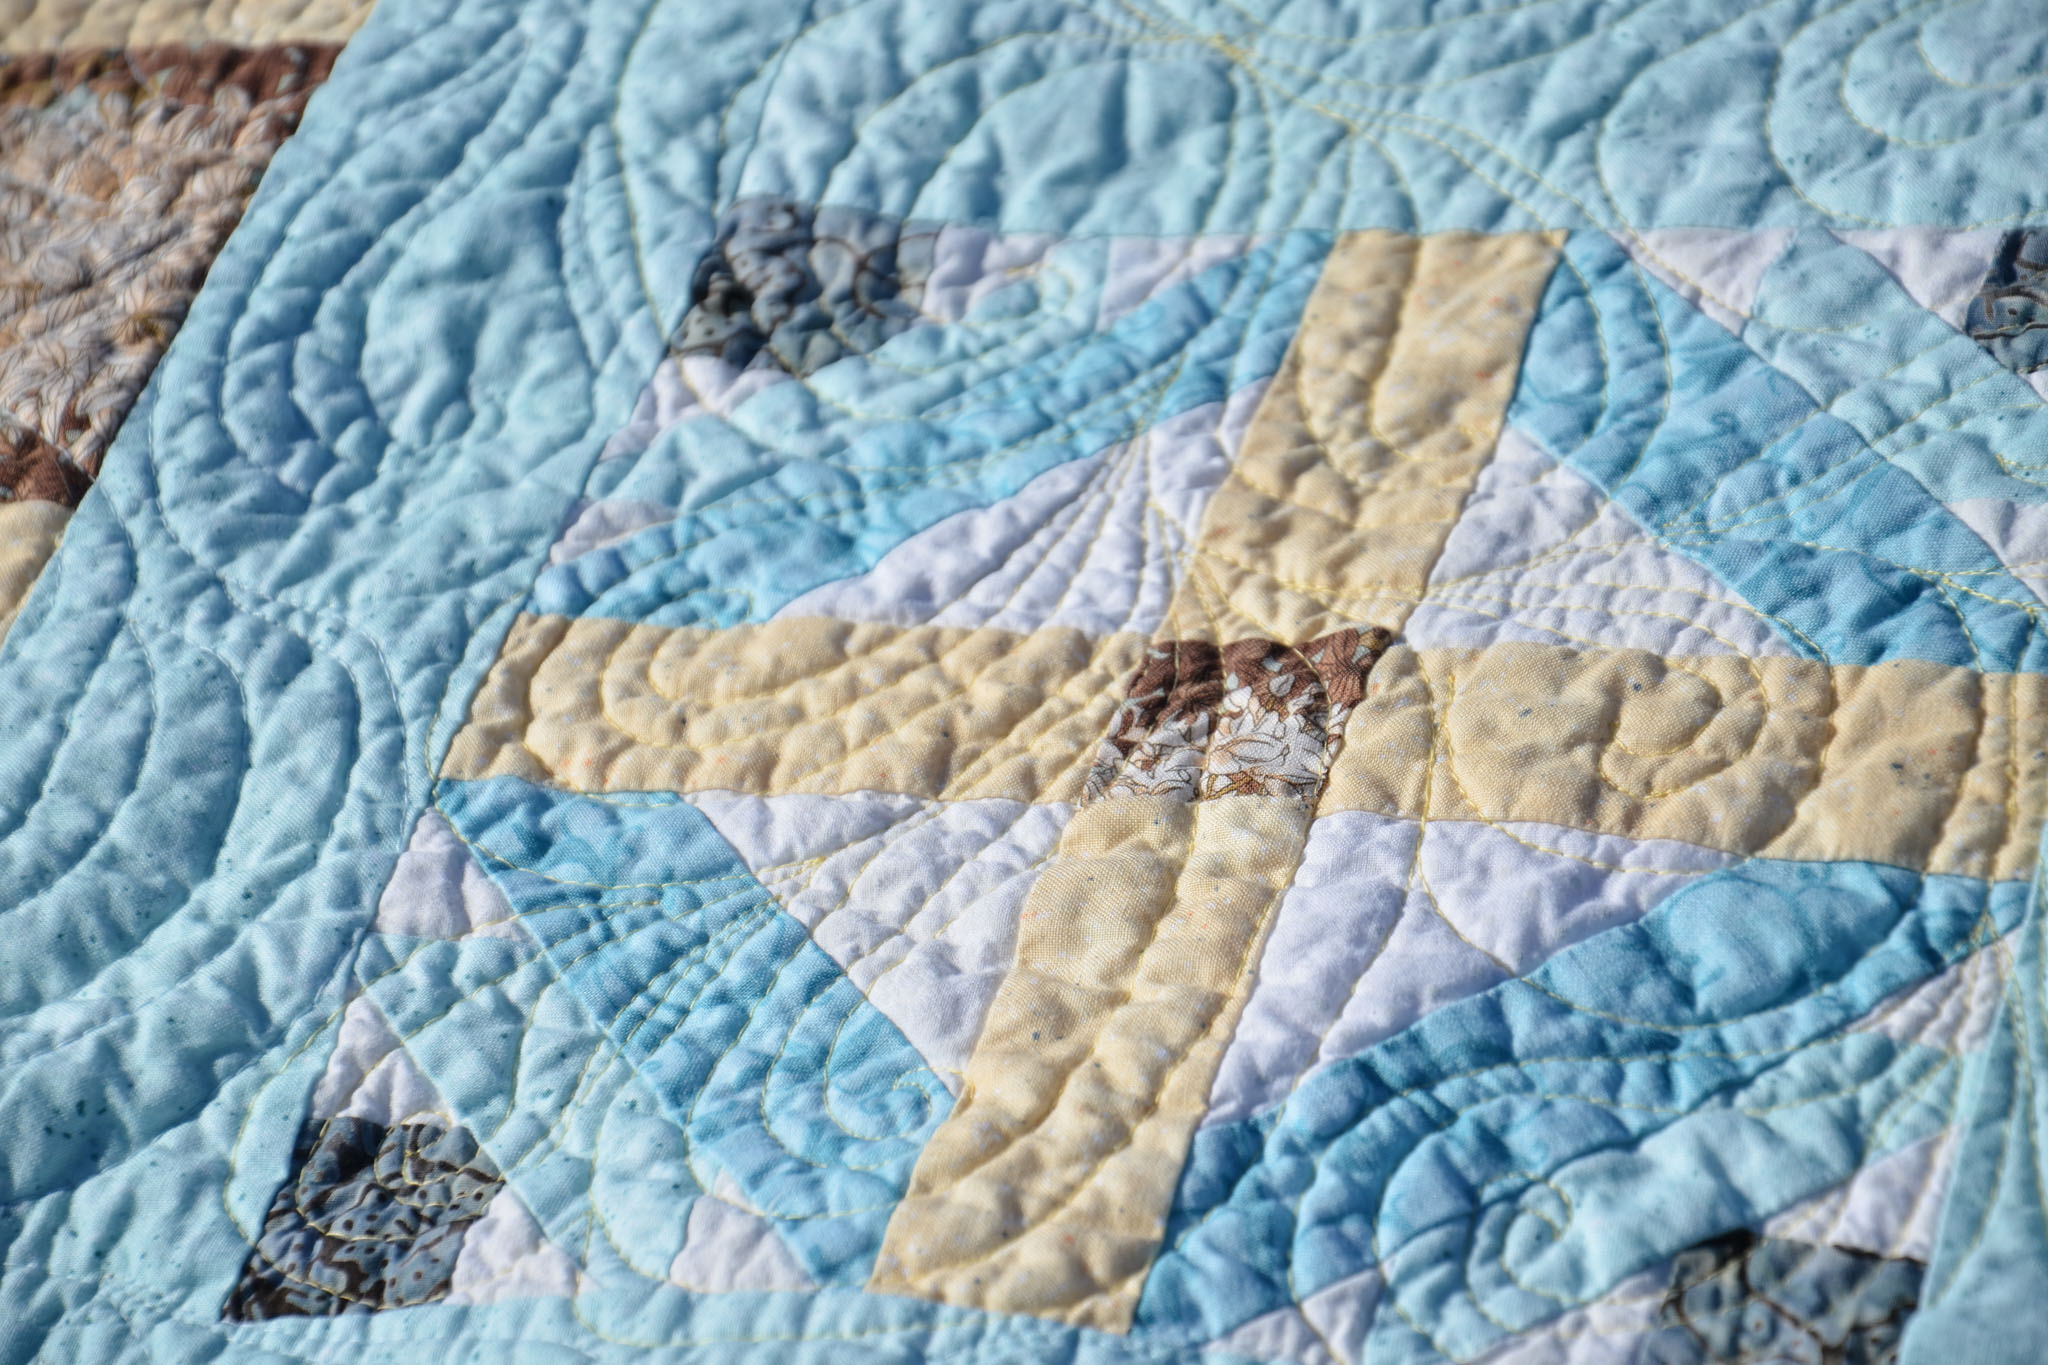
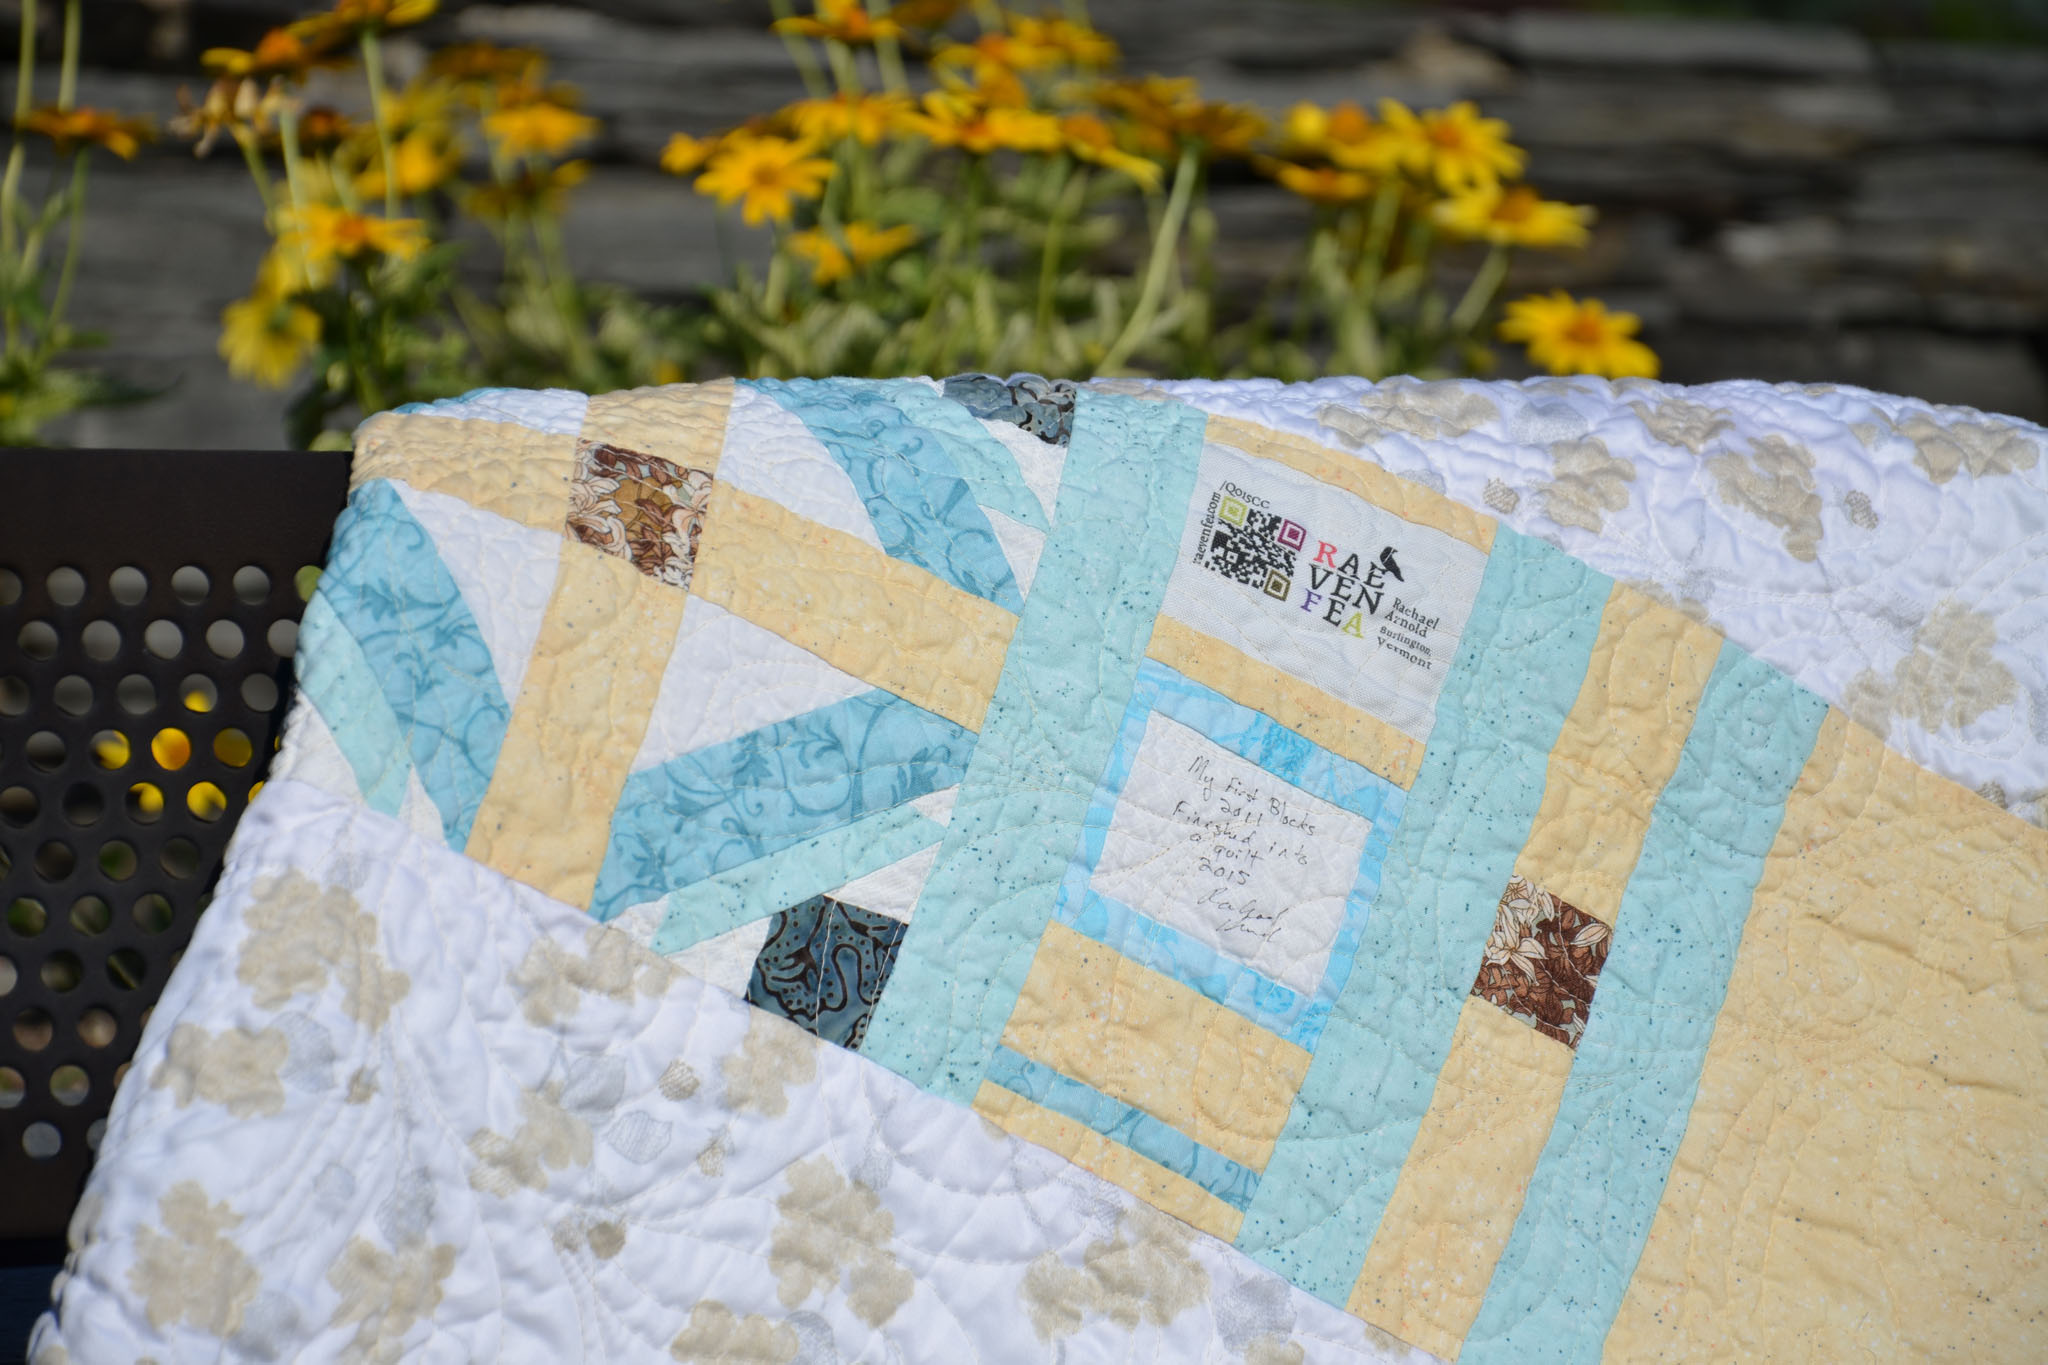
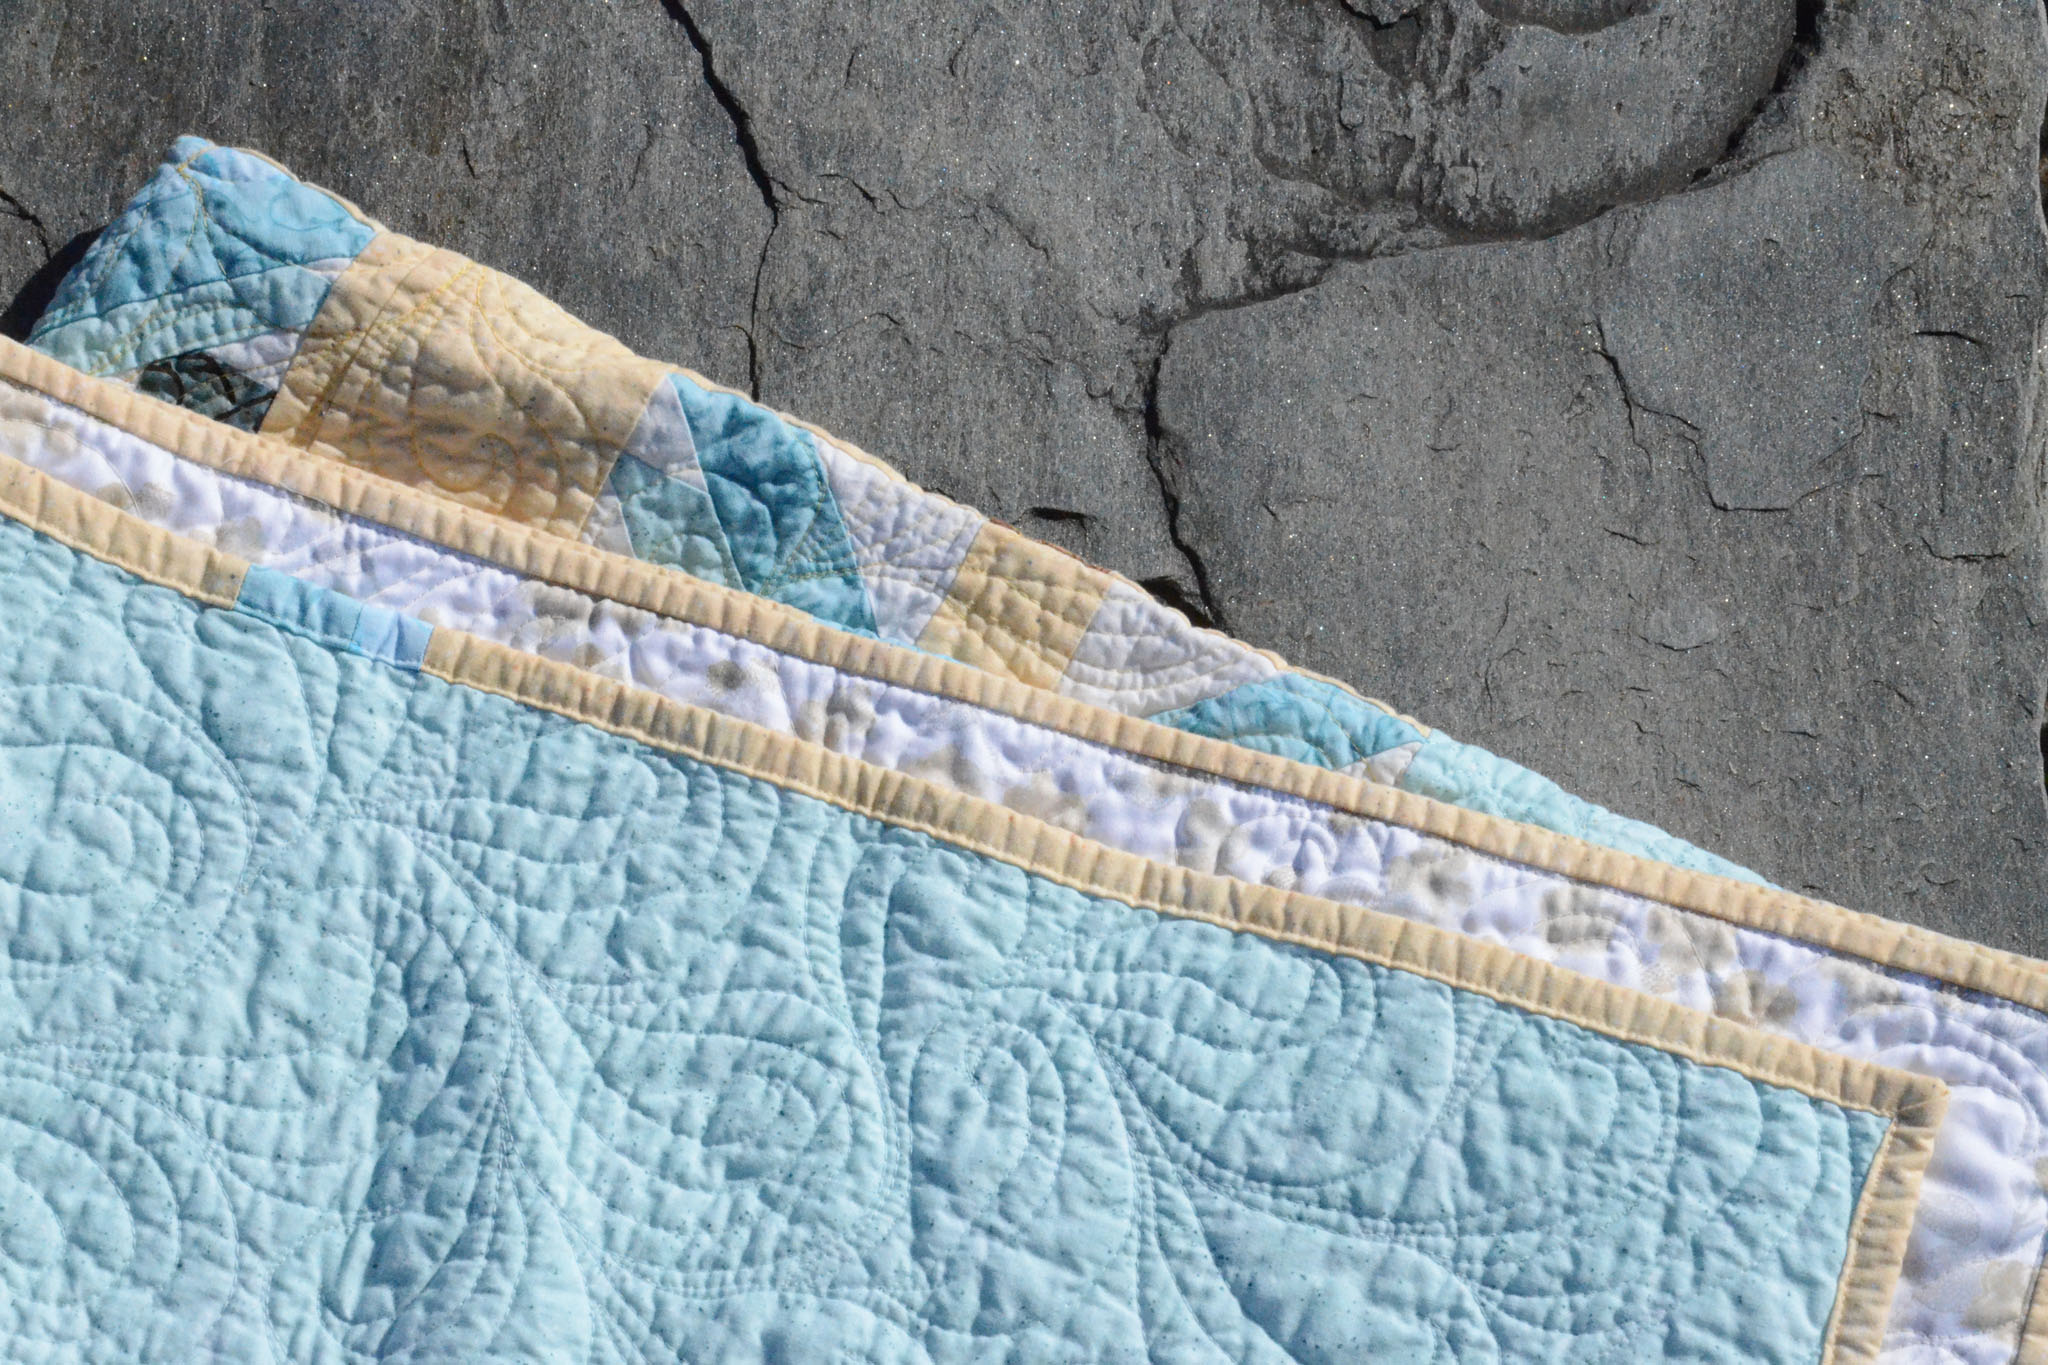
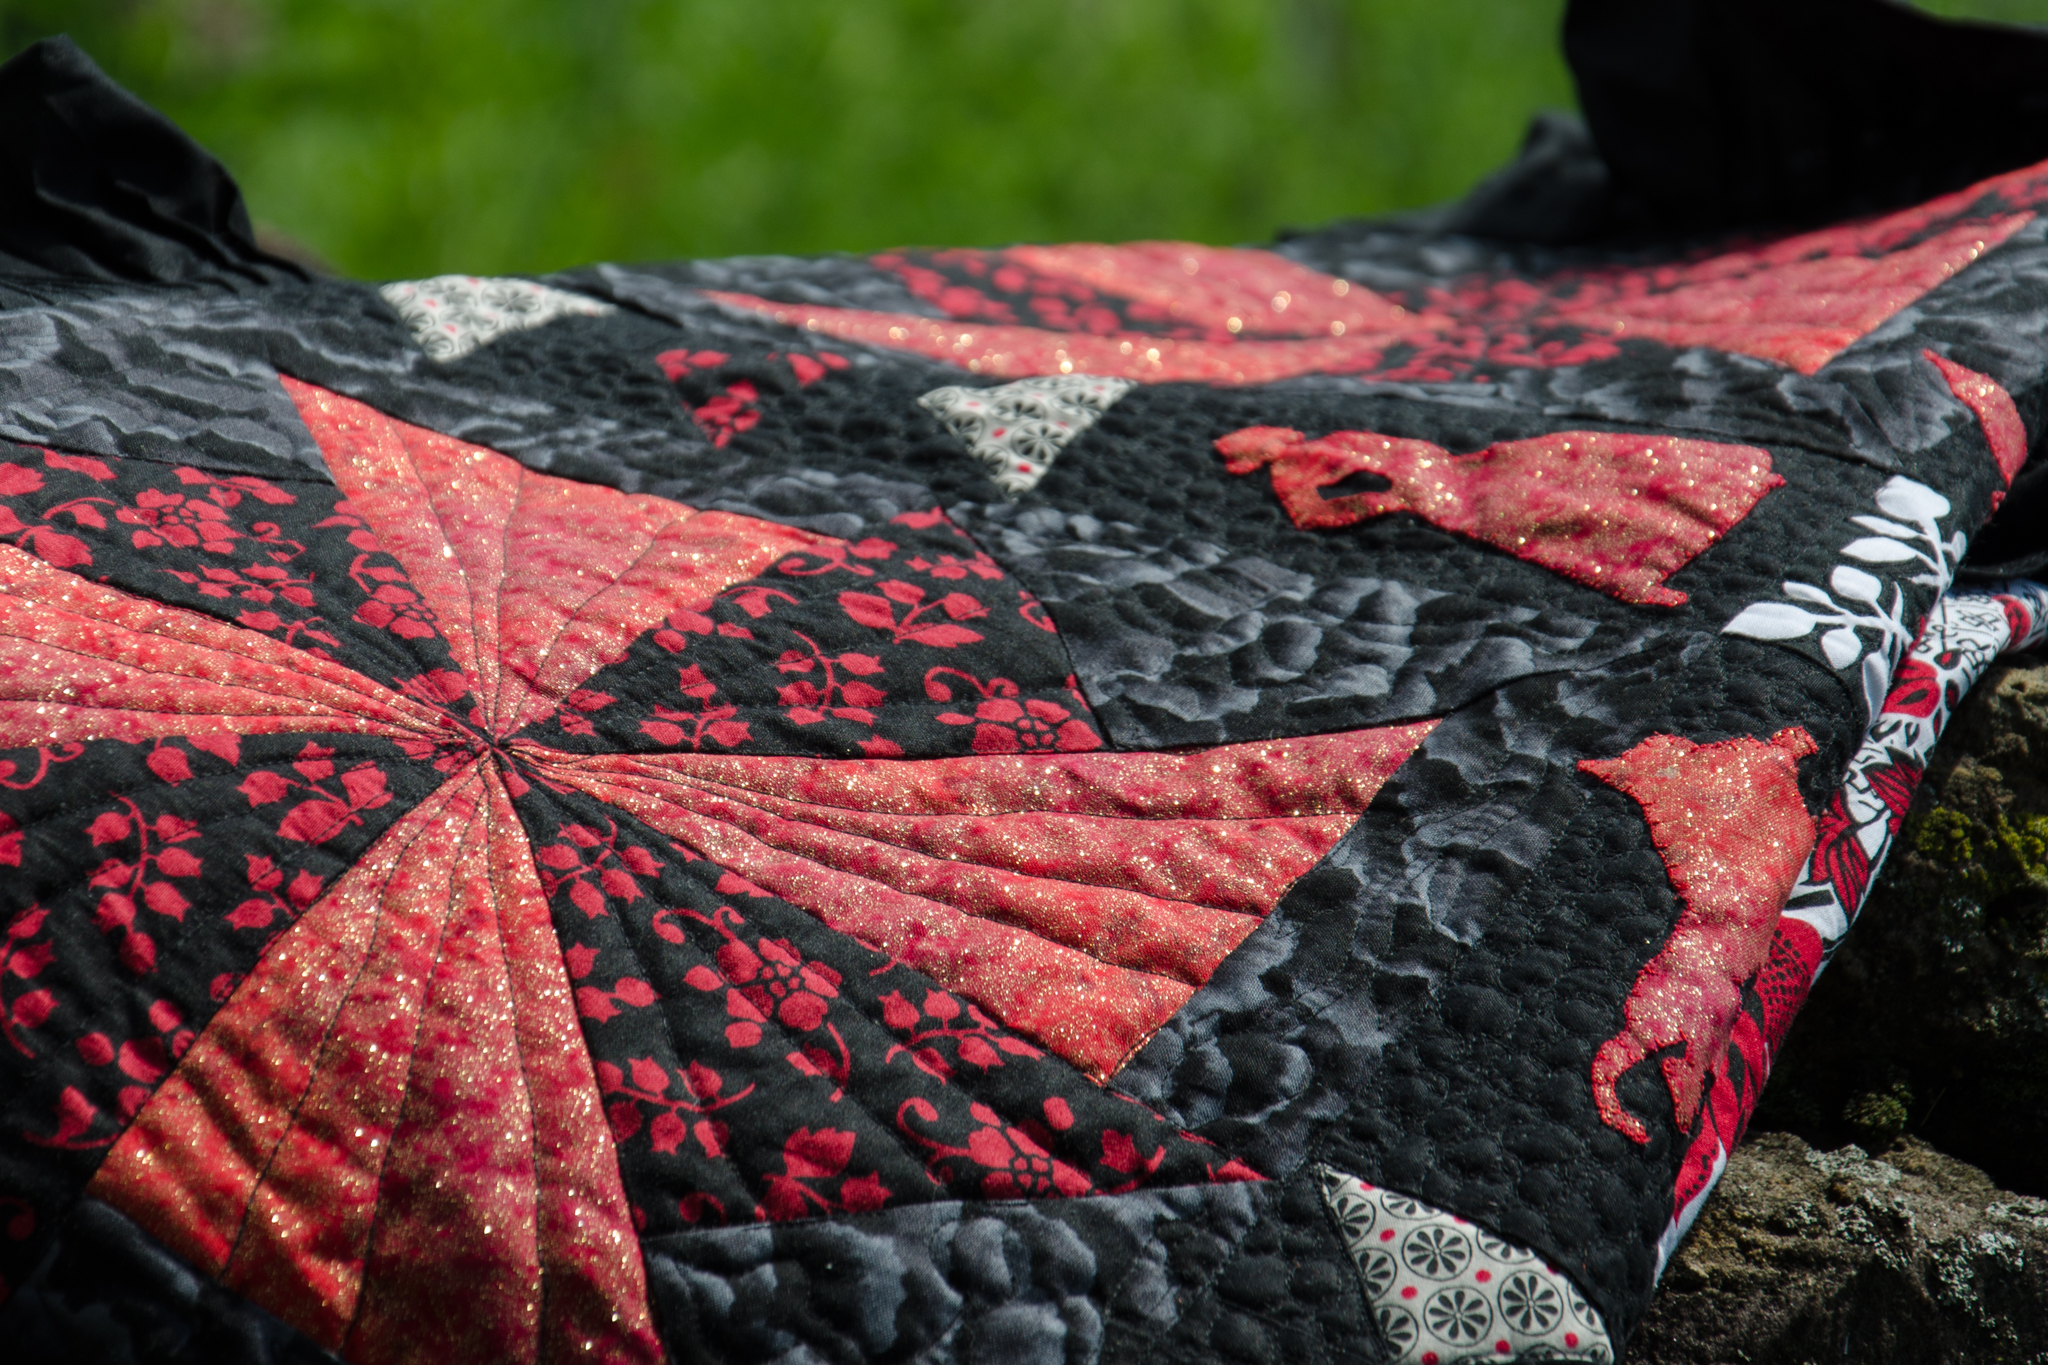
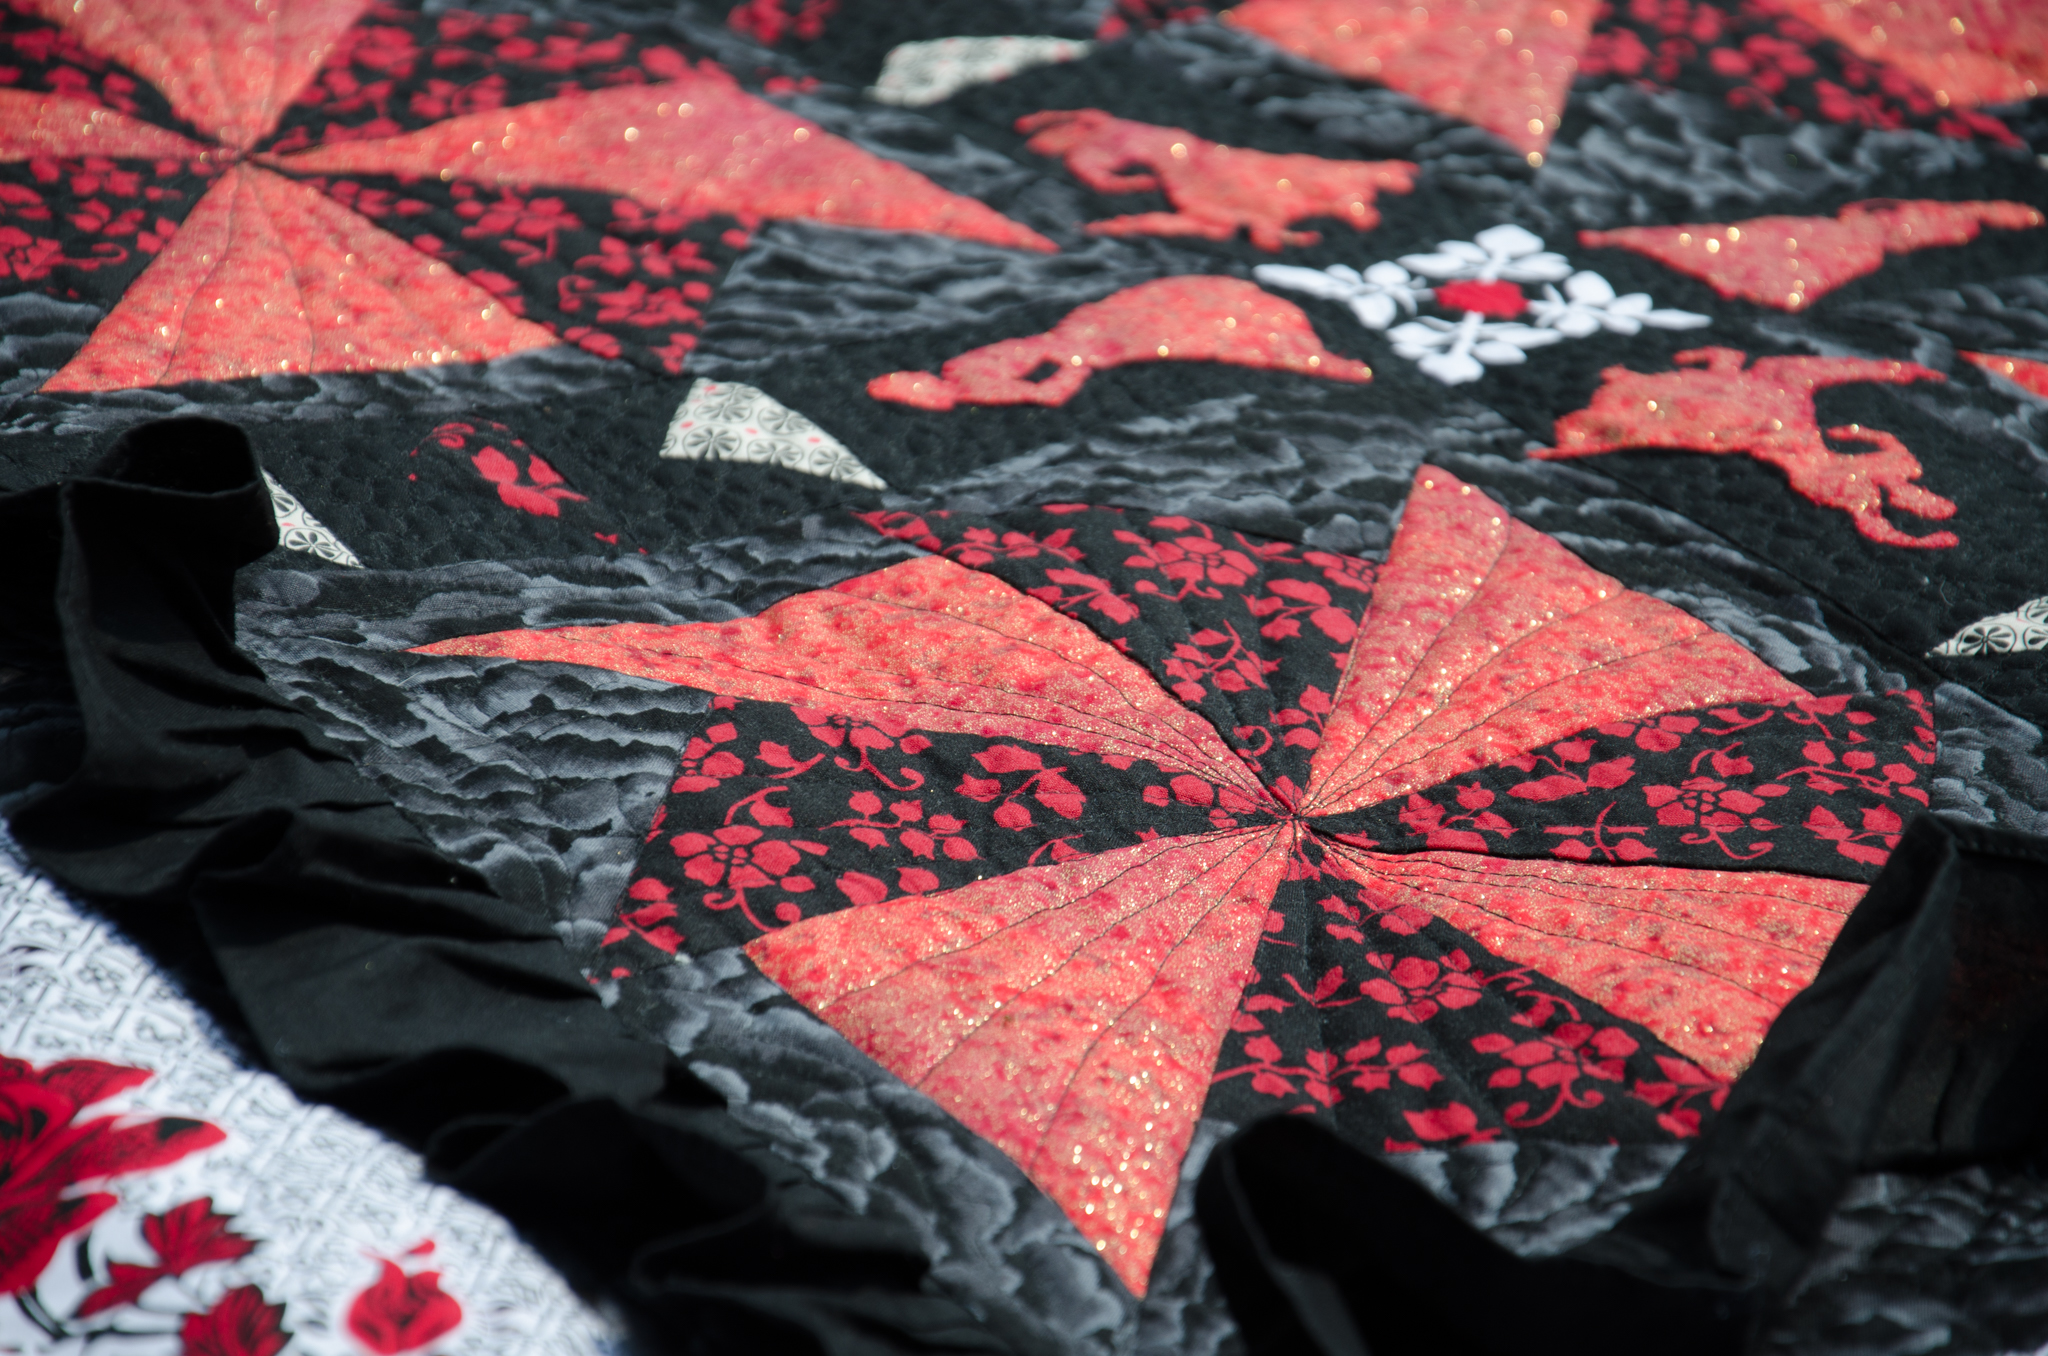
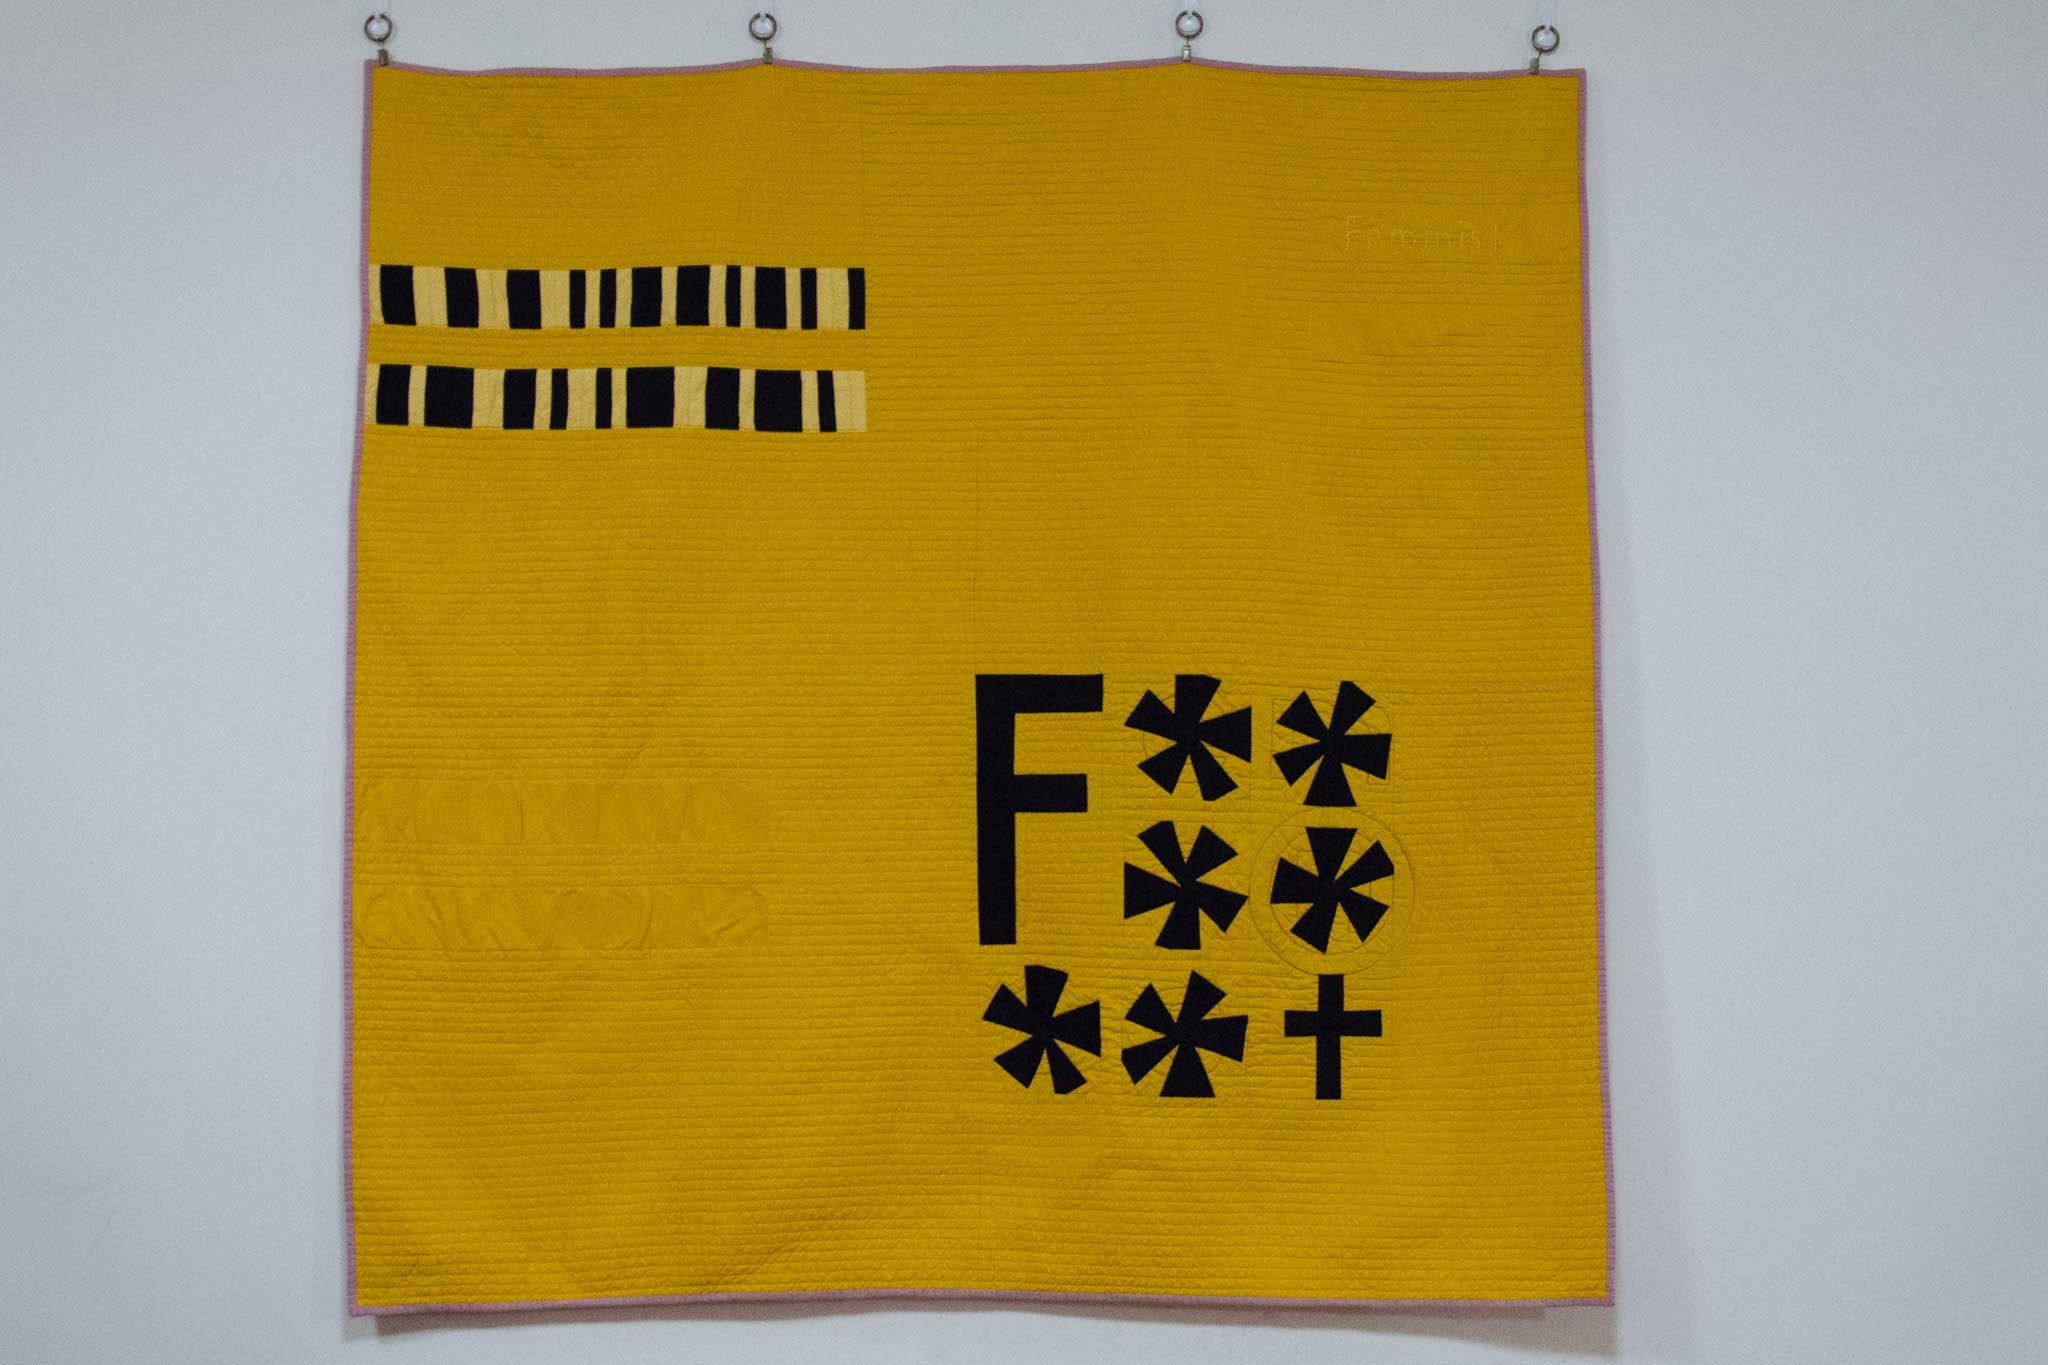
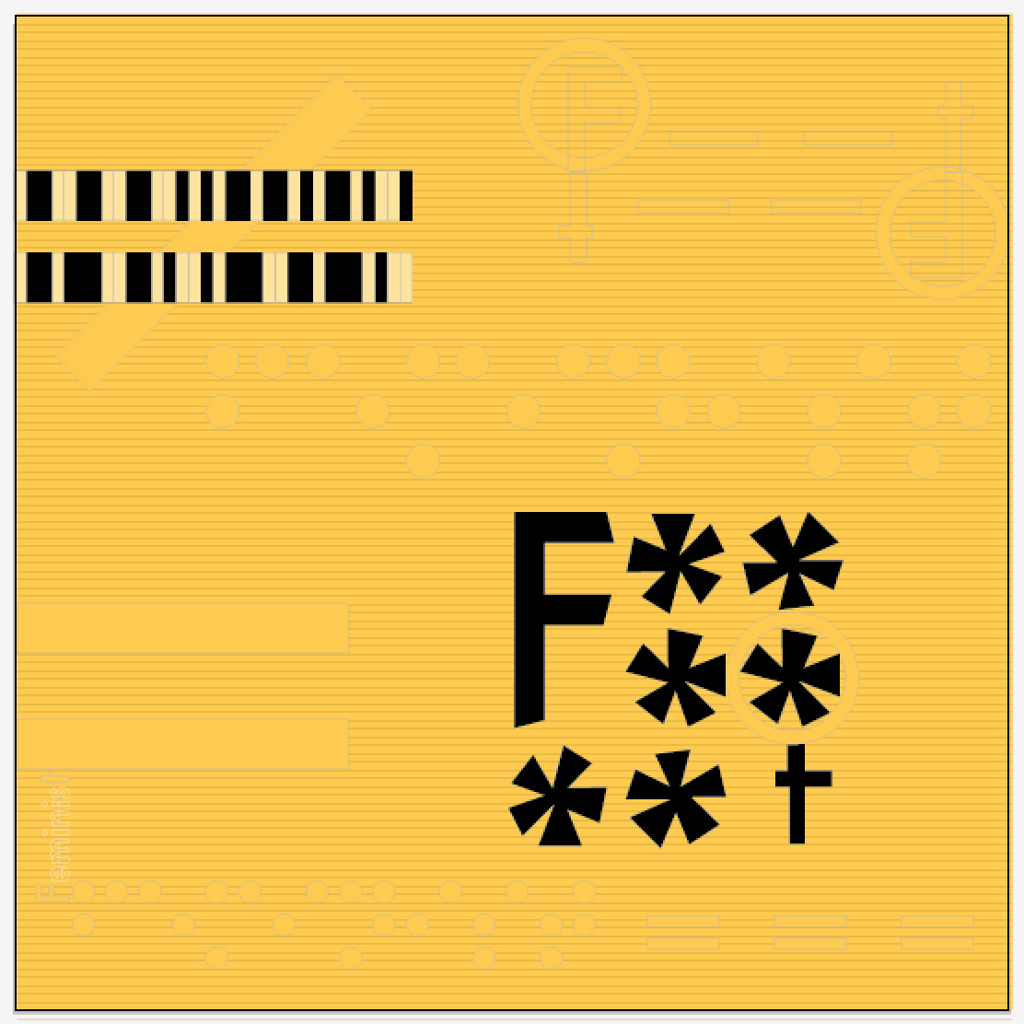
In the end, I used machine embroidery to quilt the letters that are starred-out, and freehanded “F––t” in the partial equality sign in the top right. The remaining quilting is straight lines and single echoes of the pieced shapes, using a lack of quilting to outline a second equality motif for a bit of visual balance. A well-placed black-stitched toroid turns the ‘t’ in “Feminist” into the cross found on the astrological symbol for Venus, widely considered the “female” symbol.

f-word-quilting-2
“The F-word” (detail), Rachael Arnold, September 2015, 57″x57″.

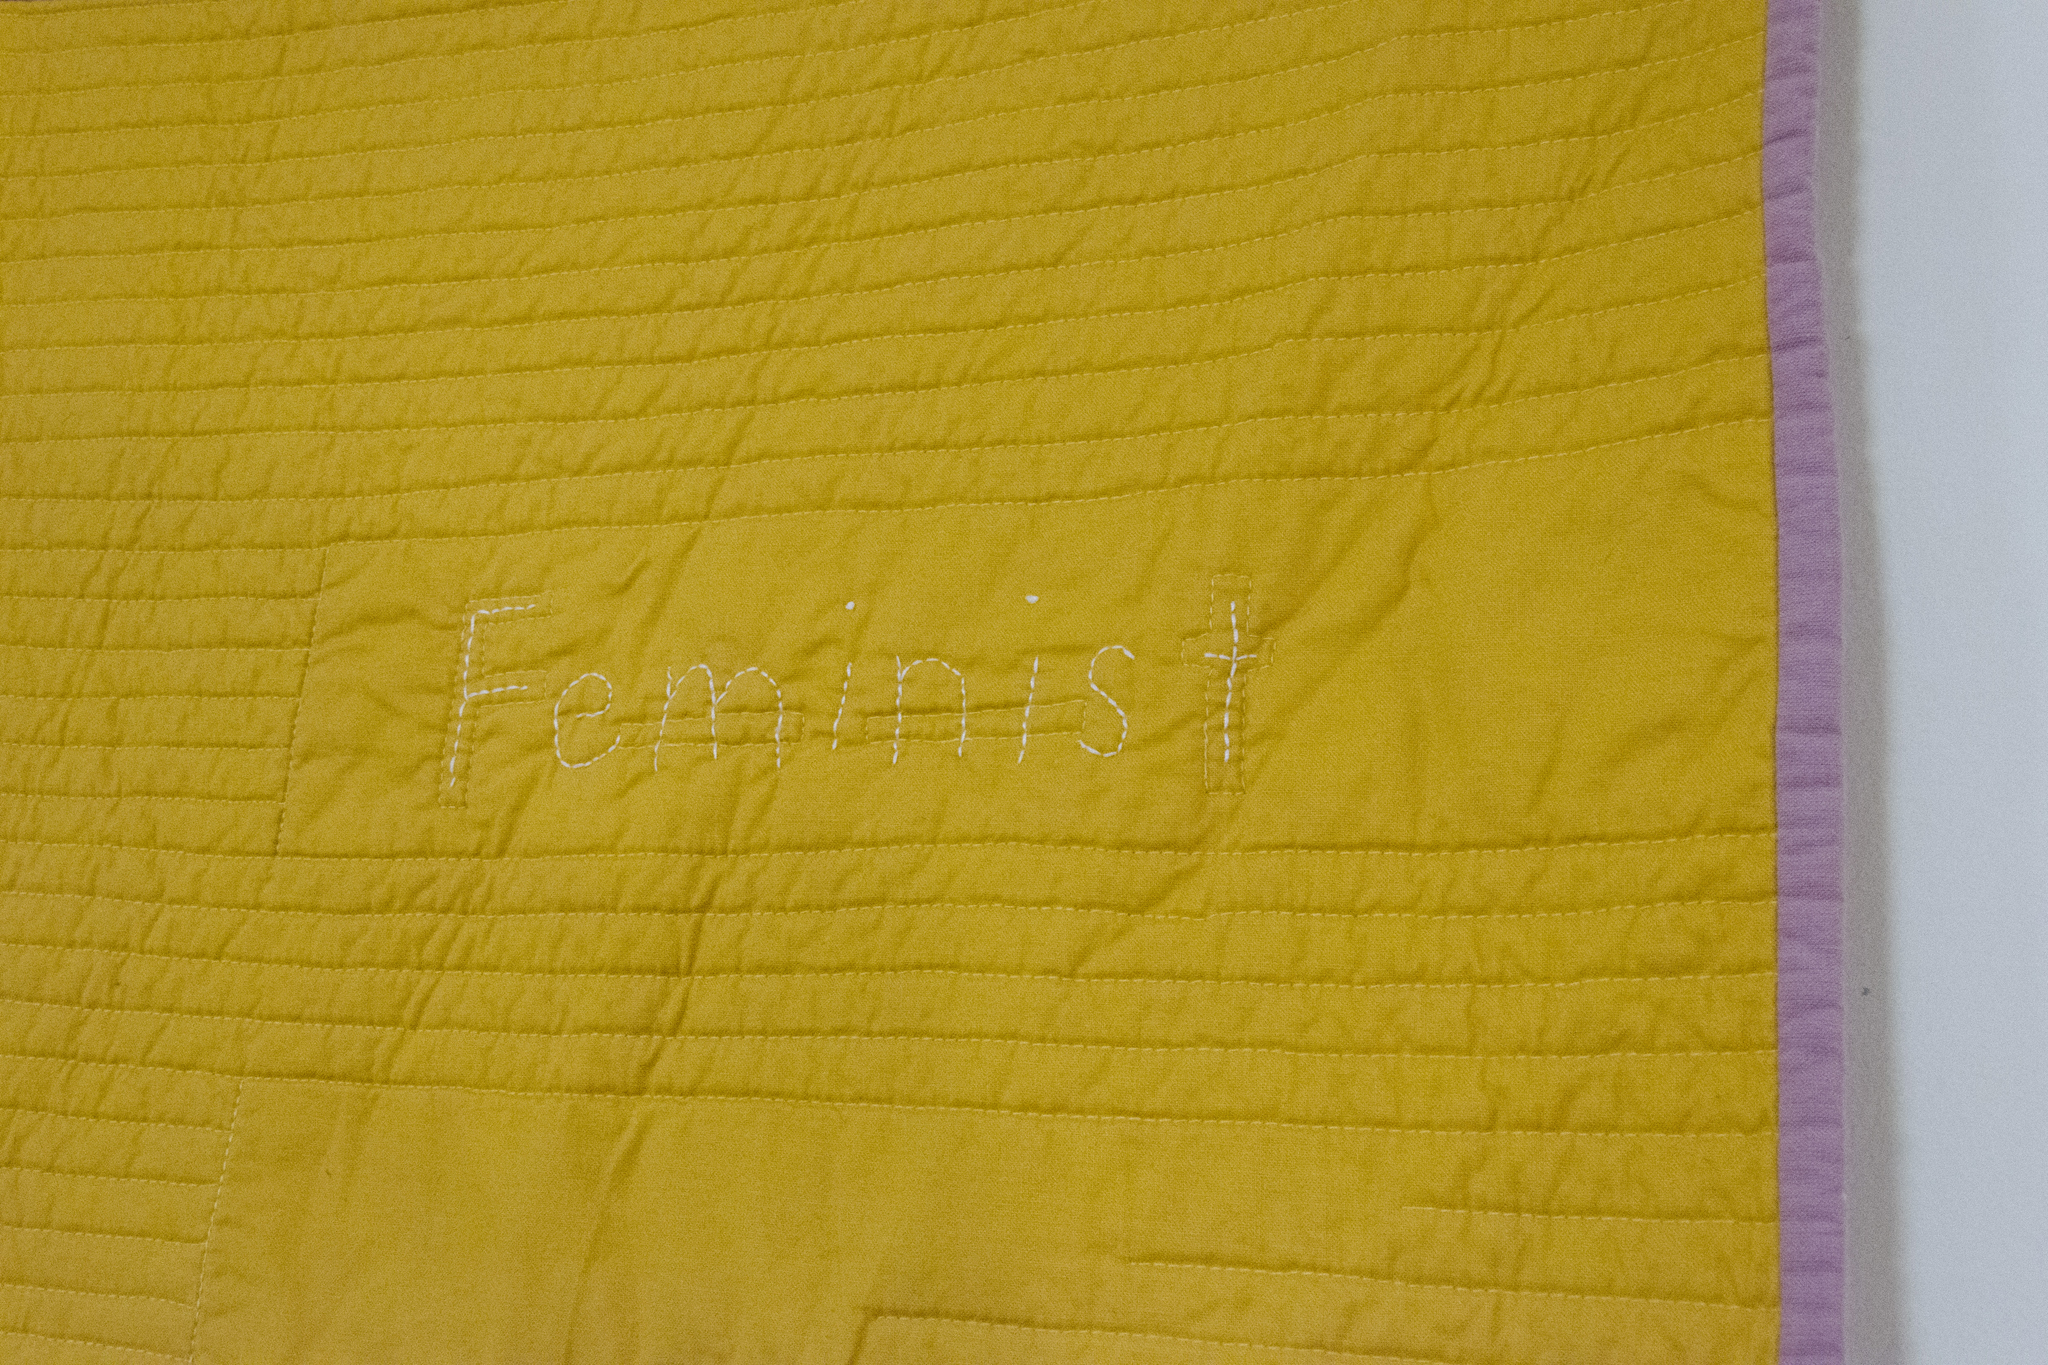
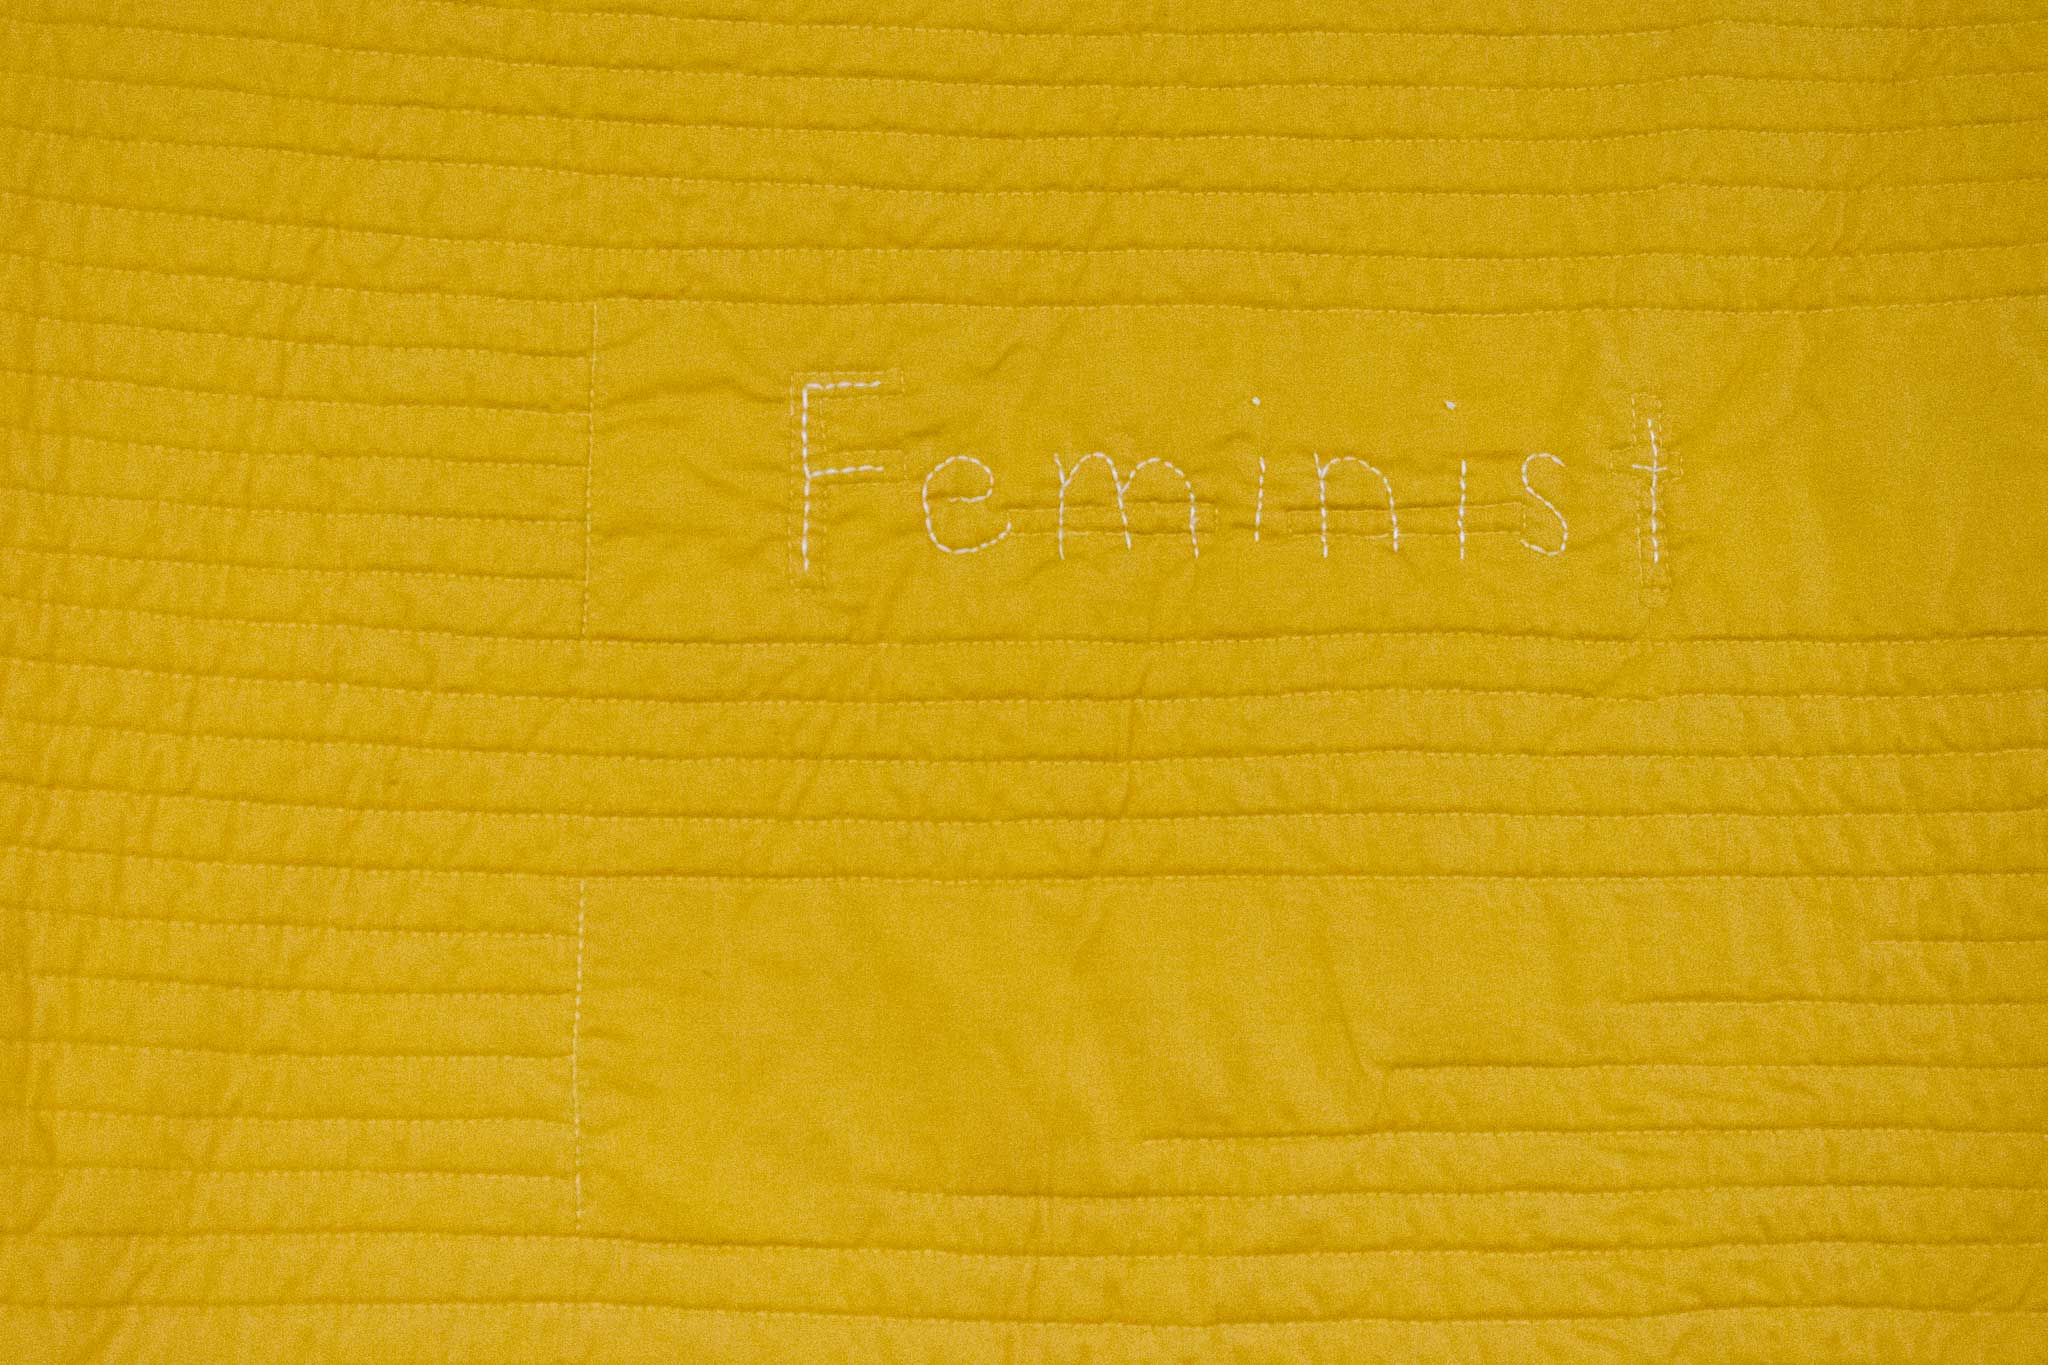
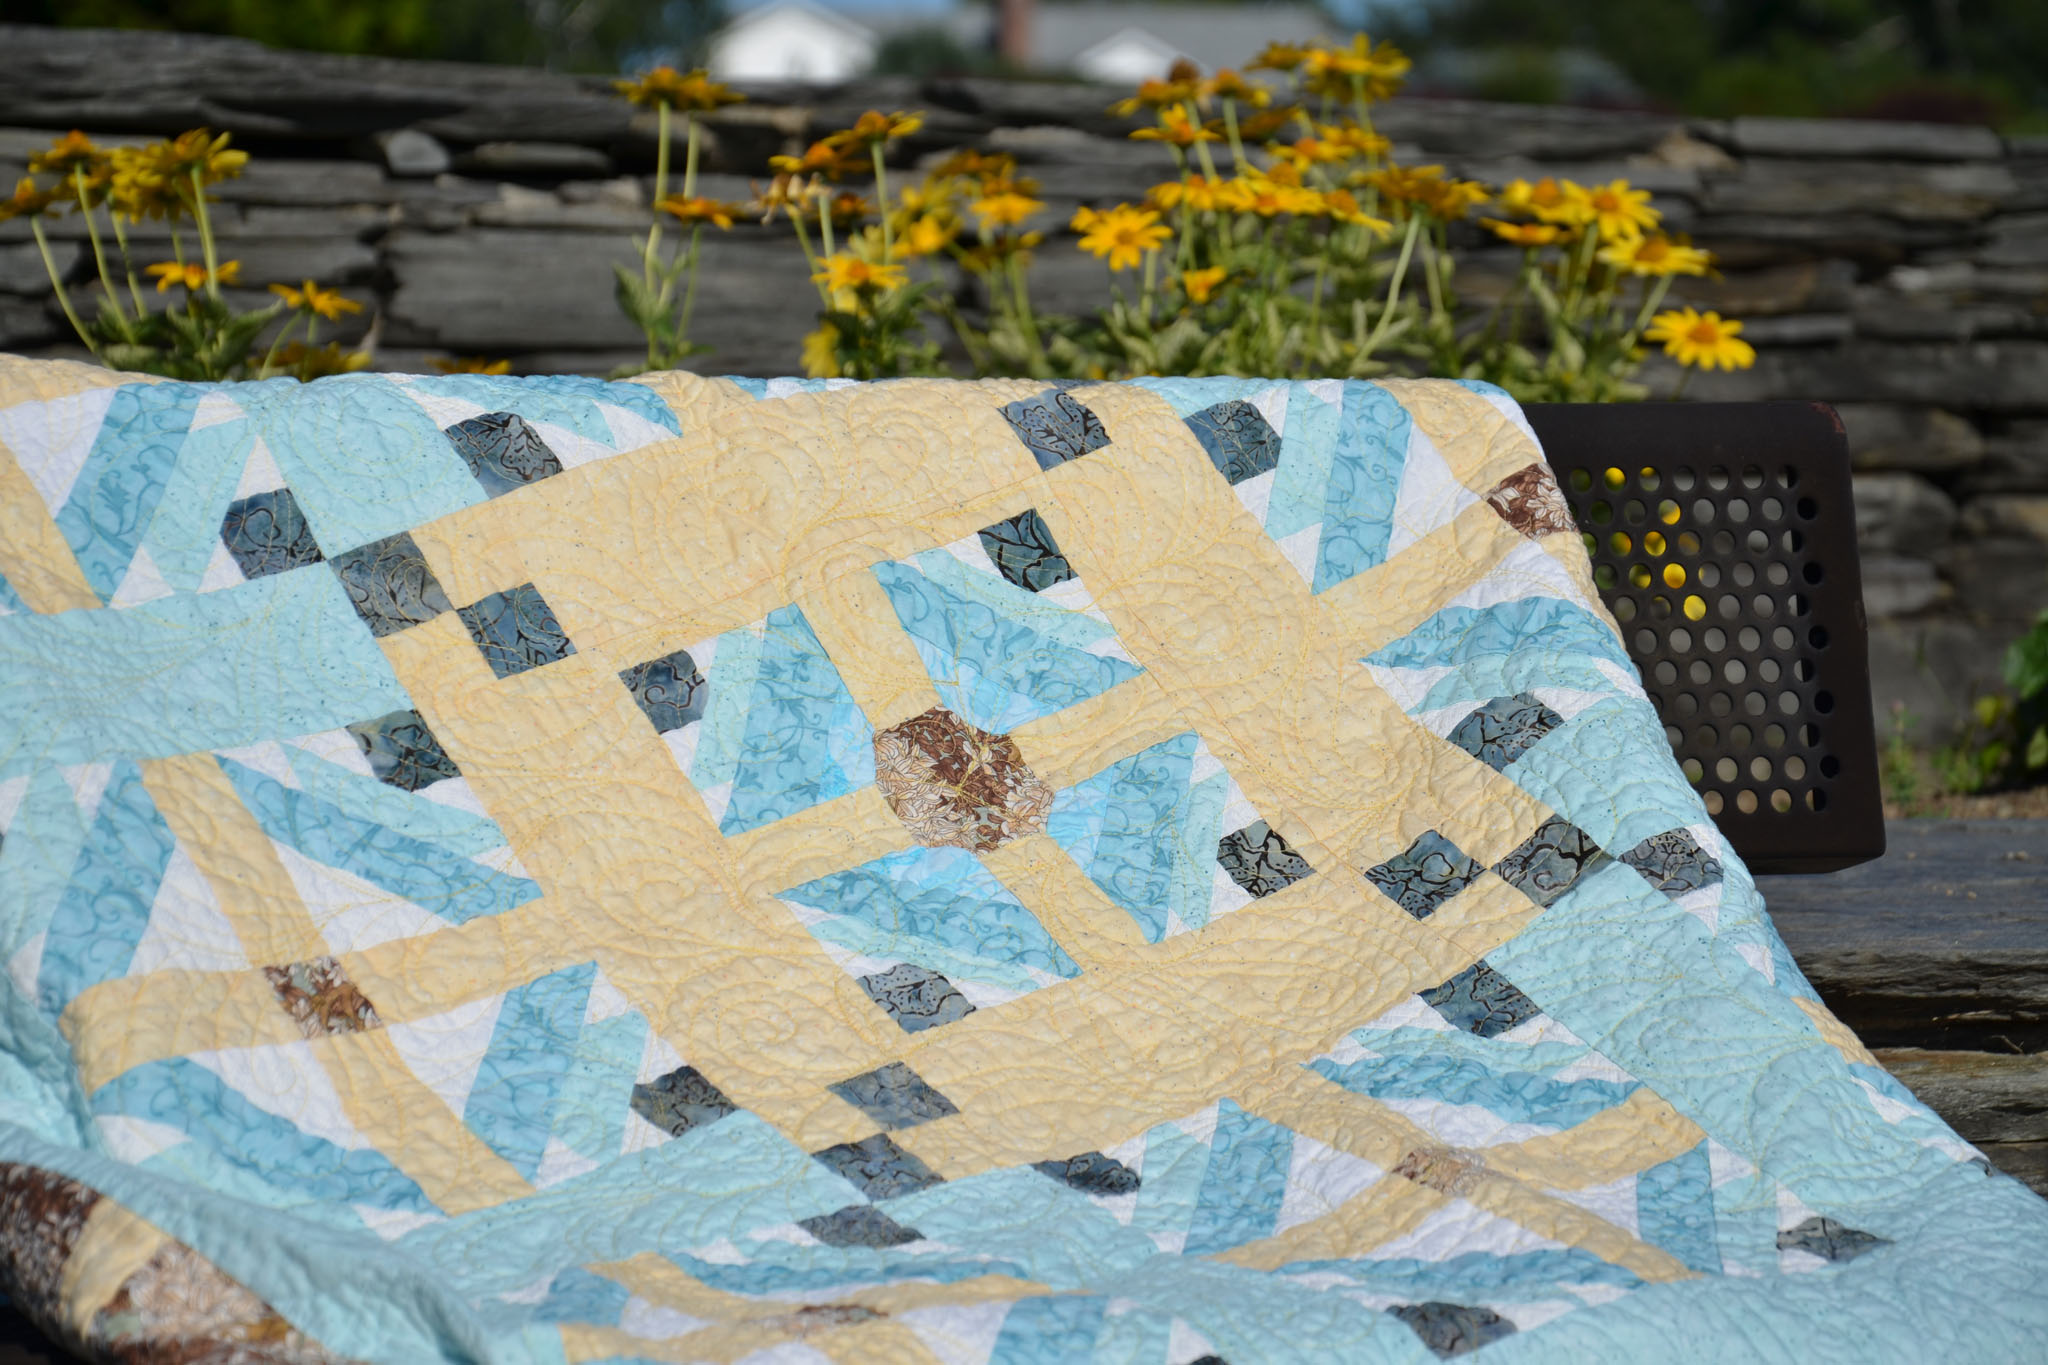
Finally, a hand-quilted “Feminist” overlaps the machined “F––t”, bringing the word to the front of the quilt in a visible, rebellious way—no infanticide or witchcraft needed.

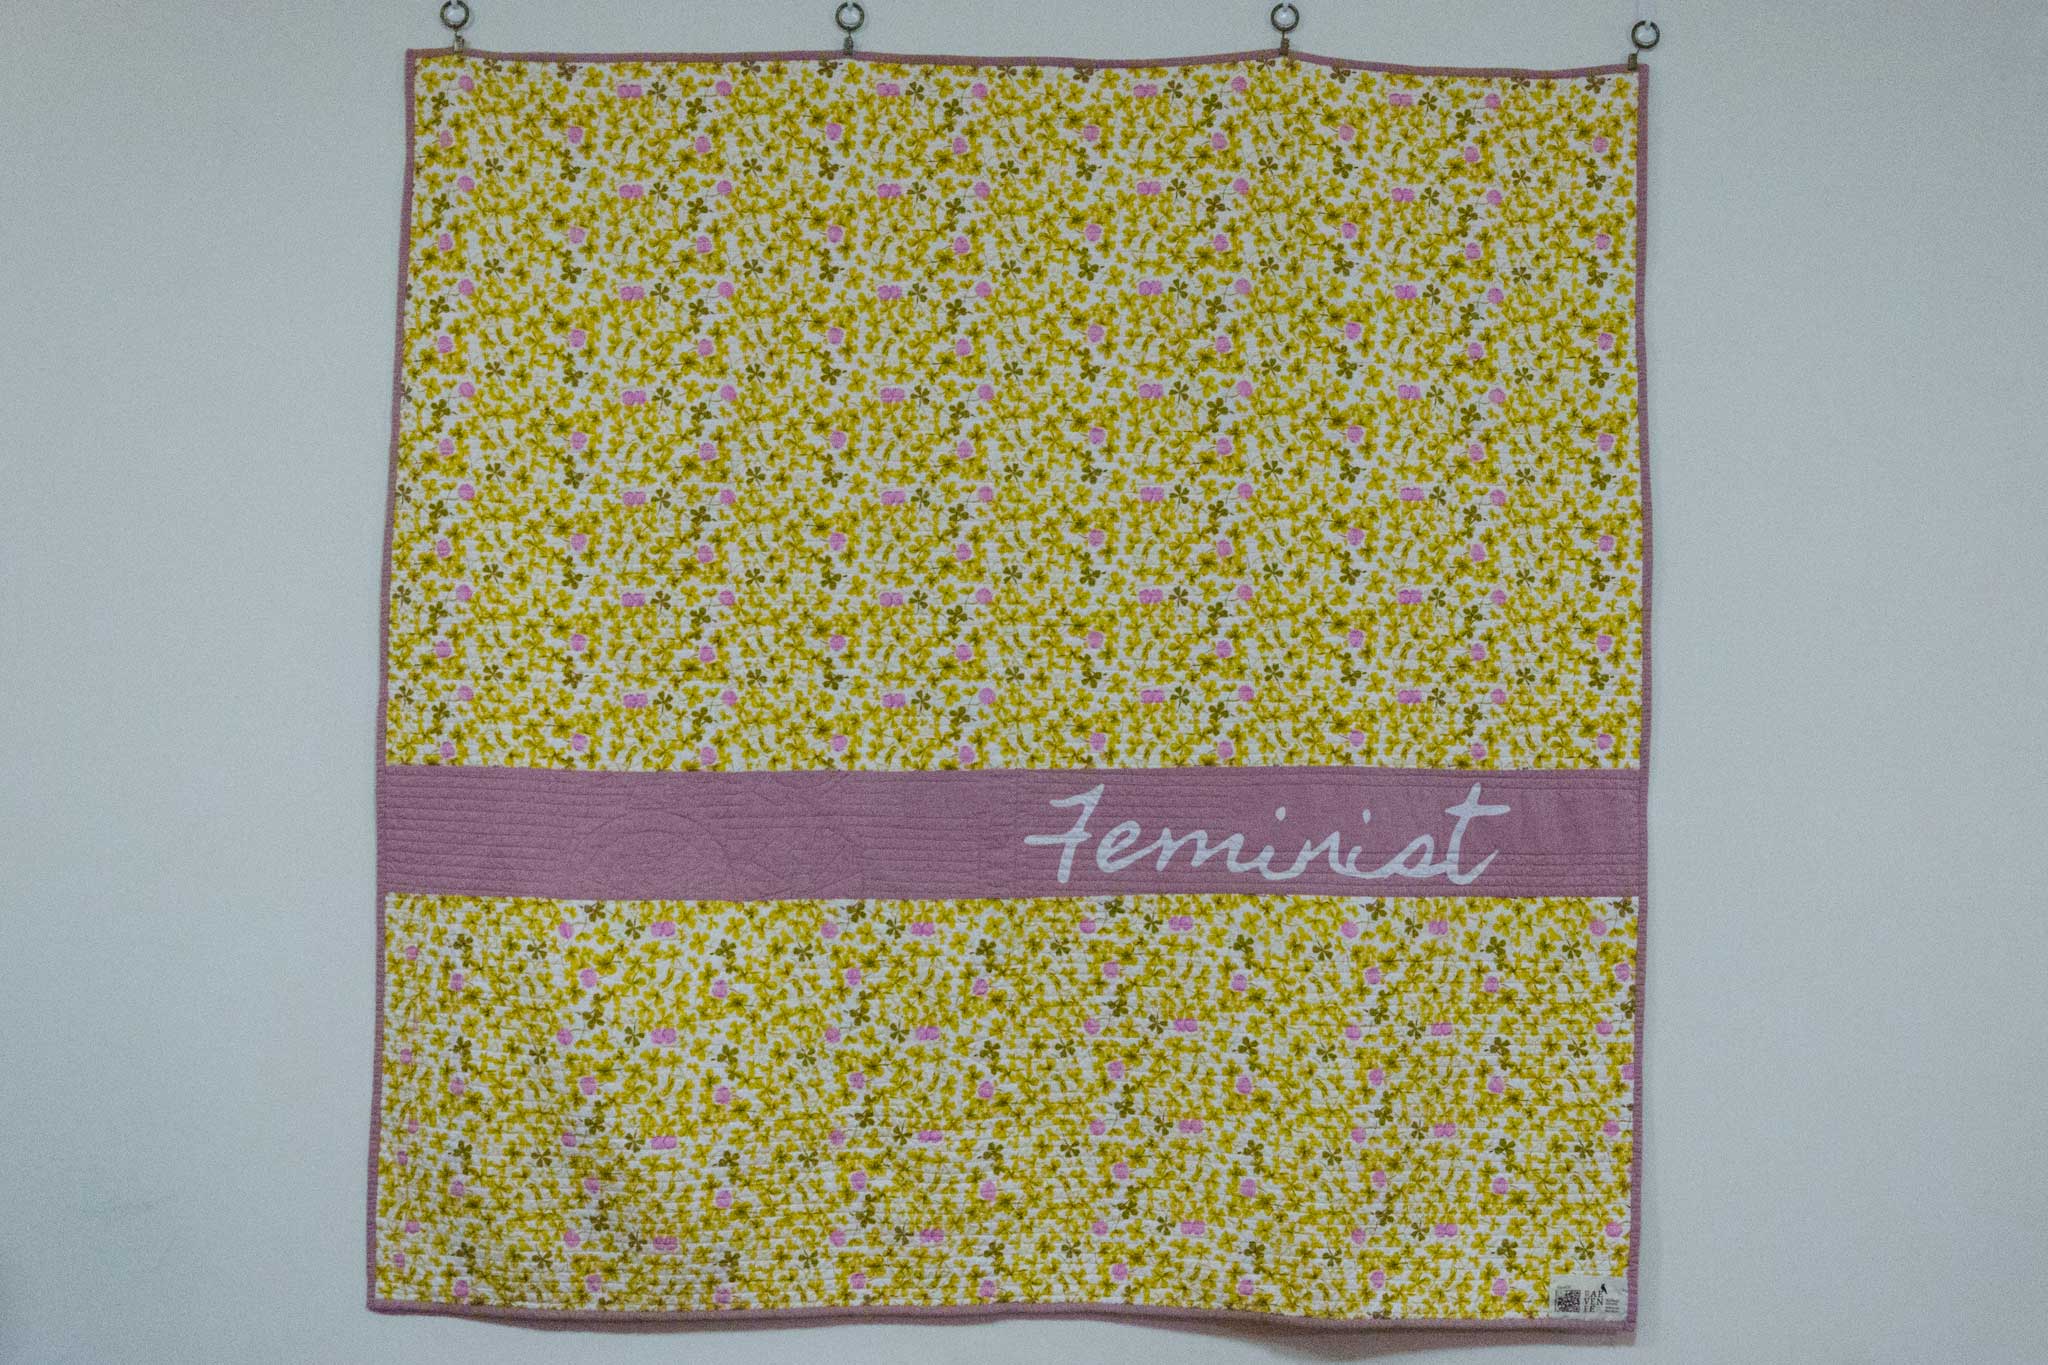
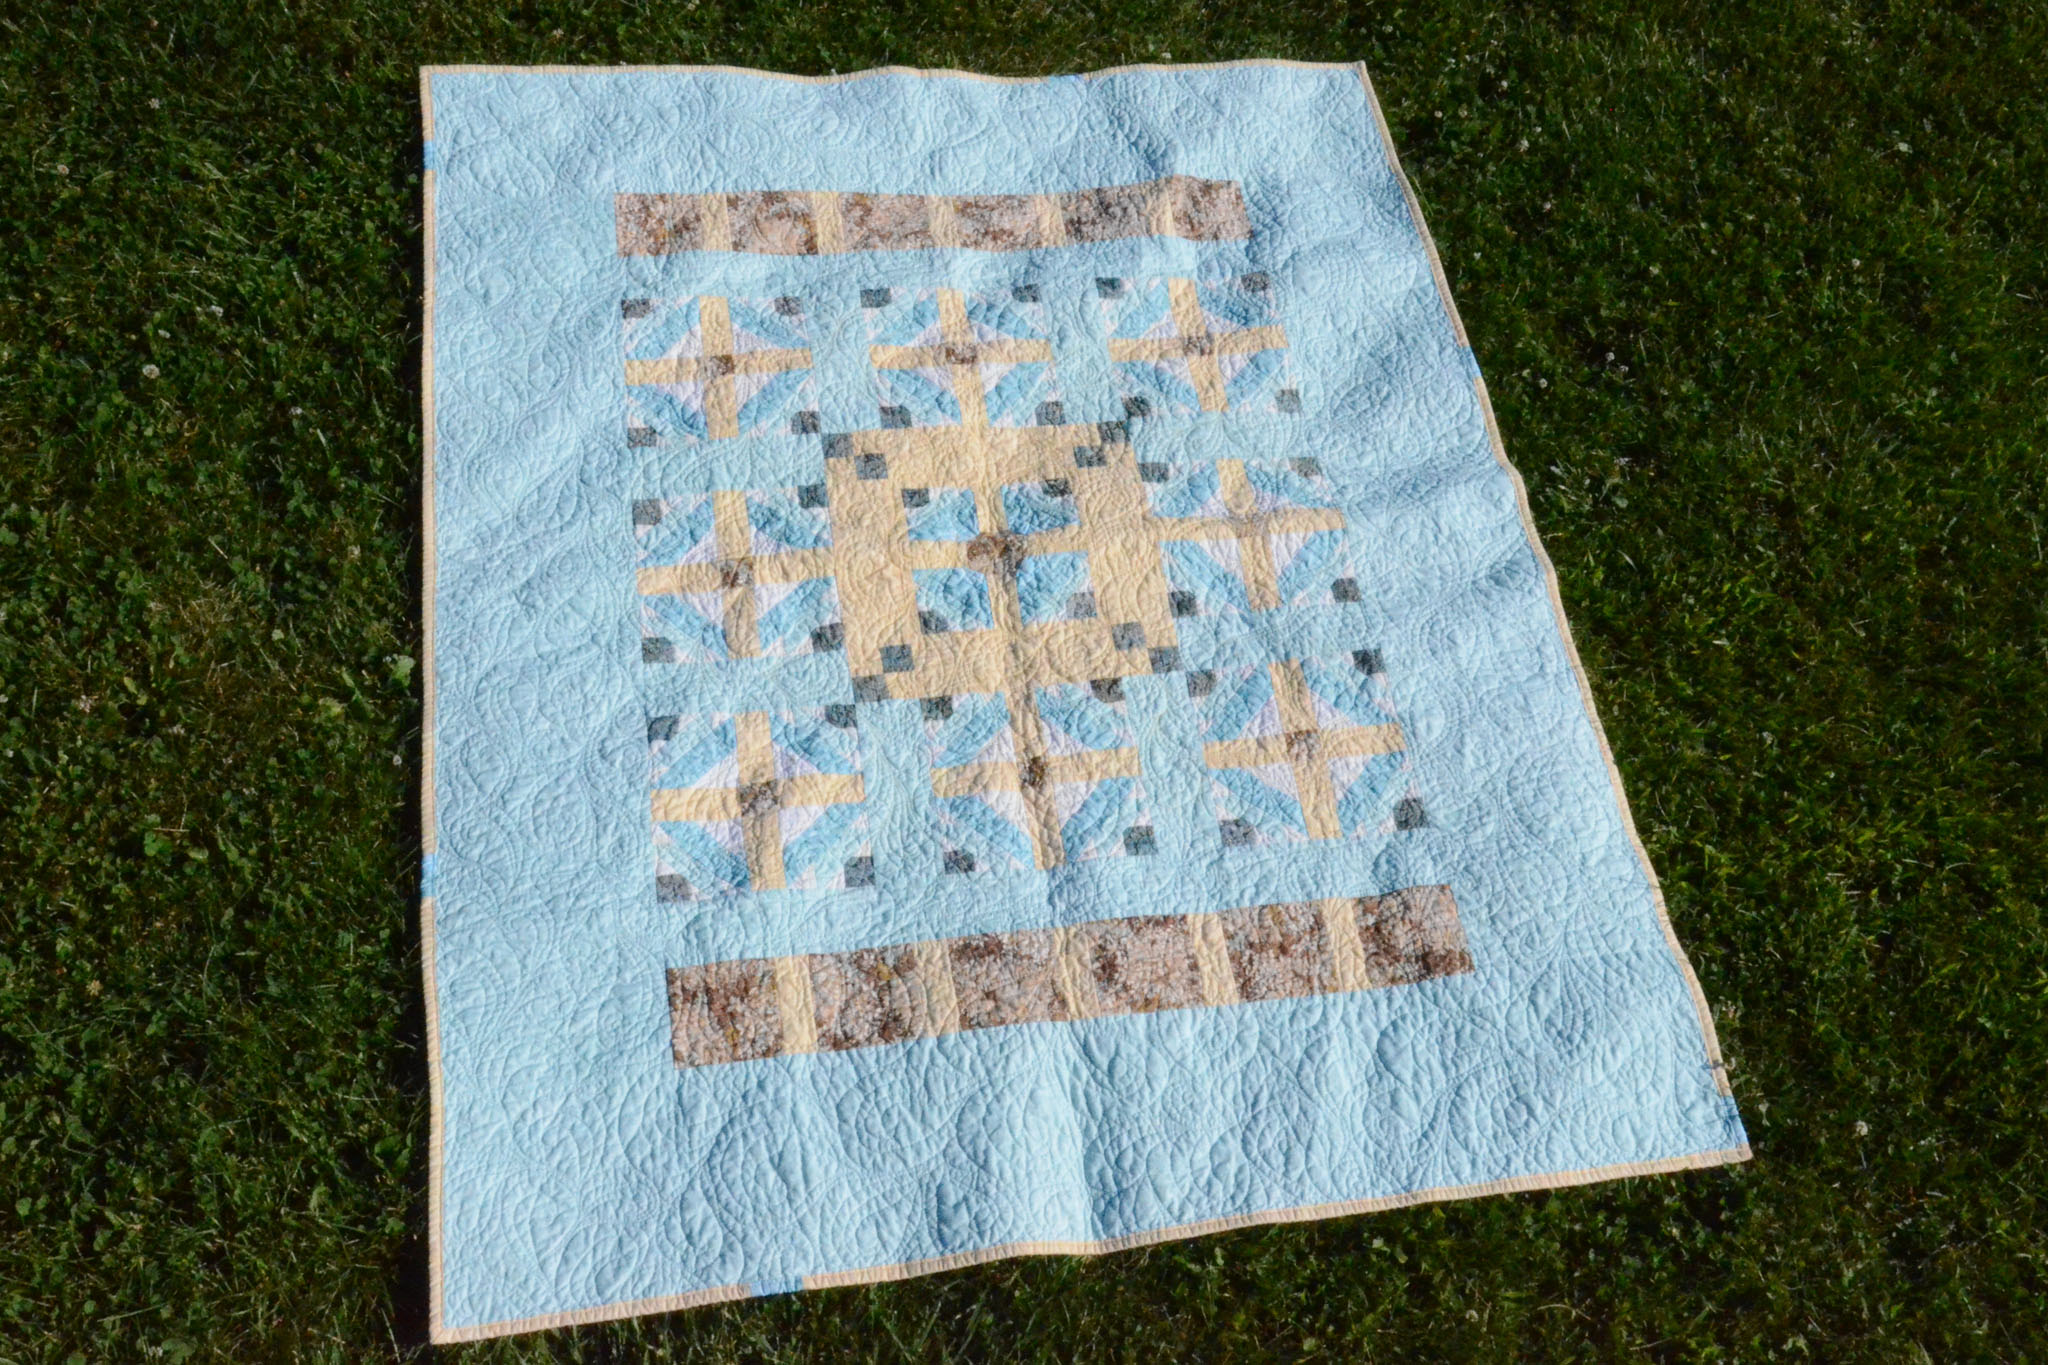
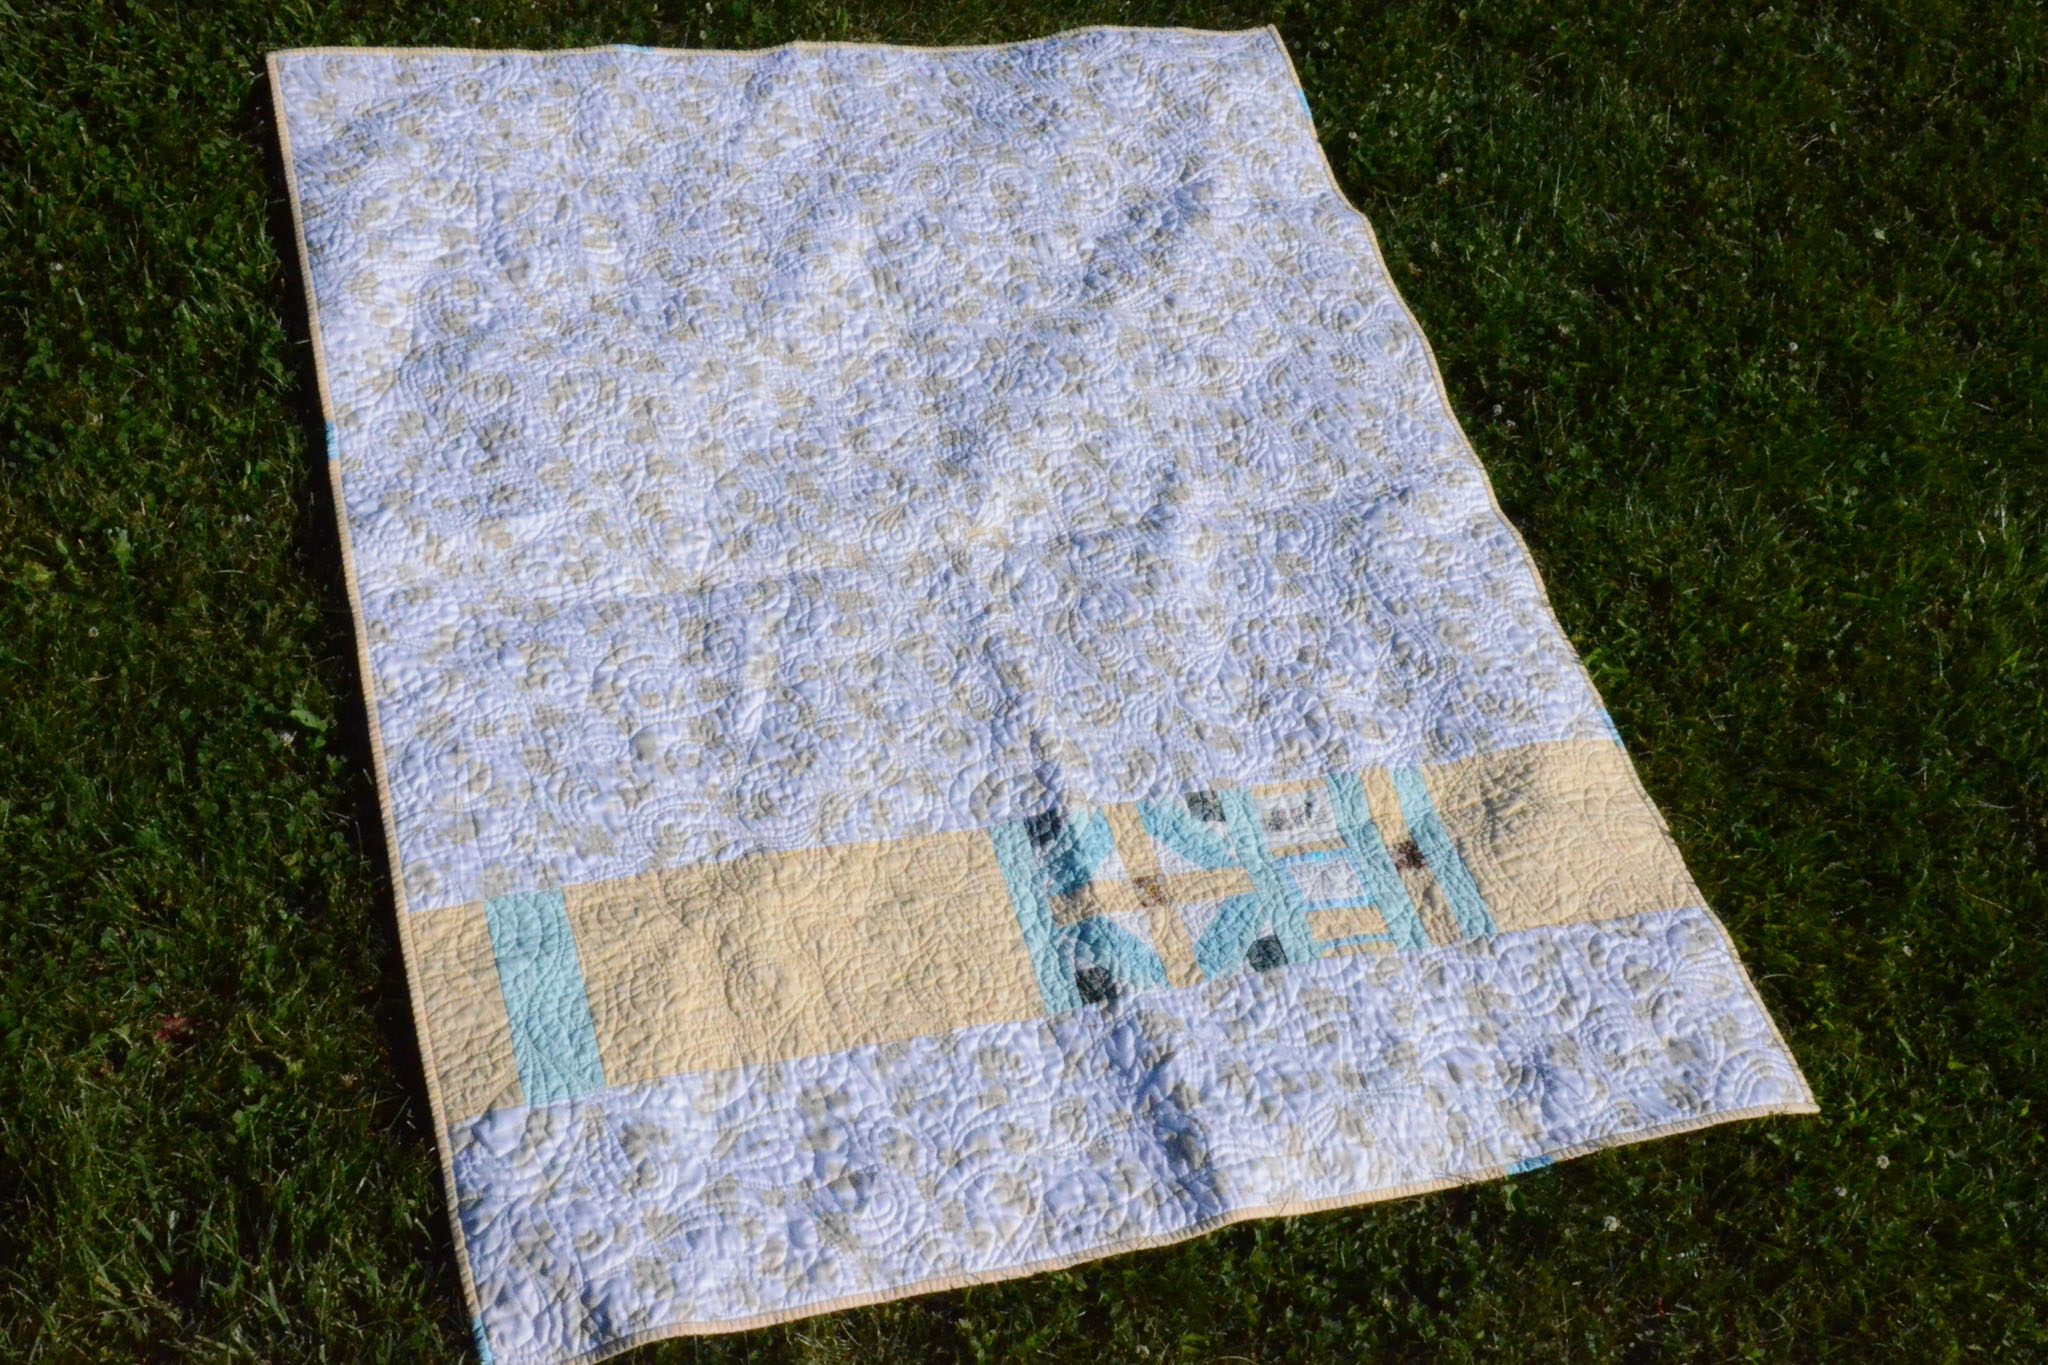
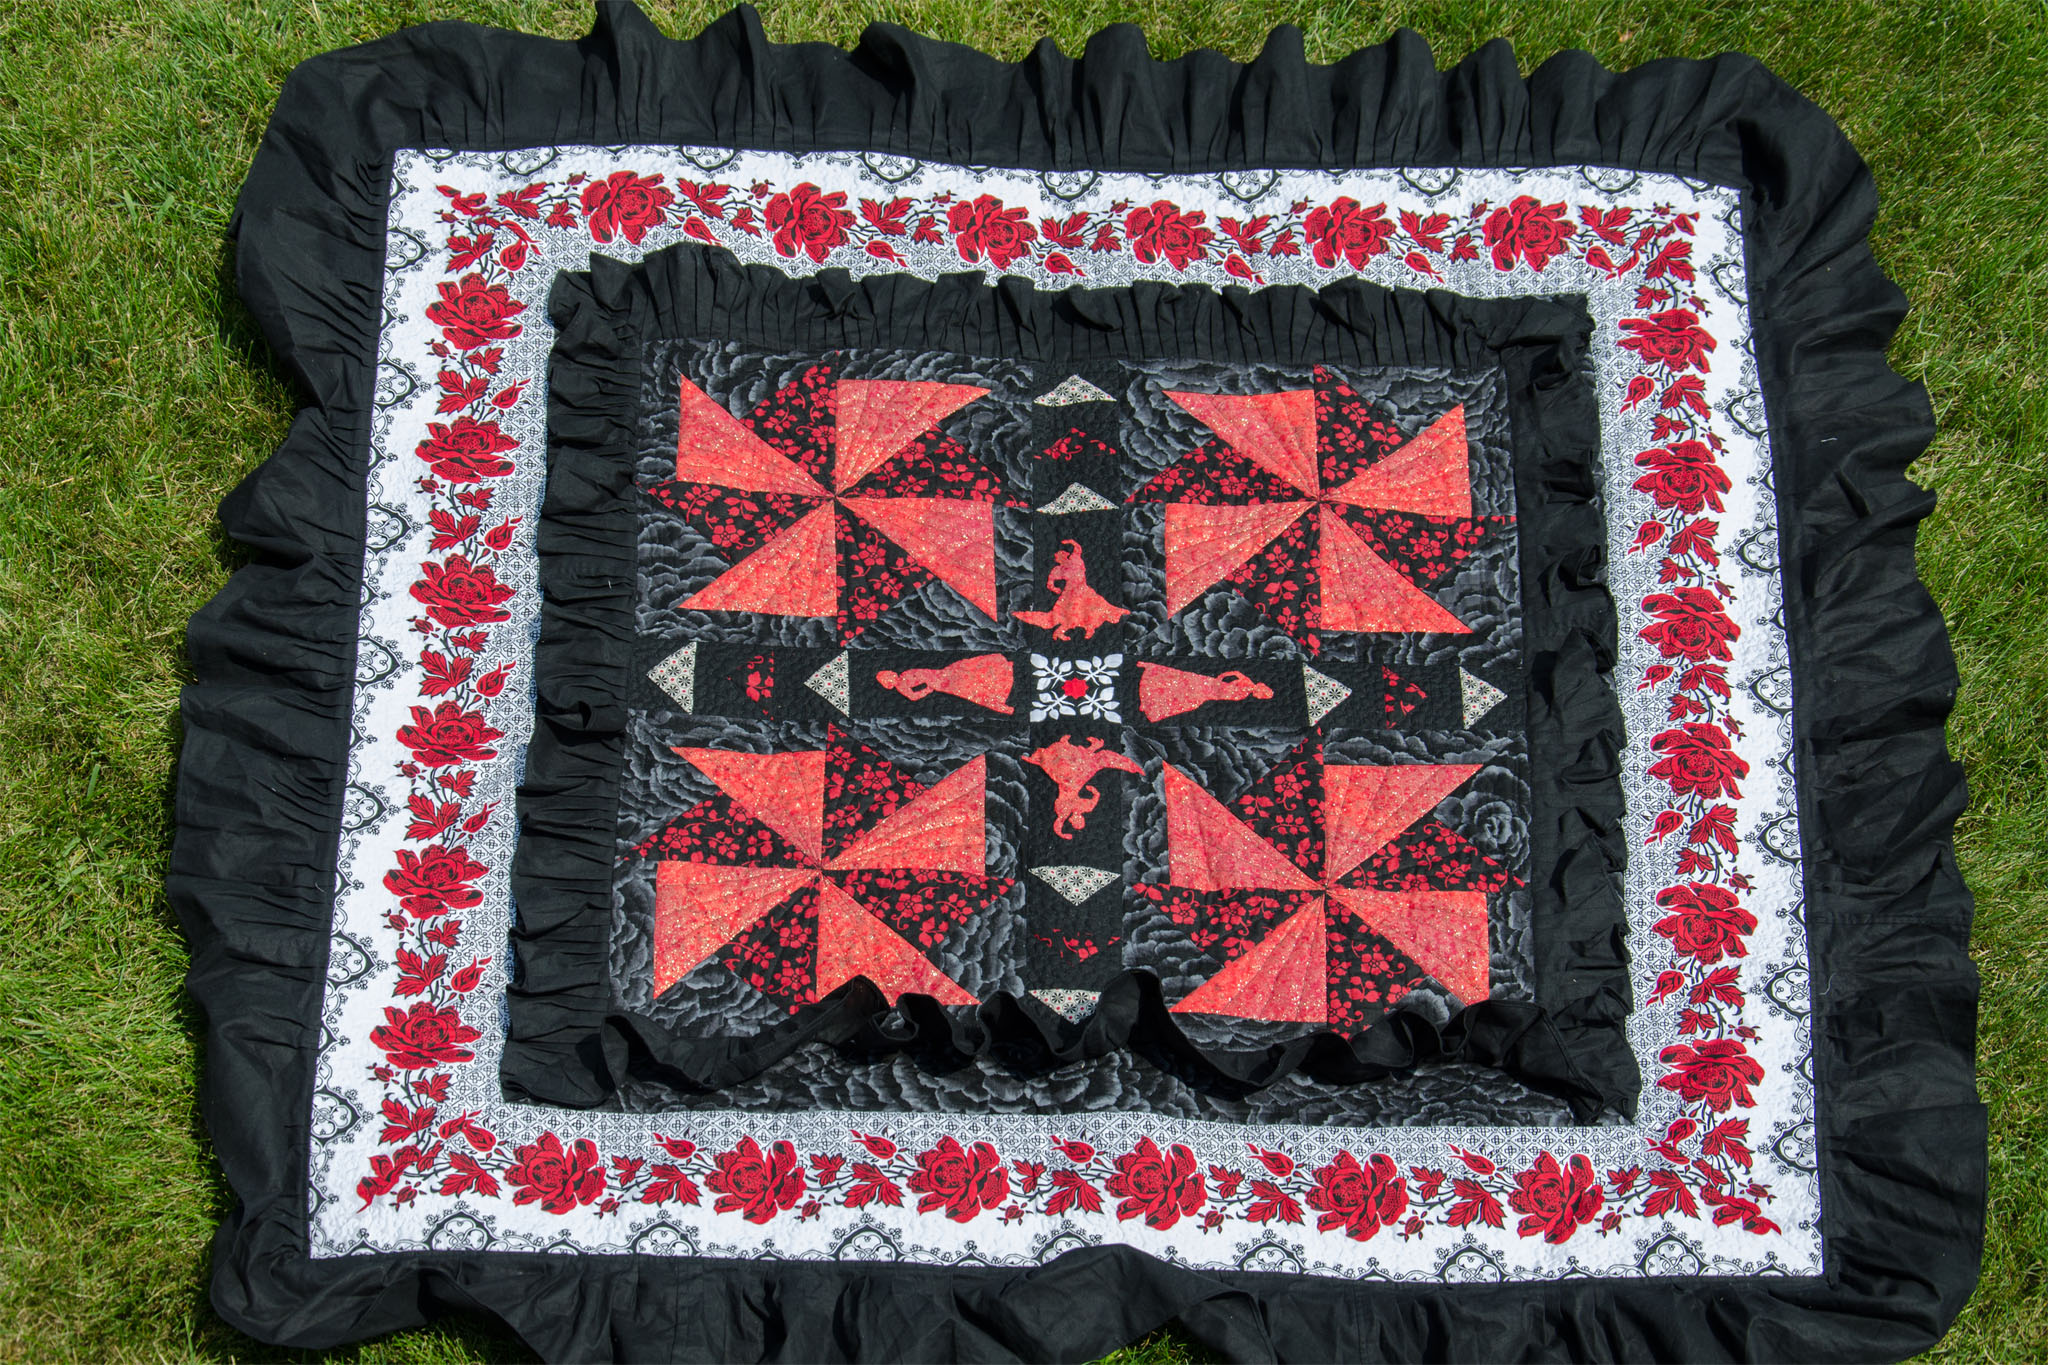
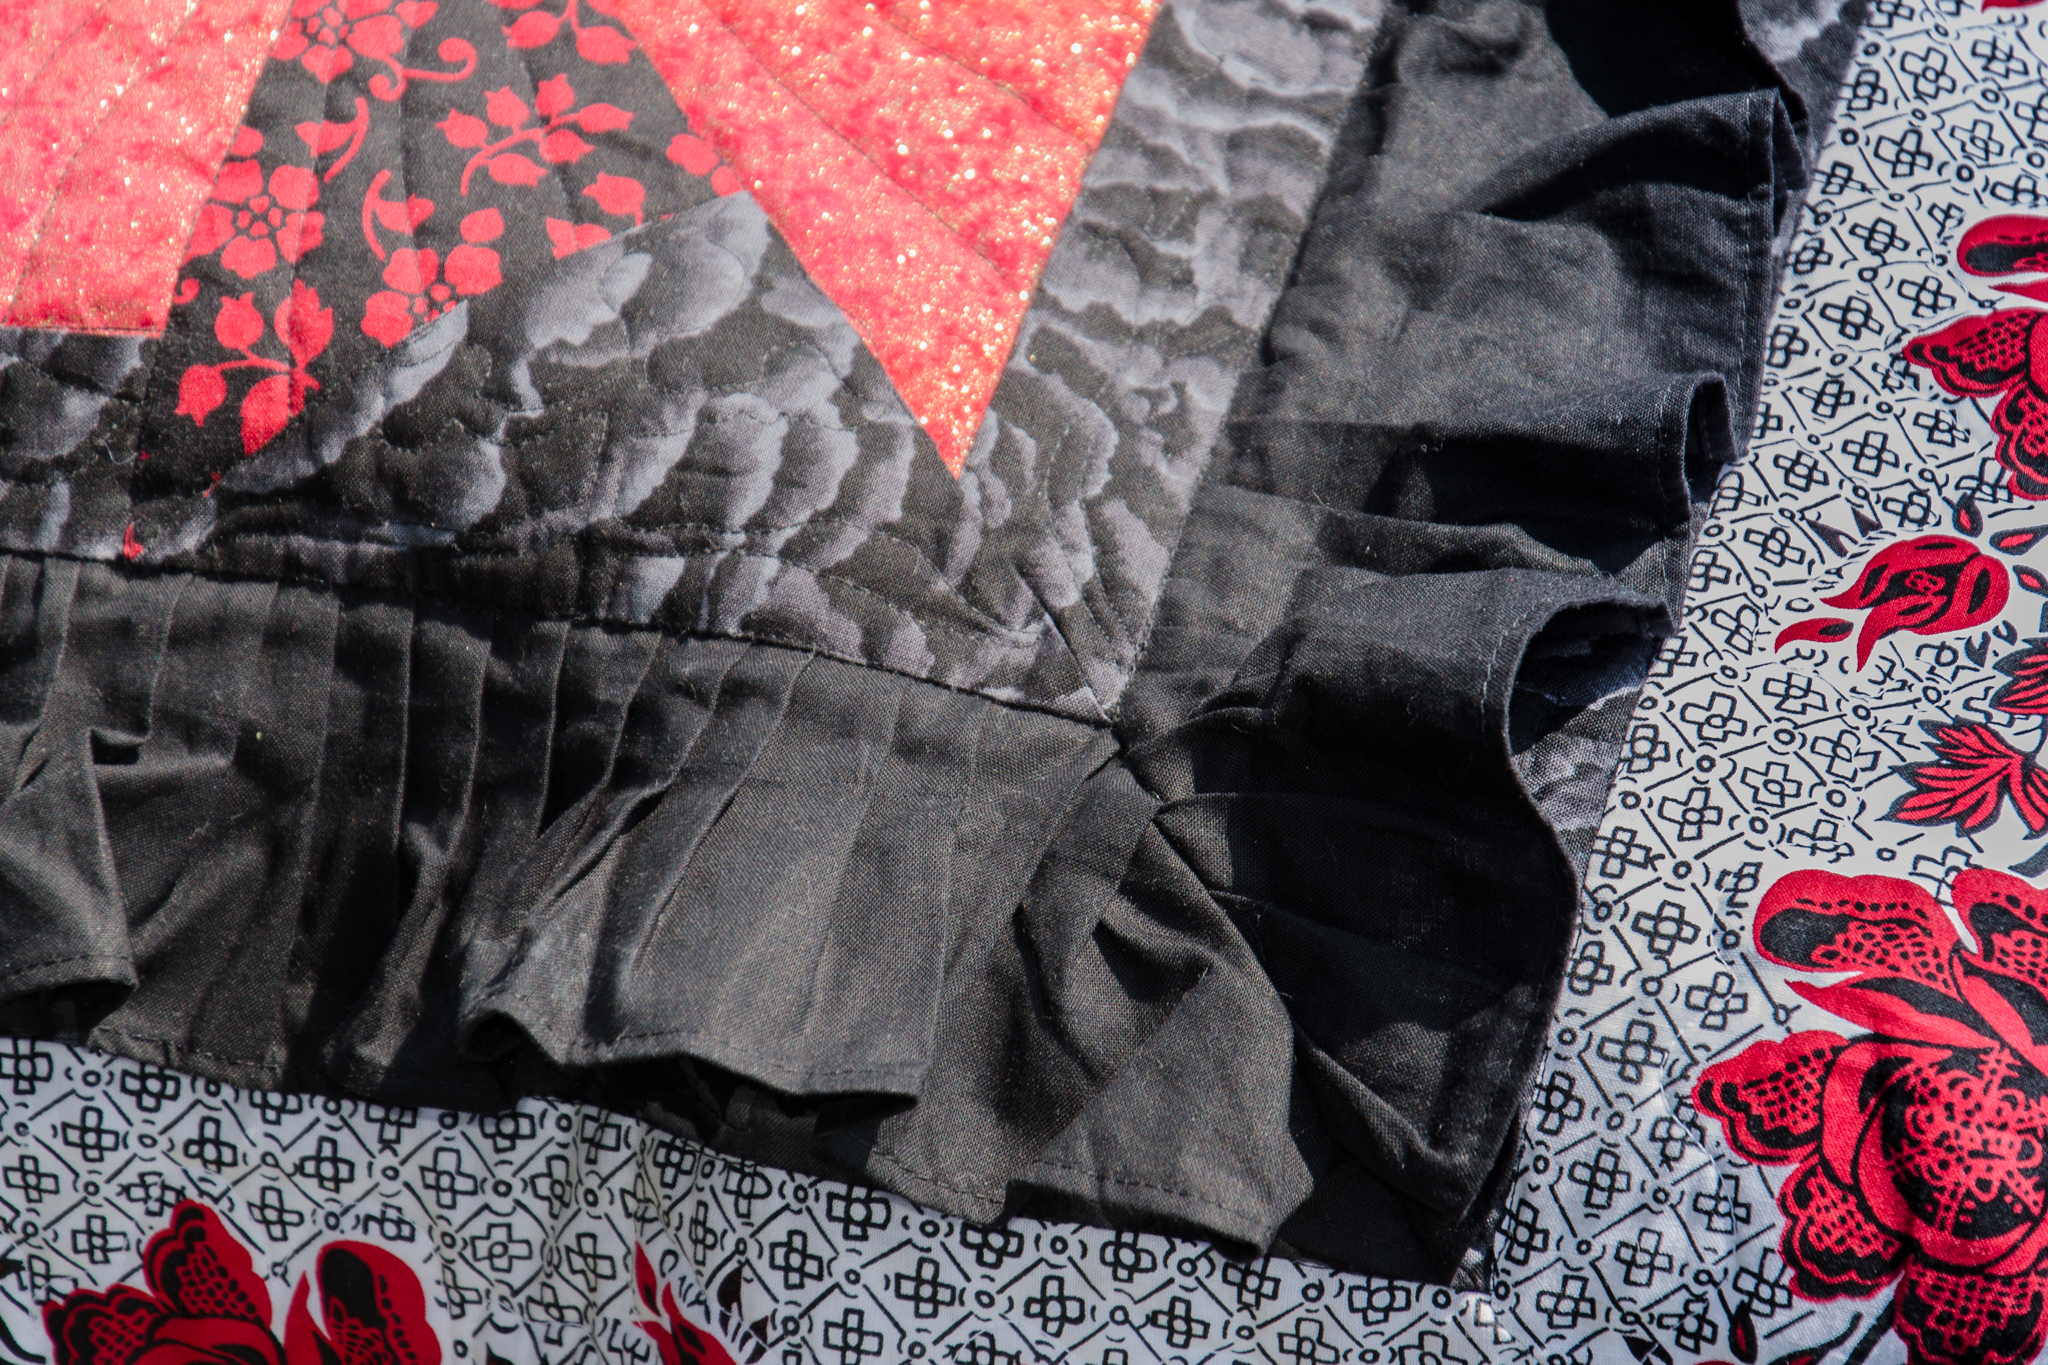
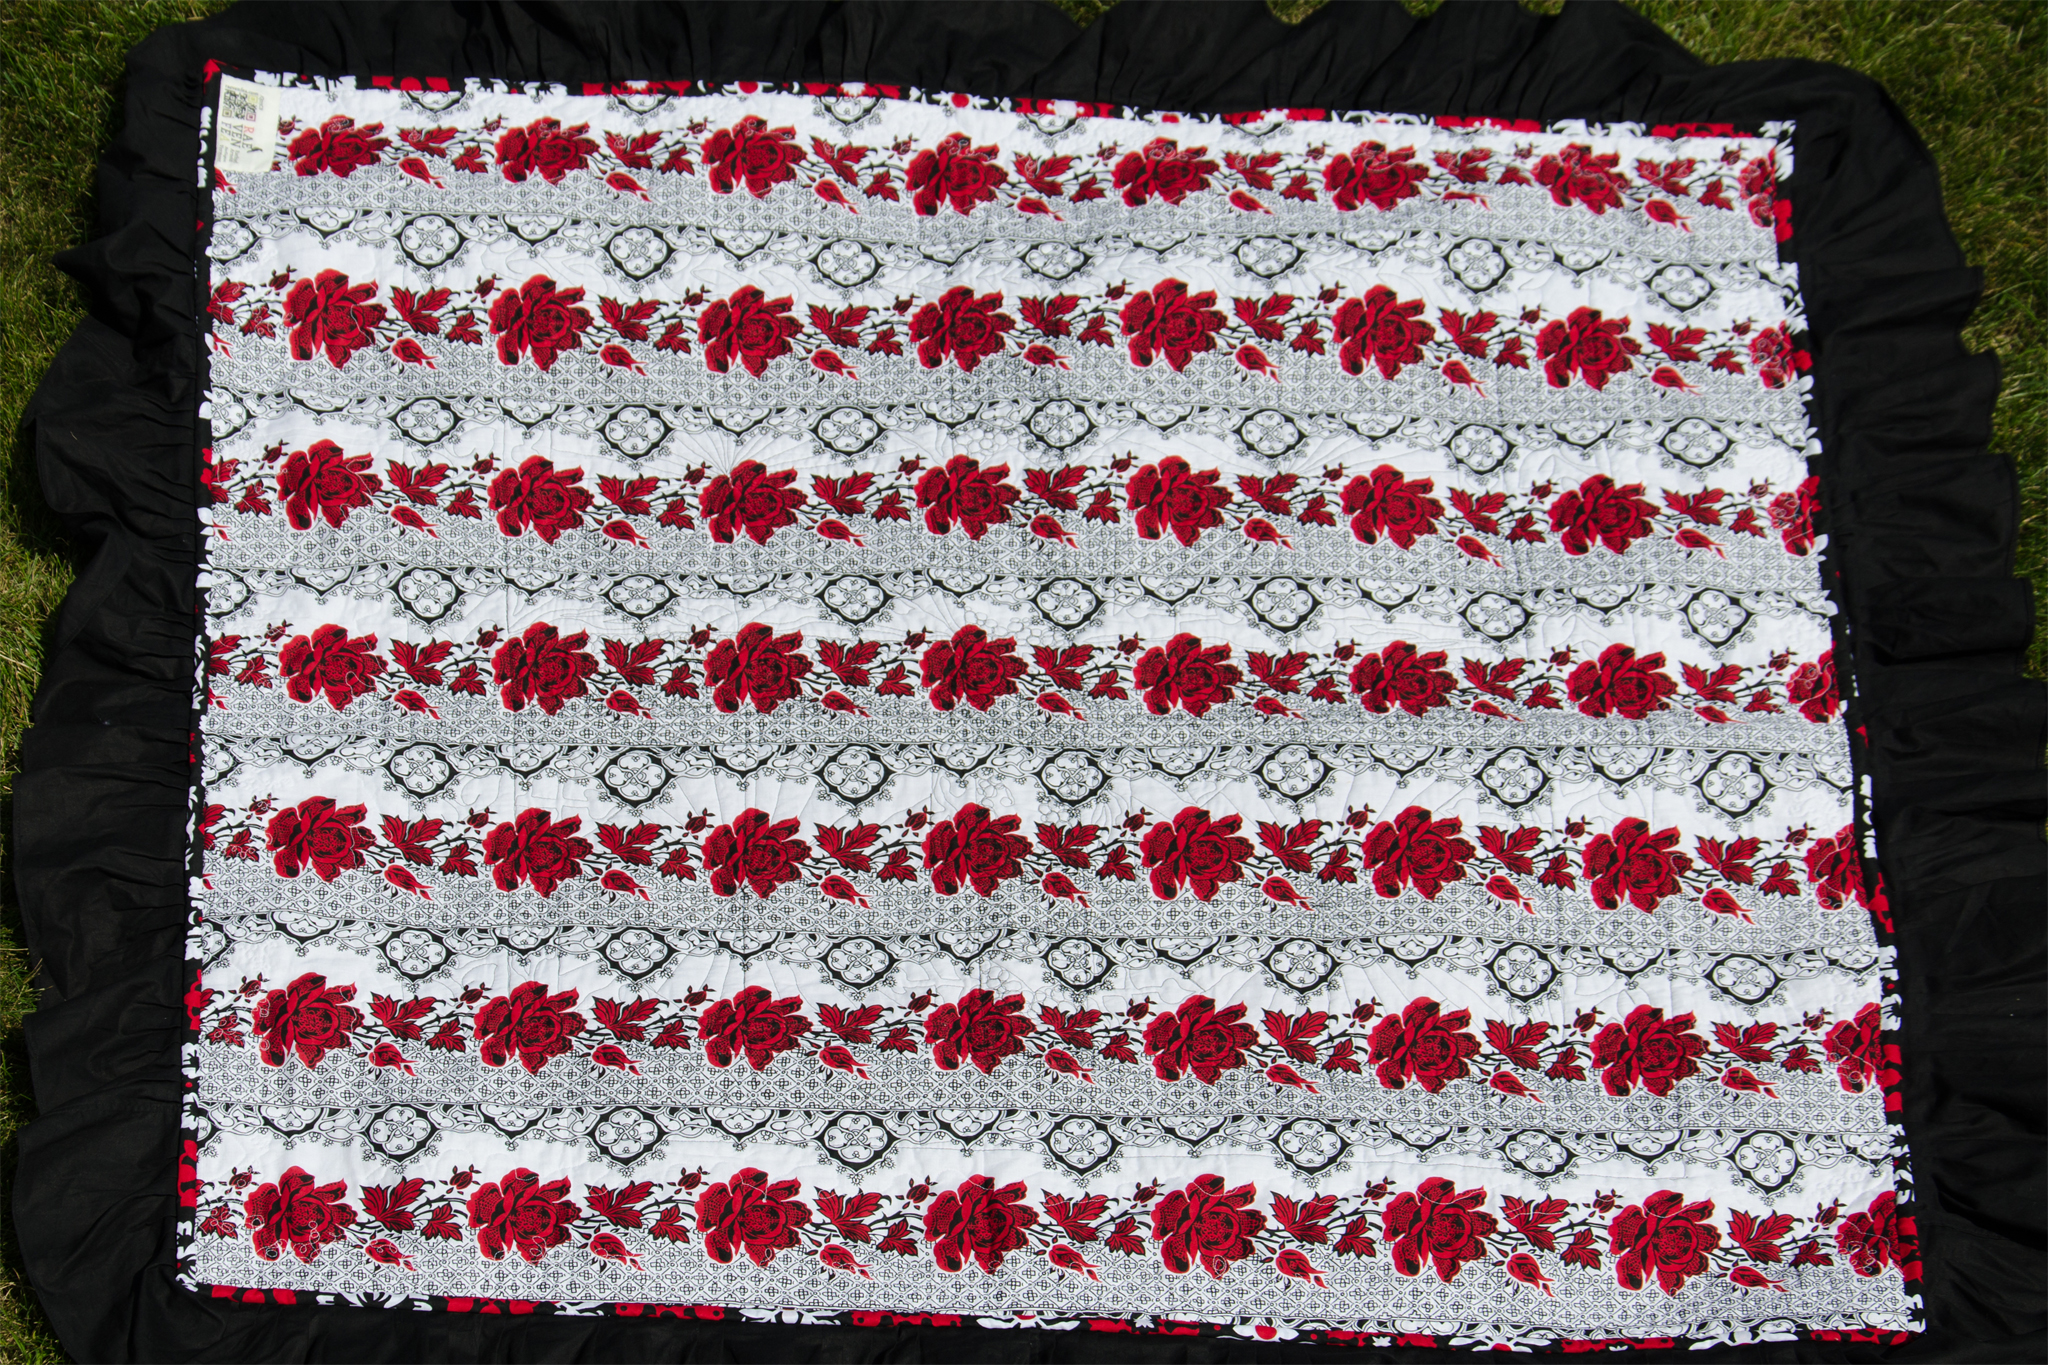
The end result is a quilt whose front is inspired by “Votes for Women” sashes for color, with a nod to technology in the binary piecing, and a visible representation of the censorship that is so rampant when one discusses equal rights for women. The back brings to mind my grandmothers’ decor (complete with my childhood baggage of anti-feminist sentiment), yet has the word feminist clearly displayed.

In case it’s not obvious, yes, quilters can be feminists too.

September 27th, 2015

The F-word

Posted in Quilting

  • Feminism
  • Finished projects
  • Q015CD
  • The F-word Quilt

I don’t give a fuck about using or hearing a bit of blue language. In fact, whether such words are truly profane, taboo, or vulgar could be an entirely different essay that I’m not nearly pious nor pedantic enough to write (there are far more interesting things to hold sacred). Four letter strings can often sum up sentiment in an unparalleled way.

But, forget about that one particular bad word for a moment. Keep the first letter, double the character count and you arrive at the dirtiest, crudest, most offensive word in modern English: feminist.

“The F-word”, Rachael Arnold, September 2015, 57″x57″.

This quilt came about because I’m tired of reading essays where the author says they’re not a feminist because feminism is icky while laying out arguments for what they actually are that are all dictionary feminism. I’m sick of reading screeds vilifying straw-men feminists written by people whose sole goal is fear-mongering. I’m weary from the constant low-level of discrimination I experience as a woman working in tech, even as I know that I’m privileged by a shocking level of near-equality compared to many of my cohort. I am absolutely exhausted by the media and people in the legislature telling me what is best for my body, income, career, mind, personality, and beliefs because I am a member of the so-called weaker sex.

It’s a rant in quilt form.

“The F-word” (detail), Rachael Arnold, September 2015, 57″x57″.

The F word. F——t. F******t. F#$!~+st. Feminist.

“The F-word” (detail), Rachael Arnold, September 2015, 57″x57″.

Details

Front: Kona Cotton Honey, Kaffe Fassett Shot Cotton Butter, Andover Textured Solid Magnum

Batting: Warm & Natural Cotton

Backing: Heather Ross Briar Rose Cricket Clover Lilac/Gold, Kaffe Fasset Shot Cotton Quartz, Kona Elegance White

Binding: Kaffe Fasset Shot Cotton Quartz

Quilting: A mix of machine embroidery quilting and straight line quilting using Guttermann cotton thread, with a small bit of hand quilting using white 28wt Aurifil.

“The F-word” (detail), Rachael Arnold, September 2015, 57″x57″.

Look for a longer post on the quilting of this project later this week.

“The F-word” (back), Rachael Arnold, September 2015, 57″x57″.

September 16th, 2015

Adventures in Soap Making

Posted in Homemaking

  • Soapmaking

After my friend gave me a bar of homemade soap that was amazingly moisturizing (no need for post-shower lotion—a miracle for my dry skin!), I was determined to recreate or improve upon it, and have fallen deep into the world of cold-process soap making.

soap-making-adventures-1

Now that my first two batches are cured enough to try, I have to admit I’m hooked on experimenting and exploring all the different oils and mixtures. Carl’s less hooked on my turning the kitchen into a science lab (lye is sort of dangerous!), and the fact that we already now have more soap than we’ll use in a year.

soap-making-adventures-2

I’ve been devouring the blog posts of various soapers, falling in love with their gorgeous photos of soap.

  • Humblebee & Me
  • Offbeat + Inspired
  • Soap Queen

Just a short list, there are so many more out there…

soap-making-adventures-3

So far, I haven’t reproduced the moisturizing properties of Bex & Adam’s bar, but I’m happy with the two I’ve made. The first is a good, hard, bar, and the second is a good exfoliating salt bar with awesome lather, but is pretty drying despite a lot of superfatting due to the high coconut content.

soap-making-adventures-4

My latest batch uses the same oils as the first, but adds in clay and honey. I can’t wait to try it out once it cures. I’m sure you’ll start seeing posts of recipes once I feel confident anything I make is actually worth sharing. And my poor, unfortunate family and friends may soon be inundated with results of my experiments lest Carl and I end up with a lifetime supply of soap by this time next year.

September 13th, 2015

Mid-year Progress

Posted in Quilting

  • English paper piecing
  • Meta Quilt
  • T-shirt quilt
  • The Miniatures Nine-patch
  • Update
  • Witches’ Bubble Brew

At the start of the year, I made a resolution to address all of my works in progress in one way or another. I cheated in a few ways (mostly unintentionally), as I only listed quilt projects and accidentally left off one entire quilt. Then, I spent most of the spring not sewing anything at all.

I haven’t made as much of a dent as I’d hoped, considering it’s the start of September (even my mid-year progress report is behind), but I have whittled down the list.

Finishes

Wheeling Ruffles (Sevillanas)—this quilt wasn’t on the list, but was one of my oldest planned quilts.
Altered Steps—my very first-ever quilt blocks (Altar Steps blocks) pieced into a finished quilt.

Progress Made

mid-year-progress-1

High-school T-shirt quilt—I pieced the entire top together in July, and the backing is in the mail. Status: plan to finish by the end of the year.

mid-year-progress-3

EPP Crosses (née Farmer’s Wife)—I’ve continued to slowly piece these EPP blocks together, although months go by between times I work on it. Status: long-term project, no estimated finish date.

Witches Bubble Brew—I sewed the background together, and added embroidery to the concept. There’s still a ton of qpplique and quilting to do. Status: plan to readdress in 2016.

mid-year-progress-2

Meta History quilt—I scavenged the scrap bin for 2.5″ squares from older projects, made sure I have squares from all of my recent projects, and modified my plan a bit. Now, the squares have a dedicated home and I’m committed to adding squares of the scraps of each quilt to this box before I call a project “done”. Status: long-term project, no estimated finish date.

mid-year-progress-4

Miniatures 9-patch—I’ve been using the strip-pieced chunks as leaders and enders for another project, and have 75% of the blocks finished. I can’t find the heart section that I pieced 5 years ago, so that will keep me from finishing until I figure out where I put it. Status: blocked, plan to finish by 2/2016 one way or another.

Still In The Box

  • Organic Spins
  • Drunkard’s Compass
  • Double Wedding Ring
  • 2013 Sampler Blocks (Cottons, Etc. and Tiger Lily)

Two finishes, one more almost done, and progress on four others is a solid start. I have a couple of new projects I’d like to finish before the year is over, so we’ll see where the others fit in.

Perhaps 2016 will be the year of dusting off wearable projects that are as of yet unfinished.

September 7th, 2015

Three Binding Tricks

Posted in Quilting

  • Binding
  • Tips and tricks

At our last guild sew-in, it seemed that half the attendees brought binding to hand finish (saving them having to lug their machines around). As we ooh-ed and ahh-ed over each other’s projects, I noticed that our president’s corners were so much cleaner than mine ever turn out—I always seem to end up with a gap in stitching on one or more corner, no matter how exact I think I am. So, I thought I’d share her corner trick, and my two finishing tricks to help ease your binding work. I use these tricks for both hand and machine-finished binding.

1. Perfect corners

These first few photos show the method I’ve always used—the only way hers differs is the very last step (photo 4), but it makes all the difference.

In words: mark the width of your seam allowance in from the edge of the quilt (photo 1). Once you stitch to that point, turn, and stitch out to the corner at a 45° angle (photo 2). Fold your binding up on the diagonal, and then even with the edge (diagonal shown in photo 3). The magic step: instead of starting part-way in, which often leaves a gap if you aren’t exact, start stitching from the very edge (photo 4). As long as you stopped at the seam allowance point from the first direction, doing this won’t screw up your corner. Once you’re finished, turn your binding to the other side, and admire your gap-free corner.

binding-tricks-1
binding-tricks-2
binding-tricks-3
binding-tricks-4
binding-tricks-9

2. Measuring the overlap to close the loop

This one’s quick—to measure the amount needed for perfect-length binding (before cutting off the extra and sewing the final seam), simply overlap the ends by the width of the binding strip.

In my example, I’m using 2.5″ strips, meaning I need an overlap of 2.5″. I’ll cut on the purple line prior to sewing the seam.

binding-tricks-5

3. Seam it the right way the first time

Until I came across this tip, I had to sew the seam to close my binding at least twice every time. I’d always sew the wrong direction or have it twisted. It’s just a quick memory trick to help keep everything straight.

With the edge of the quilt away from you, the left strip goes in back and the right goes in the front, because back/left have four letters each and right/front both have five.

Then, just make sure you have right-sides together (the peak of the folds should touch), align the strips for a bias seam, and sew from corner to corner as shown in the photo (a.k.a. the standard binding finishing).

binding-tricks-6
binding-tricks-7

Once you’ve sewn it, it should snap into place and be the perfect length (make sure to trim the seam allowance down, and press). So very satisfying!

binding-tricks-8

Do you have any other handy binding tricks you love?

August 12th, 2015

Altered Steps

Posted in Quilting

  • Finished projects
  • Q015CC
  • The Wedding quilt

There are days I’m incredibly grateful that my first attempts at quilting didn’t scare me off forever. Case in point, my very first ever quilt project. I decided to make up my own bed-sized pattern using two different versions of the Altar Steps block that are both pretty fiddly (one had set-in seams, people. I don’t even like those now!), using fabric purchased from a box-store that shifted all over the place. It was a recipe for disaster.

"Altered Steps" by Rachael Arnold (detail)
“Altered Steps” (detail), Rachael Arnold, August 2015, 54″x68″. Photo by Carl Pfranger.

Somehow, I managed to complete 10 blocks (nine of one, one of the other), although there’s about a 1″ difference in size between them all. I clearly hadn’t read about chain piecing, judging by thread tails. I cut things incorrectly but still used them. I really have no idea what I was thinking. At some point, I came to my senses and moved on to a different project.

"Altered Steps" by Rachael Arnold (detail)
“Altered Steps” (detail), Rachael Arnold, August 2015, 54″x68″. Photo by Carl Pfranger.

In my effort to clear out old works in progress (for fear of being that quilter who has 20-year-old unfinished projects hoarded away in corners of their home—not that there’s anything wrong with that if you’re so inclined, it’s just not a good thing for me, personally—, I pulled out the blocks and decided to do something with it all. My self-imposed restraints: use up as much of the uncut yardage as possible, use all ten blocks, and don’t purchase any new supplies (no quilting thread, no batting, no backing—all stash).

"Altered Steps" by Rachael Arnold
“Altered Steps”, Rachael Arnold, August 2015, 54″x68″. Photo by Carl Pfranger.

I knew from the start that there was no way I’d actually make the originally planned quilt—not with these cheap, poorly cut, questionably coordinating fabrics. I also knew that I wanted to do something fast so that I could move on to a project I was in love with, not just in love with the idea of getting out of my sewing and head space.

"Altered Steps" by Rachael Arnold
“Altered Steps” (detail), Rachael Arnold, August 2015, 54″x68″. Photo by Carl Pfranger.

With wide sashing and overly large borders, I managed to use up most of the yardage, a small chunk of pieces that had been cut out (mostly the flowered 5″ squares and yellow strips), and nine of the blocks. The remaining yardage, block, and a few additional scraps made it onto the back and into the binding. The quilt finished at 54″ x 68″—a very respectable throw size, considering what I was working with.

"Altered Steps" by Rachael Arnold (back)
“Altered Steps” (back), Rachael Arnold, August 2015, 54″x68″. Photo by Carl Pfranger.

I backed it with the second sheet of the set I used when making the Bird’s Nest quilt, plus a strip of piecing. I used 80/20 batting, since that’s what would work from my stash (I only had to piece it once). This is the first time I’ve gone directly from quilting 100% cotton to 80/20 the next day, and I did notice a pretty clear difference in loft while quilting: the 80/20 is not nearly as flat. I think I would have preferred 100% cotton for this particular quilt, but it washed up beautifully in the end.

"Altered Steps" by Rachael Arnold (detail)
“Altered Steps” (back detail), Rachael Arnold, August 2015, 54″x68″. Photo by Carl Pfranger.

It’s quilted using a blown-up, much less well-controlled version of the “Flourish” design from the book Step-by-Step Free Motion Quilting by Christina Cameli (thanks Mom). The center is quilted using two similar light yellow cotton threads (because I didn’t have enough of one for the whole thing), while the borders (roughly) are quilted using a light blue (I had about 18″ left on the spool when I finished—talk about cutting it close). The bobbins are a mix of yellow and whatever light beige I had on hand in quantity. I used up the last of the yellow blender and a few more cut pieces as binding, finished by machine.

"Altered Steps" by Rachael Arnold (detail)
“Altered Steps” (detail), Rachael Arnold, August 2015, 54″x68″. Photo by Carl Pfranger.

Five years and 36 other quilts later, it feels great to have a finished project made from those very first blocks along with a stash that is three yards of fabric (that aren’t my style) and a sheet lighter. A part of me looks at this and asks “could I have done something more edgy, more modern, more creative, more my style,” but another part is happy to have something that went from boxed in pieces to pieced and basted in under a week. There will always be another project to be more innovative with.

Now to decide if the quilt needs a home or should stay at mine.

August 7th, 2015

Less Sashay, More Sashing, Much Sizing

Posted in Quilting

  • Long-term project
  • Q015CC
  • The Wedding quilt

Wide borders and large sashing are easy ways to eat up fabric and make a larger quilt out of just a few blocks. Sashing can also help even out slightly different block sizes, such as was the case with my Altar Step blocks.

I like how this is turning out much more than I expected to.

altar-steps-remix-center-pieced

More importantly than how the project is turning out, I want to take a minute to provide sponsor-free praise of Mary Ellen’s Best Press. I avoided buying it for many years, thinking cheaper box-store spray starch or sizing was perfectly fine. Curiosity got the best of me recently, and I’m convinced I’ll never buy anything else again.

Piecing these slightly wonky, flimsy fabric-made blocks has been amazingly painless after using Best Press. It really does make an incredible amount of difference. I don’t want to say it will magically solve all problems—such as the poor technique of a beginning quilter—but let’s just say it’s well on its way to being a scientific theory from this data set of one.

August 5th, 2015

Step to the Remix

Posted in Quilting

  • Long-term project
  • Q015CC
  • The Wedding quilt

Once upon a time (circa 2010), a young woman decided that she should start quilting. Rather than design a simple project—or better yet, follow a simple pattern—she went a little crazy and pronounced that she would make a huge quilt in the span of a few months as a wedding present to a cousin. It was a dismal plan all around, and needless to say, that first project is still unfinished.

In the present time, a slightly less young woman has grown wiser with age and is tired of half-finished (or less) projects cluttering up her studio-cum-master-closet (and asking “what on Earth were you thinking, younger self!?!?”).

That wiser woman knows finishing it to the original vision is never going to happen, nor does she want to even try.

altar-steps-remix-pieces

So, while she ponders what to do with ten blocks, a million little cut-out pieces, and three uncut yards of coordinating fabric, you’re left reading a blog post written about herself in the third person, all for the purpose of describing one photo that should have just gone on Instagram.

It’s dangerous work, delving into the dark recesses of the unfinished object pile.

Anyone want a bunch of tiny squares and trapezoids of questionable-quality fabric, possibly pre-washed?

July 29th, 2015

Wheeling Ruffles (Sevillanas)

Posted in Quilting

  • Finished projects
  • Long-term project
  • Q015CB
  • Ruffles

For a time in 2011, I took Flamenco lessons. I’m mostly uncoordinated and soon decided to devote more time to my other fledgling hobby (quilting!), but was inspired to design this quilt. The design and fabric went hand-in-hand: I found the border print and designed the quilt around it. After building it out in Illustrator, I decided it needed ruffles—a decision that stymied immediate progress as I debated buying a ruffling foot or doing it all by hand.

Wheeling Ruffles front
“Wheeling Ruffles (Sevillanas)”, Rachael Arnold, July 2015, 47″x47″ (excluding ruffle). Photo by Carl Pfranger.

Fast forward to 2015: the fabrics were tucked away in a box, I’d since bought a ruffling foot for other projects, and my quilting aesthetic has shifted away from the quilt design and the style of the fabrics. I decided to make the quilt anyway, mostly to play with ruffles and to mark one more unfinished project off the list (and reduce my stash at the same time).

Wheeling Ruffles detail
“Wheeling Ruffles (Sevillanas)” (detail), Rachael Arnold, July 2015, 47″x47″ (excluding ruffle). Photo by Carl Pfranger.

The center medallion piecing is all straightforward pinwheels and flying geese, with a bit of machine applique added to the sashing (raw-edge via Steam-a-Seam 2 Lite, sewn with a ‘hand look’ applique stitch on my machine) . Instead of a plain inner border, however, there’s a ruffle—because what is a Flamenco-inspired anything without ruffles?

Wheeling Ruffles detail
“Wheeling Ruffles (Sevillanas)” (detail), Rachael Arnold, July 2015, 47″x47″ (excluding ruffle). Photo by Carl Pfranger.

To make the 3″ ruffled inner border, I cut 3.75″ x width-of-fabric strips, sewed two strips together with a flat-felled seam, used a rolled-hem foot to finish one side, then gathered it all with the ruffling foot using a standard stitch length (2.5 on my machine) and a tuck every 6 stitches. Once ruffled, I pressed it all to keep the pleats in place, then sewed the ruffle and a 3.5″ strip of background fabric to the medallion. Because ruffles are a bit hard to predict length for, I made sure mine were longer than I needed and used the exactly-cut background fabric (35.5″ long) to measure and gauge length as I sewed the seam. I mitered the corners of the inner border, trapping the ruffles there, mostly because it was an easy solution to handling the corners and I liked how it looked.

Wheeling Ruffles detail
“Wheeling Ruffles (Sevillanas)” (detail), Rachael Arnold, July 2015, 47″x47″ (excluding ruffle). Photo by Carl Pfranger.

The outer border uses strips of a border print, finished with mitered corners. I planned on adding another ruffle after the printed border just like the inner one with a background strip below, and then a final binding ruffle. But, when I attached the first side of this outer riffle, I found that the cheap border print fabric bunched and pulled far too much, so modified my plan to just use a ruffle on the binding. It worked out fine, and saved me having to purchase another 1.5yds of black for the second ruffle (they sure do eat up fabric!).

Wheeling Ruffles back
“Wheeling Ruffles (Sevillanas)” (back), Rachael Arnold, July 2015, 47″x47″ (excluding ruffle). Photo by Carl Pfranger.

The back is pieced together from leftover border print. I must have purchased what I did with that plan in mind, as I had the perfect amount. The quilting is a mix of Gutermann 100% Cotton thread in black and white, with Pellon Eco 70/30 as batting. I free motion quilted a mix of pebbles, stitches in ditches, vines and leaves based off the center square motif, little loops, and echoed the printed design in the outer border. It’s bound in the leftovers of the fabric I used to fussy cut the center square, and has a 6″ ruffle attached.

Wheeling Ruffles rolled
“Wheeling Ruffles (Sevillanas)” (detail), Rachael Arnold, July 2015, 47″x47″ (excluding ruffle). Photo by Carl Pfranger.

At 47″ square (+ 12″ of ruffle), this can either be a large wall-hanging or a kid quilt. I don’t know where it’ll end up, yet, but it feels great to cross another unfinished project off the list.

Known fabric list: Michael Miller Fairy Frost and Rouge et Noir Petals; Windham Toni Floral Toss; Springs Creative Saroya Lace Stripe and Saroya Abstract; Free Spirit Black Solid.

July 22nd, 2015

Makers Gonna Make Scrappy Pouches

Posted in Crafting

  • Bags
  • Fabric: Essex Yarn Dyed
  • Fabric: The Cottage Garden
  • Quick project
  • Zipper

Like many quilters, my scrap bin (boxes, cubes, bags…) is out of hand—unorganized, jumbled, and overflowing. This year, I’ve tried to be mindful of what is leftover from my projects and keep it organized in some way so that I don’t add to the existing problem. One solution has been offering up the leftover fabric to guild members—particularly when I’m “over” working with that line and there’s a substantial amount leftover. This especially made sense for my #mqgfabricchallenge scraps, since it meant another member may be able to enter. I already have more scraps than I think I’ll use in my life—particularly since I don’t make many scrappy things.

Makers Gonna Make Pouch Front

But, after packaging up my challenge scraps, I still had a few left that were already pieced together in various ways (cut-offs from piecing the bag). One thing I always appreciate having around are zip pouches—they’re handy for packaging up projects, carting things around, and organizing. So, I threw together a quick zip pouch from scraps, the ribbon from the fabric challenge bundle, another embroidery, and a recycled zipper from one of those free-gift-with-cosmetic-purchase vinyl pouches that always seem to clutter up my bathroom cabinets.

Makers Gonna Make Pouch Back

I didn’t spend much time on it, nor is the scrappy piecing the most aesthetically pleasing, but it’ll serve its purpose just fine.

Makers Gonna Make Pouch Open

What’s your favorite quick scrap busting project?

July 18th, 2015

 Previous Posts
Newer Posts  

© 2008–2025 Raevenfea